
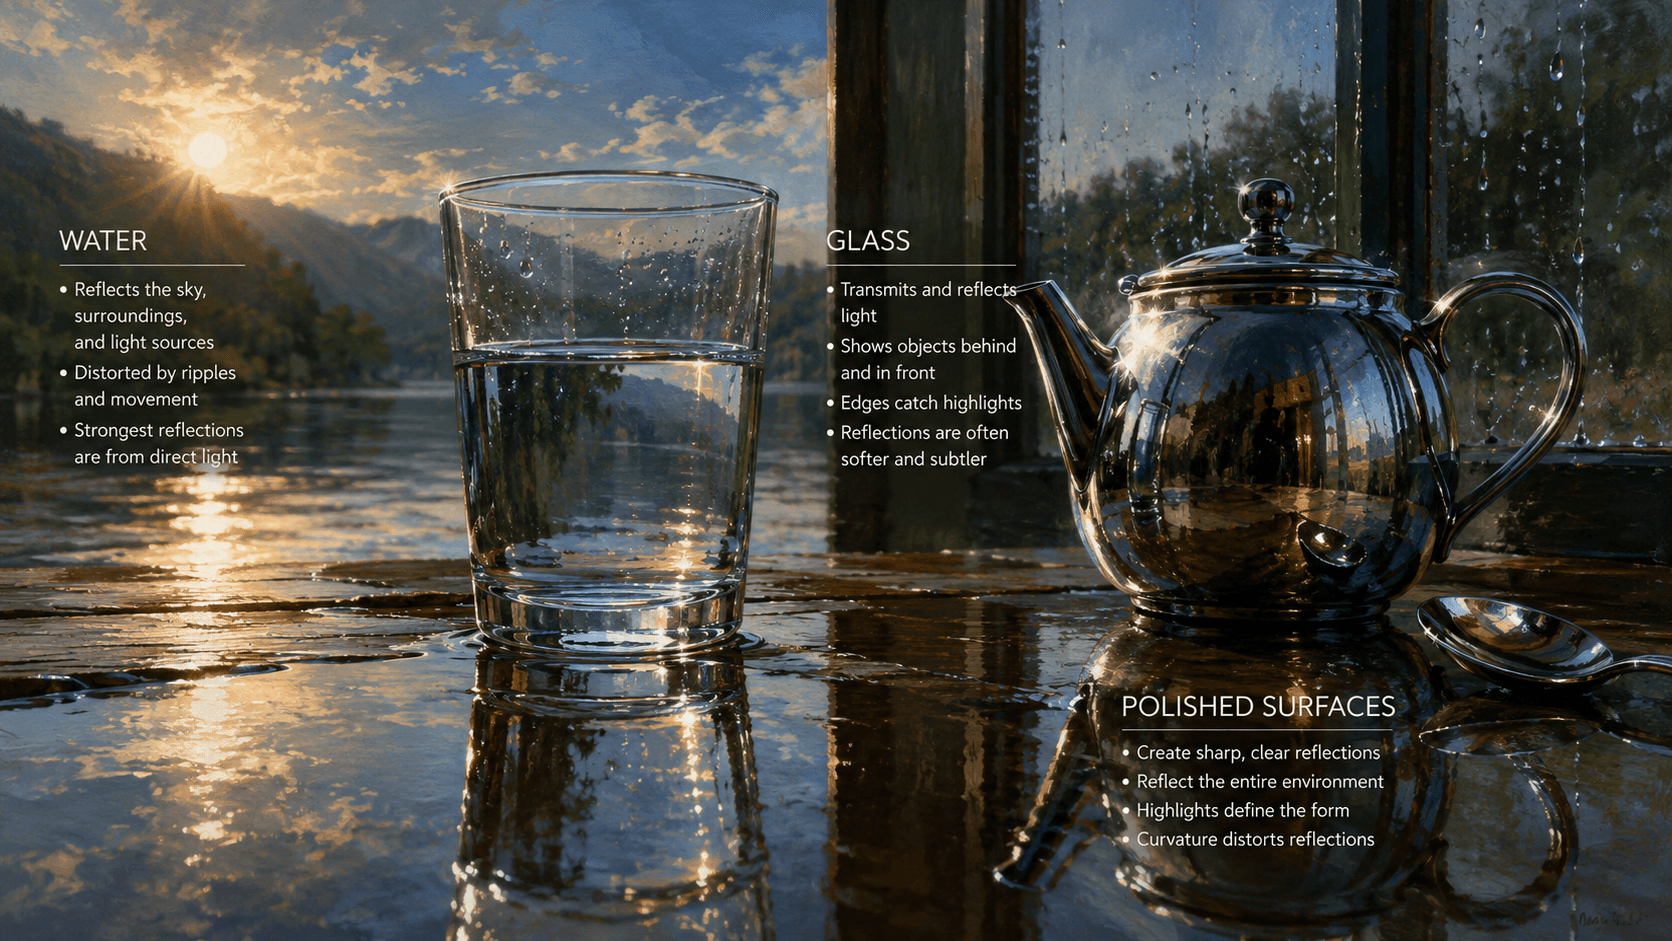
Painting reflections involves understanding the physics of light, the properties of the reflective surface, and how to translate those observations into paint through careful color mixing, value control, and brushwork. Mastering reflections means capturing not just what is reflected, but also the nature of the surface itself, whether it’s the shimmering distortion of water, the transparent depth of glass, or the sharp clarity of polished metal.
Keypoint Summary
- Observe Light & Angle: Reflections are governed by the angle of incidence and the quality of light.
- Understand Surface Properties: Water distorts, glass refracts and reflects, and polished surfaces offer sharp, often inverted, images.
- Master Value & Color: Accurate values and subtle color shifts are crucial for depicting depth and realism in reflections.
- Practice & Patience: Experiment with different mediums and surfaces to develop your reflective painting skills.

What are the Fundamental Principles of Painting Reflections?
The fundamental principles of painting reflections revolve around the physics of light and how it interacts with different surfaces. Light travels in straight lines, and when it hits a reflective surface, it bounces off at an angle equal to the angle at which it struck, a principle known as “the law of reflection” (Source: Wikipedia). This means reflections are often a mirror image, though distortions occur depending on the surface’s texture and curvature. Artists must also consider the color of the reflected object, the color of the reflective surface itself, and the ambient light.
How Do You Paint Realistic Water Reflections?
Painting realistic water reflections requires capturing movement, depth, and the interplay of light. Water acts as a mirror, but its surface is rarely still, leading to distortions and ripples. To begin, observe the source of light and the objects being reflected. Reflections in water are typically darker and less saturated than the original objects, and they often appear elongated or broken by ripples.
Start by laying down the general color and value of the water itself. Then, introduce the reflected elements, paying close attention to their shape and how they are distorted. For calm water, reflections will be clearer and more defined, often appearing slightly softer than the original. For moving water, use horizontal brushstrokes to suggest ripples and movement, breaking up the reflected shapes. Consider how the sky’s color influences the water’s hue, especially in the distance. Exploring techniques like those found in how to paint watercolor reflections: techniques and tips can provide excellent guidance for capturing the fluid nature of water. Remember that the secret to John Singer Sargent’s watercolor technique often involved capturing light and atmosphere with remarkable fluidity, a skill directly applicable to painting water.
What Techniques Are Best for Painting Glass Reflections?
Painting glass reflections involves a delicate balance of transparency, reflection, and refraction. Glass is unique because it allows light to pass through it (transparency) while also reflecting light from its surface. This means you’re often painting what’s behind the glass, what’s reflected on the glass, and the subtle ways the glass itself distorts or refracts light.
Begin by establishing the objects seen through the glass, perhaps slightly muted or distorted. Then, introduce the reflections on the glass surface. These reflections will be sharper and brighter than those in water, often showing distinct shapes from the surrounding environment. Use sharp, bright highlights to indicate the glass’s sheen and its curved surfaces. The edges of glass objects often show subtle color shifts due to refraction, bending light like a prism. Artists like Johannes Vermeer were masters of depicting light on various surfaces, including glass and ceramics, often using subtle glazes and precise highlights to create luminosity (Source: The Metropolitan Museum of Art). Don’t forget to consider how the glass might pick up colors from nearby objects, requiring careful color mixing, perhaps even learning how to make brown paint for specific shadows or reflections.
How Can I Paint Polished Metal and Other Shiny Surfaces?
Painting polished metal and other shiny surfaces demands precision in capturing sharp, often inverted, reflections and extreme contrasts in value. Unlike water or glass, polished metal typically offers a very clear, undistorted reflection of its surroundings. The key is to accurately render the light source, the reflected objects, and the dramatic shifts from bright highlights to deep shadows.
Identify the primary light source and how it creates a distinct highlight on the polished surface. These highlights are often very bright, almost white, and sharply defined. The reflections themselves will mimic the shapes and colors of the environment, often appearing stretched or compressed depending on the object’s curvature. For instance, a chrome sphere will reflect its entire surroundings in a distorted, panoramic view. Pay close attention to the edges of these reflections, which should be crisp. Artists throughout history, including those from the revolutionaries of the canvas: how four abstract artists changed the face of modern art to classical masters, have explored the challenge of capturing metallic sheen. Practice observing real-world examples, noting how light bounces and shapes are mirrored.
Tips for Observing and Practicing Reflections
To truly master painting reflections, consistent observation and practice are paramount. Spend time looking at how light interacts with different surfaces in various lighting conditions. Take photographs or make quick sketches to capture fleeting moments of reflection. Experiment with different mediums, from oils to acrylics to watercolors, as each offers unique properties for rendering reflective surfaces. Don’t be afraid to simplify complex reflections into basic shapes and values first, gradually adding detail. Consider how even modern tools like expert AI painting tips often rely on understanding these foundational principles of light and shadow.
FAQs
What colors should I use for reflections?
The colors in reflections are primarily determined by the colors of the objects being reflected and the ambient light. However, the reflective surface itself can subtly tint these colors. For instance, water might add a cool blue or green hue, while polished brass could impart a warm yellow tone. Always observe carefully and mix colors accordingly.
How do I avoid making reflections look flat?
To prevent reflections from appearing flat, focus on varying values and incorporating subtle color shifts. Reflections are rarely uniform; they have depth and movement. Use softer edges for distant reflections and sharper edges for closer, more defined ones. Adding subtle distortions and ripples, especially in water, also helps create a sense of dimension.
Is it better to paint reflections before or after the main subject?
Generally, it’s often best to establish the main subject or the background first, then paint the reflections. This allows you to accurately match the reflected colors and values to their source. However, for transparent surfaces like glass, you might paint what’s behind the glass first, then layer the reflections on top.
How do I make reflections appear wet or shiny?
To make reflections appear wet or shiny, focus on strong contrasts between light and dark, especially sharp highlights. For wet surfaces, use soft, diffused reflections with subtle blurring. For shiny, polished surfaces, employ crisp, distinct reflections with very bright, often pure white, highlights and deep, dark shadows. The key is the sharpness of the edges and the intensity of the light.

Olly
Olly Farmer M.Sc, B.Sc, PGCE 25 years experience of Watercolor Painting and AI Art; teacher for 13 years; Creator of Art Tools; Art Gallery Contributor of Art Articles to Medium.com, LinkedIn and Facebook
Continue exploring

PROMINENT PAINTING
Keep your creative momentum
Get new painting guides, practical techniques and artist stories delivered without the noise.
Occasional emails. Unsubscribe whenever you like.