
Welcome to the ultimate troubleshooting guide for artists!
Every single artist – from cave painters thousands of years ago to modern masters hanging in world-class museums – makes mistakes. In fact, learning how to recognize, understand, and fix a mistake is what separates a beginner from a true professional.
When paint cracks, paper bends, or colors turn to mud, your artwork isn’t ruined. It is just trying to tell you a story about chemistry and physics! This glossary is split into three levels: Beginners (the absolute basics), Intermediate (for those experimenting with trickier media and rules), and Advanced (for complex paint chemistry and framing issues).
Keep this guide by your easel, drafting table, or desk, and let’s solve some art mysteries together!
Part 1: Beginner Troubleshooting (The Basics)

If you are just starting your art journey, you are likely working with user-friendly materials like watercolor, acrylics, pencils, and basic drawing paper. Here are the ten most common issues beginners face and how to conquer them.
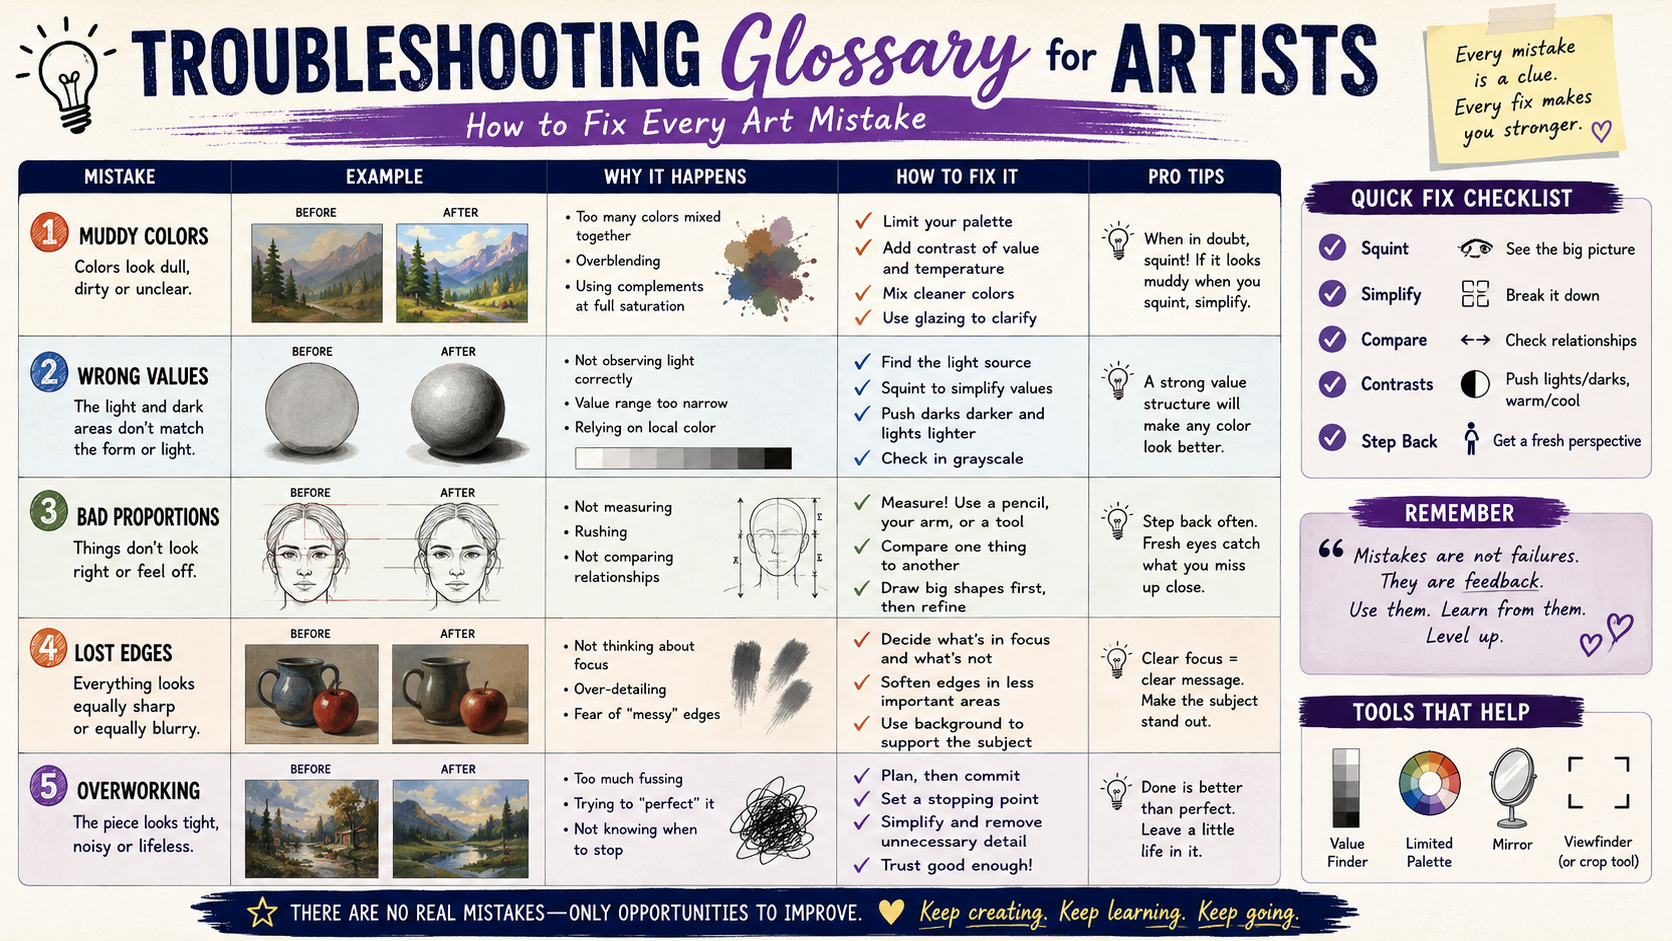
1. Muddy Colors (Overmixing)
- What it looks like: Instead of a vibrant green, orange, or purple, your mixed paint looks like a dull, grayish-brown puddle of sludge.
- The Science: All paint pigments absorb and reflect specific wavelengths of light. When you mix too many colors together, you create a physical cocktail that absorbs almost all light, reflecting very little back to your eyes. If you mix complementary colors (opposites on the color wheel, like red and green) in equal amounts, they cancel each other out, resulting in a neutral gray or brown.
- The Quick Fix: Stop stirring! If the paint is already on your canvas, let it dry completely. You can then paint a fresh, clean layer of color right over the top of the dry “mud.”
- Future Prevention: Use the “three-color rule.” Try not to mix more than three colors together at one time. If you want to mix a secondary color like purple, make sure your red and blue pigments don’t contain secret yellow undertones.
2. The Warped Paper Wonder (Paper Buckling)
- What it looks like: Your beautiful watercolor paper is bending, waving, and curling up like a potato chip as soon as it gets wet.
- The Science: Paper is made of tiny cellulose wood fibers. When water touches the paper, these fibers act like tiny sponges, absorbing water and swelling in size. The dry parts of the paper remain the same size, which forces the expanding wet fibers to buckle upward to find room.
- The Quick Fix: Once the painting is completely dry, turn it face down on a clean sheet of towel or smooth paper. Lightly mist the back of the painting with clean water using a spray bottle. Place a clean, heavy book (or a stack of them) on top and leave it overnight. It will dry perfectly flat!
- Future Prevention: Use heavier paper. Paper thickness is measured by weight. Look for watercolor paper that is labeled at least 140 lb (or 300gsm) or heavier. For very wet projects, use painter’s tape to secure all four edges of your paper to a hard board before you start painting. Do not remove the tape until the paint is 100% dry.
3. The Runny Paint Dilemma (Over-Dilution)
- What it looks like: Your acrylic paint is running down your canvas in watery drips, leaving behind patchy, faint colors that do not stick to the surface.
- The Science: Acrylic paint is made of color pigments suspended in an acrylic polymer binder (which is basically a type of liquid plastic glue). If you add too much water to your acrylic paint—usually more than a 1:1 ratio of water to paint—the water breaks apart the chemical chains of the binder. Without enough binder, the pigment particles float away and cannot stick to your canvas.
- The Quick Fix: Gently dab the runny drips with a dry, clean paper towel before they dry.
- Future Prevention: If you want to make your acrylic paint thin and see-through, do not use plain water. Instead, use an artist’s medium, such as a “glazing medium” or “matte medium.” These products contain the same liquid plastic binder as your paint but without any pigment, allowing you to thin your paint safely without destroying its sticky properties.
4. The Ghostly Smudge (Graphite Smearing)
- What it looks like: You are drawing a beautiful pencil sketch, but the side of your hand has dragged across the paper, turning your clean background into a blurry, dark graphite mess.
- The Science: Pencil leads are made of graphite mixed with clay. Graphite is made of flat carbon sheets that easily slide off one another. When you draw, these sheets slide off the pencil and rest loosely on top of the paper fibers. The physical friction of your hand dragging across the paper easily lifts and redistributes these loose particles.
- The Quick Fix: Use a kneaded eraser (a squishy, clay-like eraser) to gently “lift” the smudged graphite off the paper by pressing down and lifting up, rather than rubbing back and forth, which can damage the paper.
- Future Prevention: Place a clean, blank piece of scrap paper under your drawing hand. This acts as a protective shield between your skin and your graphite. Additionally, try working from the top-left of your page to the bottom-right (if you are right-handed) so your hand never has to rest on completed areas.
5. The “Bald” Brush (Brush Shedding)
- What it looks like: You are painting a smooth background, and you notice tiny black hairs from your paintbrush stuck forever in your drying paint.
- The Science: Paintbrushes are made of hairs (synthetic or natural) held together inside a metal band called a ferrule. The ferrule is glued to the wooden handle. If you leave your brushes sitting face-down in a cup of water, the water travels up the bristles, dissolves the glue inside the ferrule, and expands the wooden handle, loosening the metal ring and allowing the hairs to slip out.
- The Quick Fix: Use a pair of clean tweezers to carefully pluck the loose brush hairs out of the wet paint as soon as you spot them. Smooth over the disturbed paint with a clean, damp finger or brush.
- Future Prevention: Never leave your paintbrushes soaking in water! Wash them immediately after use with lukewarm water and mild soap. Always dry them flat on a towel or hanging upside down so water cannot pool inside the metal ferrule.
6. The Race Against Time (Acrylic Paint Drying Too Fast)
- What it looks like: You are trying to blend a beautiful sunset from yellow to red, but by the time you start blending, the paint on your canvas has already dried into a hard, unmovable plastic layer.
- The Science: Acrylic paint dries through a process called evaporation. Because the water inside the paint evaporates very quickly into the surrounding air, the polymer molecules are forced together rapidly to form a solid plastic film. This can happen in as little as 2 to 5 minutes!
- The Quick Fix: If the paint has already dried, do not try to scrub it with water—this will only damage your canvas. Simply wait for it to dry completely, mix a fresh batch of paint, and try blending again right on top of the dry layer.
- Future Prevention: Use a “stay-wet palette” (a palette containing a damp sponge and special permeable paper that keeps paint wet from underneath). You can also add a drop of “acrylic retarder” or “slow-dry medium” to your paint mix, which slows down the chemical evaporation process and gives you more time to blend.
7. Streaky Canvas Syndrome (Transparent Patchiness)
- What it looks like: You painted a blue sky, but you can see the white texture of the canvas showing through in uneven, streaky patches.
- The Science: Some pigments are naturally transparent (such as Phthalo Blue or Quinacridone Magenta), while others are naturally opaque (such as Titanium White or Cadmium Red). When you apply a highly transparent pigment directly to a white canvas, any slight variation in your brush stroke thickness will show up as a dark or light streak.
- The Quick Fix: Let the first layer dry completely. Apply a second, thin layer of the exact same paint over the top, moving your brush in the opposite direction (a cross-hatching motion) to fill in the gaps.
- Future Prevention: Check the paint tube label! Most professional and student paint tubes feature a small symbol indicating opacity: a clear square square means transparent, a half-filled square box minus means semi-transparent, and a solid black square blacksquare means opaque. If using a transparent color, mix in a tiny speck of Titanium White (TiO2
 ) to instantly boost its opacity.
8. The Unwanted Bleed (Watercolor Blossoms)

- What it looks like: You painted a nice, crisp shape in watercolor, but when you painted another color next to it, the two colors rushed together, creating a messy, fuzzy, root-like pattern on the paper.
- The Science: Watercolor paint always travels to where the paper is wettest. This is called capillary action. If you place wet paint next to another wet paint patch, the water will flow between them like a river, carrying the fine pigment particles along with it.
- The Quick Fix: Dry your brush completely on a paper towel to create a “thirsty brush.” Touch the dry bristles to the unwanted puddle of color; the dry hairs will act like a sponge and suck up the excess wet paint before it spreads further.
- Future Prevention: Patience is key! Wait for your first color section to dry completely before painting right next to it. If you are in a hurry, use a hair dryer on a cool, low-power setting to speed up the drying time of your first layer.
9. The Eraser Disaster (Torn Paper)
- What it looks like: You tried to erase a mistake on your paper, but the eraser rubbed a hole right through the paper or left a dark, greasy smear that will not budge.
- The Science: Cheap pink school erasers are made of hard synthetic rubber. When rubbed aggressively against delicate paper, the friction creates heat and physically tears the delicate cellulose fibers apart. Additionally, cheap erasers can contain oils that leave greasy residues on the paper surface.
- The Quick Fix: If the paper is torn, you cannot un-tear it. However, you can camouflage the spot by gluing a tiny piece of matching paper over the tear from behind, or turning the torn texture into a physical element of your drawing (like bark on a tree or texture on a stone).
- Future Prevention: Throw away hard pink erasers! Upgrade to a soft vinyl (plastic) eraser or a kneaded eraser. These erasers are designed to lift graphite through molecular adhesion rather than rough physical friction, protecting your paper fibers.
10. The Magic Disappearing Act (Underdrawing Bleed-Through)
- What it looks like: You sketched out your drawing beautifully in dark pencil, but when you painted over it with light-colored acrylics or watercolors, the graphite smeared, turning your bright yellow sun into a messy, dirty greenish-gray shape.
- The Science: Graphite is highly slippery and non-binding. When wet paint is brushed over a heavy, dark graphite line, the water or binder lifts the graphite particles off the paper and suspends them inside the wet paint layer, contaminating the clean pigment.
- The Quick Fix: Use a clean, damp cotton swab to gently dab the dirty paint away before it dries, then wipe the underlying pencil sketch with a kneaded eraser to lighten it.
- Future Prevention: Sketch very lightly! Use a hard pencil like a 2H or 4H (which contains more clay and less graphite) rather than a soft pencil like a 2B or 4B. Before you start painting, gently press a kneaded eraser over your sketch to lift up the excess graphite, leaving just a faint ghost of a guideline to follow.
Part 2: Intermediate Troubleshooting (Refining Your Technique)
Now that you have mastered the basics, you might be moving on to more complex mediums like oils, gouache, and high-quality colored pencils, or dealing with canvas preparation and color theory. Let’s tackle ten intermediate challenges!

11. The Great Crack-Up (Gouache or Acrylic Cracking)
- What it looks like: Your paint dried, but it looks like a dry desert floor with tiny, spiderweb-like cracks breaking through the surface.
- The Science: This is called mud-cracking. It happens when paint is applied too thickly in a single layer. As the top surface of the thick paint layer dries, it shrinks and forms a solid “skin.” The paint underneath is still wet. As that lower wet paint eventually dries and shrinks, it pulls the dry top skin apart, creating physical fractures.
- The Quick Fix: For gouache, you can brush a small amount of clean water over the cracks to re-wet and smooth out the paint. For acrylics, you must wait for the paint to dry completely, then fill in the cracks with a thin layer of medium mixed with paint.
- Future Prevention: Paint in multiple thin layers instead of one thick, gloopy layer. Let each thin layer dry before adding the next. This allows the water to evaporate evenly throughout the entire thickness of the paint film.
12. The Color-Shift Shock (Acrylic Drying Darker)
- What it looks like: You mixed the perfect, delicate pastel pink on your palette, but once it dried on your canvas, it turned into a dark, intense magenta.
- The Science: Acrylic binder (acrylic polymer emulsion) is actually milky white when it is wet. Because the wet binder is white, it makes the wet paint look lighter than it actually is. As the water evaporates, this polymer binder turns completely clear. Without the white binder reflecting light, the true, darker color of the dry pigment is revealed.
- The Quick Fix: You will need to paint over the dry area. Mix a new batch of paint that is about 10 to 20% lighter than your target color (by adding more Titanium White).
- Future Prevention: Always do a quick test swatch on a scrap piece of paper and dry it with a hair dryer to see its true “dry color” before applying it to your main masterpiece.
13. The Fat-over-Lean Failure (Oil Paint Cracking and Peeling)

- What it looks like: Your oil painting is wrinkling, cracking, or the top layers of paint are peeling off like old stickers.
- The Science: This is a violation of the golden rule of oil painting: Fat over Lean. “Lean” paint is paint straight from the tube mixed with solvent (like odorless mineral spirits). It dries very fast and hard. “Fat” paint is paint mixed with extra oil (like linseed oil). It dries very slowly and remains flexible. If you paint a fast-drying, rigid “lean” layer over a slow-drying, flexible “fat” layer, the top layer will dry first. When the bottom layer eventually dries and moves underneath, it will crack and shatter the brittle top layer.
- The Quick Fix: If the paint has cracked and is peeling off, carefully scrape away the loose paint flakes with a palette knife, let the area dry completely, and repaint it using the correct layering rules.
- Future Prevention: Always follow the fat-over-lean rule.
- Layer 1 (bottom): Lean paint (solvent only).
- Layer 2 (middle): Medium paint (a 1:1 mixture of oil and solvent).
- Layer 3 (top): Fat paint (paint mixed with pure linseed oil). This ensures your painting dries from the bottom layers up to the top!
14. The “Sunk-In” Oil Trap (Dull, Matte Patches in Oils)
- What it looks like: Parts of your dry oil painting are vibrant and shiny, while other parts look totally dry, dull, and faded.
- The Science: Oil paint needs a non-porous surface to rest on. If your canvas was not primed properly with gesso, the thirsty fabric of the canvas will suck the linseed oil right out of your paint layer, leaving the pigment particles stranded on the surface without enough binder to keep them shiny. This is called “sinking in.”
- The Quick Fix: You can use a technique called “oiling out.” Apply a very thin layer of artist’s linseed oil or walnut oil over the dull areas using a soft cloth or brush. This restores the lost oil binder and brings the color back to life.
- Future Prevention: Always apply 2 to 3 thin coats of high-quality acrylic gesso to your canvas or wood panel before you start painting with oils. Sand lightly between each gesso coat to ensure a perfectly sealed, smooth surface.
15. Hard Edge Havoc (Unwanted Crisp Lines in Blends)
- What it looks like: You were trying to blend a soft shadow on a face, but instead of a smooth transition, you ended up with a sharp, ugly line where the colors meet.
- The Science: Hard edges occur when one paint layer dries faster than the adjacent layer, or when you use a brush that is too wet or loaded with too much paint at its outer tips. The paint pools along the outer edge of the brush stroke, drying into a raised ridge.
- The Quick Fix: If you are using acrylics or oils, you can gently blend a transitional mid-tone color directly over the hard edge. If using watercolor, use a damp, clean brush to gently scrub the hard edge to soften and dissolve the dry paint line.
- Future Prevention: Use a dry, fluffy brush (like a mop brush or a fan brush) to lightly sweep over the border between your two wet colors. Keep your brush strokes light and feather-soft, moving in a circular or zigzag pattern.
16. The Speckled Spray (Fixative Sputtering)
- What it looks like: You sprayed your charcoal or pencil drawing with a can of fixative spray to protect it, but instead of a fine mist, the can spat out large, dark drops that ruined your clean background.
- The Science: Aerosol spray nozzles can easily become clogged with dry resin. When you press down on a clogged nozzle, the pressure cannot escape evenly, causing the liquid to pool at the nozzle and fly out in large, heavy droplets instead of a fine, pressurized mist.
- The Quick Fix: Do not touch the wet spots! Let the spray dry completely. Once dry, you can sometimes use a precision craft knife or a kneaded eraser to gently scrape or lift the dark spots away from the paper.
- Future Prevention: Before spraying your artwork, always shake the can vigorously for 1 full minute. Do a test spray on a piece of scrap cardboard first. When you are done spraying, turn the can upside down and press the nozzle for 2 seconds until only clear gas comes out—this clears the nozzle of dry glue for next time!
17. Wax Bloom Blues (Chalky Colored Pencils)
- What it looks like: Your gorgeous, dark colored-pencil drawing has developed a strange, hazy, white chalky film over the darkest areas.
- The Science: Many professional colored pencils are made with a wax binder. When you apply many heavy layers of colored pencil to create deep shadows, you leave behind a thick layer of wax. Over time, the wax molecules slowly migrate to the surface of the drawing, where they crystallize upon contact with the air, creating a white film known as “wax bloom.”
- The Quick Fix: Gently wipe the white film away with a clean, dry, soft microfiber cloth or a cotton swab. Do not scrub hard, or you will smudge the pencil lines!
- Future Prevention: Once your drawing is completely finished and wiped clean of any wax bloom, spray it with a light coat of archival fixative. This seals the surface and physically blocks the wax from rising and reacting with the air.
18. The Sagging Canvas (Loose Fabric)
- What it looks like: Your stretched canvas is looking loose, wrinkly in the corners, and bounces like a trampoline when your brush touches it.
- The Science: Canvas is a woven cotton or linen fabric. Fabric reacts to changes in temperature and humidity. When the air is humid, the canvas fibers absorb moisture and swell, causing the weave to loosen and sag. When the air drys out, it can warp unevenly if not tensioned correctly.
- The Quick Fix: Look at the back of your stretched canvas. You should see small wooden slots in the four corners of the wooden frame. Insert the small wooden corner keys (the little wedge-shaped wooden triangles that came with your canvas) into these slots and tap them gently with a hammer. This pushes the wooden bars slightly outward, tightening the canvas fabric.
- Future Prevention: Store your canvas paintings in rooms with stable temperatures and humidity levels. Avoid storing your artwork in damp basements, hot attics, or directly in front of air conditioning vents.
19. Under-Bound Paint (Chalky Acrylics)
- What it looks like: Your dry acrylic painting feels dusty or chalky to the touch, and if you wipe it with a damp cloth, the color rubs off onto the cloth.
- The Science: This is a classic case of under-binding. It happens when you dilute your acrylic paint with way too much water. The acrylic binder is spread too thin to hold the pigment particles together or stick them to the canvas. The water evaporates, leaving behind loose, dry pigment dust resting on your painting surface.
- The Quick Fix: Carefully brush a layer of clear acrylic matte medium or gloss medium over the entire painting. This fresh binder will soak into the loose pigment particles and glue them permanently down to the canvas.
- Future Prevention: Keep your water-to-paint mixing ratio under control! If you want to paint with thin, runny layers, always mix your paint with a glazing liquid or acrylic medium instead of plain tap water.
20. The Bleeding Undercoat (Soluble Layering Errors)
- What it looks like: You sketched your guidelines with a water-soluble ink pen or watercolor pencil, but when you painted over it with acrylics, the ink dissolved and bled into your paint, turning your clean colors muddy.
- The Science: Water-soluble inks and pencils do not contain waterproof binders. When you paint over them with any water-based paint, the moisture in the fresh paint re-dissolves the ink, pulling the ink pigments up into your new paint layer.
- The Quick Fix: If the ink is bleeding, stop painting! Let the area dry completely. Once dry, seal the bleeding lines by painting a thin layer of clear gel medium or acrylic varnish over them. This creates a waterproof barrier, allowing you to safely paint your next color layer on top.
- Future Prevention: Always use waterproof drawing tools (like archival pigment liners or traditional India ink) for your underdrawings. If you are unsure, do a quick test on a scrap piece of paper: draw a line, let it dry, and brush water over it to see if it moves.
Part 3: Advanced Troubleshooting (Mastering Paint Chemistry)

For advanced artists, painting is a delicate dance of chemistry and physics. When working with professional varnishes, complex oil layers, and museum-quality materials, small errors can lead to big problems. Here are ten advanced troubleshooting challenges explained.
21. Delamination Drama (Paint Peeling Off)
- What it looks like: Entire sheets or chunks of dry acrylic paint are literally peeling off your canvas or board like dry skin after a sunburn.
- The Science: Delamination occurs when there is a total failure of mechanical adhesion between two paint layers. This usually happens if you paint acrylics over a greasy, oily surface (since water and oil repel each other), or if you paint onto a shiny, ultra-smooth plastic surface without sanding it first to give the paint grip.
- The Quick Fix: Carefully peel away any loose, flaking paint. Use a fine-grit sandpaper to lightly scuff the exposed surface to create “tooth” (texture). Wipe away the dust, and repaint the area.
- Future Prevention: Never paint acrylics over oils! Keep your surfaces free of oils, wax, and fingerprints. If you are painting on non-porous surfaces like plastic or metal, always scuff the surface with sandpaper and apply a specialized adhesion primer first.
22. The Sticky Situation (Oil Paint That Won’t Dry)
- What it looks like: You painted your oil masterpiece six months ago, but the surface is still sticky, tacky, and grabs dust out of the air.
- The Science: Oil paint does not dry by water evaporation. Instead, it dries through a complex chemical process called oxidation and polymerization. The oil absorbs oxygen from the air, causing the oil molecules to cross-link into a solid, flexible plastic-like film. This process requires UV light, oxygen, and moderate temperatures. If you paint in a dark, cold, damp room, or if you used an industrial, non-drying oil (like cheap cooking oil) by mistake, the paint film cannot cure.
- The Quick Fix: Move your painting to a warm, well-ventilated room with plenty of natural indirect sunlight (UV light is a catalyst that speeds up the chemical drying process).
- Future Prevention: Only use high-quality, professional-grade artist oils (like linseed, safflower, or walnut oil). Avoid adding slow-drying oils like clove oil to your paints unless you want them to stay wet for weeks. Use a drying catalyst, such as a tiny drop of alkyd medium (Liquin), to speed up the drying time of your oil paints to 24 hours.
23. The Cloudy Varnish Curse (Varnish Blooming)
- What it looks like: You applied a clear protective coat of varnish over your finished dry oil painting, but it dried into a cloudy, milky, or foggy mess that hides your beautiful colors.
- The Science: This is called blooming. It happens when moisture becomes physically trapped beneath or inside the varnish layer as it dries. If you varnish your painting on a highly humid day (relative humidity above 70%, or if your painting is not 100% dry, the water molecules get locked inside the curing resin, refracting light in all directions and appearing as a white fog.
- The Quick Fix: If you used a removable artist’s varnish (like mineral-spirit-acrylic or Damar varnish), you can use a clean cloth soaked in mineral spirits or turpentine to gently dissolve and wipe away the cloudy varnish layer. Once the canvas is dry, re-varnish on a dry day.
- Future Prevention: Never varnish your artwork in a damp humid environment, outdoors, or on a rainy day. Ensure your oil paintings have cured for at least 6 months (and up to 12 months for thick paintings) before applying a final picture varnish.
24. Support-Induced Discoloration / S.I.D. (Yellowing Acrylics)

- What it looks like: The white and light-colored areas of your acrylic painting on a wood panel have turned a dirty, sickly amber-yellow over time.
- The Science: Acrylic paint is an excellent vacuum cleaner—it pulls water-soluble impurities out of the support panel underneath as it dries. Wood panels contain natural acids, lignins, and resins. As the water inside the wet acrylic paint evaporates, it draws these dark amber-colored wood impurities up into the paint film, permanently tinting your bright white paints.
- The Quick Fix: You must seal the surface. Paint over the yellowed areas with a highly opaque, stain-blocking primer, and then repaint your white details on top.
- Future Prevention: Never apply acrylic paint directly to raw wood! Always seal your wood panels with 2 coats of a high-quality, gloss acrylic medium (like Golden GAC 100) before applying your white gesso. This creates a clear physical barrier that blocks the wood acids from migrating upward.
25. The Yellowing Varnish Nightmare (Aged Resin)
- What it looks like: Your grandmother’s vintage oil painting looks like it has a dirty yellow filter over it, making all the beautiful blues look a muddy green.
- The Science: Traditional natural varnishes (like Damar or mastic) are made of natural organic tree resins. Over decades of exposure to oxygen, heat, and ultraviolet light, these organic molecules break down, oxidize, and turn yellow-brown.
- The Quick Fix: Take the painting to a professional art conservator. Conservators can use chemical solvent mixtures tailored to the painting’s age to safely dissolve and remove the old yellowed varnish layer without harming the oil paint underneath, and then apply a modern, non-yellowing synthetic varnish.
- Future Prevention: Use modern, synthetic, archival-grade varnishes (such as those made with Regrez or Paraloid B-72 resins). These high-tech formulas are engineered to remain perfectly clear and chemically stable for over 100 years.
26. The Wrinkly Paint Skin (Thick Oils Wrinkling)
- What it looks like: The surface of your oil painting has shriveled up like a prune, creating a network of ugly, wrinkled ridges across the paint.
- The Science: Oil paint cures through oxygen absorption. If you apply oil paint in an extremely thick layer, the very top surface is exposed to oxygen and dries into a tough, solid skin. However, the wet paint directly underneath this skin is cut off from oxygen and cannot cure. As the dry top skin expands and moves around over the squishy, wet paint base, it wrinkles and bunches up.
- The Quick Fix: If the wrinkle is small, wait for it to dry completely (which might take a year!), sand it flat with fine sandpaper, and repaint the area. If it is very large and wet inside, you must scrape away the wet under-layer with a palette knife and start over.
- Future Prevention: Avoid painting with extremely thick layers of pure oil paint directly from the tube. If you want to paint with thick, sculptural textures (called impasto), mix your oil paint with an impasto medium or an alkyd-gel medium. These mediums contain catalysts that help the paint layer cure evenly throughout its entire thickness at the same time.
27. Binder Separation (Separating Pigments in Tubes)
- What it looks like: You squeeze your tube of oil or acrylic paint, and instead of colored paint, a clear, greasy yellow liquid or watery goo shoots out first, followed by a hard clump of pigment.
- The Science: Paint is a suspension of pigment particles inside a liquid binder. Over time, gravity pulls the heavy pigment particles to the bottom of the tube, squeezing the lighter liquid binder to the top. This is completely normal, especially in high-quality paints that do not contain artificial chemical stabilizers or fillers.
- The Quick Fix: Squeeze the paint out onto your palette, and use a metal palette knife to mix the liquid binder and the solid pigment back together until it is smooth and uniform.
- Future Prevention: Store your paint tubes upside down or lay them flat. Give your paint tubes a gentle massage in your hands before opening them to help remix the binder and pigments inside the tube.
28. The Glazing Ghost (Lifting Dry Paint)
- What it looks like: You are glazing a thin, see-through layer of color over a dry paint layer, but your paintbrush is physically lifting and dissolving the dry layer underneath, creating a bald patch on your painting.
- The Science: This is a common issue with water-soluble paints like gouache, watercolor, and low-quality acrylics. If the lower paint layer is not water-resistant, adding a wet glaze on top re-wet the binder, allowing the physical scraping of your brush to tear the lower layer apart.
- The Quick Fix: Stop brushing immediately! Let the area dry completely. Carefully patch the bald spot with fresh paint using a tiny detail brush, blending the edges to match.
- Future Prevention: When glazing with water-sensitive media like watercolor or gouache, use a very soft brush (like squirrel hair), work extremely quickly, and make only one single sweep of the brush over any spot. Never scrub back and forth! If using acrylics, ensure the paint you are glazing over has fully cured (at least 24 hours) before applying wet glazes.
29. Craquelure (Fine Oil Cracking)
- What it looks like: Your historic oil painting has developed a network of fine, hair-thin cracks across its entire surface, looking like cracked porcelain.
- The Science: This is called craquelure. It is caused by the physical stretching and shrinking of the canvas support over decades due to changes in humidity and temperature. Because old dry oil paint is incredibly brittle, it cannot bend with the moving canvas, causing it to fracture in clean geometric patterns.
- The Quick Fix: Do not try to fix this yourself! Craquelure is a natural sign of an artwork’s age and is highly valued on historical paintings. If the paint flakes are actively falling off, take the piece to a professional conservator who can secure the flakes with a special adhesive.
- Future Prevention: Mount canvas paintings on rigid wood or aluminum composite panels to prevent the support from flexing. Always display and store valuable oil paintings in climate-controlled rooms with a stable humidity level of around 45% to 55% and a temperature of 65°F to 72°F (18°C to 22°C).
30. Metamerism (The Color Chameleon)
- What it looks like: Your painting looked absolutely perfect with beautiful, warm neutral skin tones in your studio, but when you hung it in the gallery under cool fluorescent lights, the skin tones turned a sickly, cold greenish-gray.
- The Science: This optical phenomenon is called metamerism. Different light sources (sunlight, incandescent bulbs, fluorescent tubes, LEDs) emit different wavelengths of light. Two paint mixtures might reflect the exact same wavelength of light under one light source (matching perfectly), but reflect different wavelengths under a different light source (appearing totally different).
- The Quick Fix: Adjust the lighting of your exhibition space. Swap out cool, greenish fluorescent bulbs for high-CRI (Color Rendering Index) LED lights that mimic natural daylight.
- Future Prevention: Try to paint under the same lighting conditions in which the artwork will ultimately be displayed. Better yet, install “daylight-balanced” bulbs (with a color temperature of around 5000°K and a CRI rating of 95+ in your studio. This ensures your color mixing is highly accurate and will hold up beautifully under any light source!
Quick-Reference Summary Table
Use this quick guide to diagnose your art problems in a flash:
| Skill Level | Problem | Primary Cause | Quickest Solution |
|---|---|---|---|
| Beginner | Muddy Colors | Overmixing too many pigments together | Let dry; paint clean layer on top. |
| Beginner | Warped Paper | Fiber expansion from water absorption | Mist back of dry paper; press under books. |
| Beginner | Runny Paint | Too much water added to acrylic binder | Dab excess with dry towel; use media. |
| Beginner | Graphite Smudge | Friction from hand dragging over carbon | Lift with kneaded eraser; protect with guard sheet. |
| Beginner | Brush Shedding | Water dissolving glue inside ferrule | Pluck hairs with tweezers; store brushes flat. |
| Intermediate | Paint Cracking | Applying thick paint coats in one go | Fill cracks with thin layer of media. |
| Intermediate | Color-Shift | Acrylic binder turning clear when dry | Mix colors 15% lighter than goal. |
| Intermediate | Peeling Oil | Violating “Fat-over-Lean” rules | Scrape loose flakes; repaint with proper ratio. |
| Intermediate | Dull Oil Patches | Raw canvas absorbing binder | Apply oil back to surface (“oiling out”). |
| Intermediate | Hard Edges | Paint drying too fast between blends | Soften with damp brush or transitional shade. |
| Advanced | Delamination | Painting acrylics over oil/smooth surfaces | Sand surface for grip; paint on correct gesso. |
| Advanced | Sticky Oil Paint | Low UV light/cold air/bad oils | Move painting to warm room with natural light. |
| Advanced | Cloudy Varnish | Humidity trapped inside varnish layers | Dissolve varnish with mineral spirits; reapply. |
| Advanced | Panel Yellowing | Wood acids bleeding through gesso | Seal wood with gloss gel medium before gesso. |
| Advanced | Metamerism | Color shift under different light waves | Swap to high-CRI 5000°K LED bulbs. |
Art is a journey of constant discovery. The next time something goes wrong on your canvas or paper, don’t throw your work away! Look at it as a fun science experiment, pull out this glossary, and turn your mistakes into masterpieces. Happy painting from all of us at ProminentPainting.com!
References: Troubleshooting Glossary for Artists
- Canadian Conservation Institute (CCI) – Caring for Paintings
- Description: An exceptionally thorough, government-backed resource detailing the physical structure of paintings, common causes of damage, and professional-grade preventive conservation strategies for artists and collectors.
- CAMEO: Conservation and Art Materials Encyclopedia Online
- Description: Produced by the Museum of Fine Arts, Boston, this is an essential electronic database of terms, materials, and techniques used in the production and conservation of artistic works. It is ideal for identifying material properties.
- National Gallery of Art – Conservation Resources
- Description: The official conservation department site for one of the world’s leading museums. It offers insights into the material science of paintings, historical techniques, and the professional standards required for preserving art.
- Tate – Art Terms & Conservation
- Description: While known for its collections, Tate provides a deep, accessible glossary of art terms and technical explanations about media, framing, and conservation practices suitable for both emerging and professional artists.
- The Getty Conservation Institute (GCI)
- Description: A premier global authority on the science of art conservation. Their publications often delve into the chemical interactions of pigments, binders, and supports, making them a top-tier resource for advanced troubleshooting.
- The Pigment Codex (Kremer Pigments)
- Description: As a leading provider for professional fine art restorers, Kremer offers extensive technical documentation on the lightfastness, toxicity, and compatibility of specific pigments and mediums, providing deep technical context for material-based mistakes.

