
Painting a river is one of the most relaxing things an artist can do. There is something magical about the way water flows through a forest or down a mountain. For many beginners, however, water can be a bit scary to paint because it is always moving and changing. In this guide, we will break down the process into easy steps so you can create a beautiful river scene on your own. Whether you want to paint a calm stream or a rushing rapid, these tips will help you master the art of landscape painting.
Summary: In this post, you will learn how to choose the right colors for river water, the secrets to making water look see-through, and techniques for painting moving rapids. We will cover a step-by-step watercolor method and provide tips for painting realistic rocks and pebbles along the bank. The key takeaways are to always paint your dark values first, use horizontal brush strokes for flat water, and remember that water reflects the sky above it.
What Colors do i need to paint a river

One of the biggest mistakes beginners make is thinking they only need blue paint to create a river. In reality, water is like a mirror. It reflects the colors of the sky, the trees, and the rocks around it. To get started, you should have a good mix of colors on your palette. For a basic river, you will need Ultramarine Blue, Phthalo Green, Burnt Sienna, and Titanium White. If you are just starting out, check out our color theory basics guide to learn how to mix these effectively.
If the sky is bright blue, your river will have a lot of blue in it. If the river is in a deep forest, you will see a lot of dark greens and browns. You might even need a bit of Yellow Ochre to show the sandy bottom of the river or the highlights on the rocks. When you look at a real river, notice how the color changes as the water gets deeper. Shallow water is often lighter and warmer, while deep water looks darker and cooler. Learning to see these shifts is a big part of landscape composition and will make your art look much more professional.
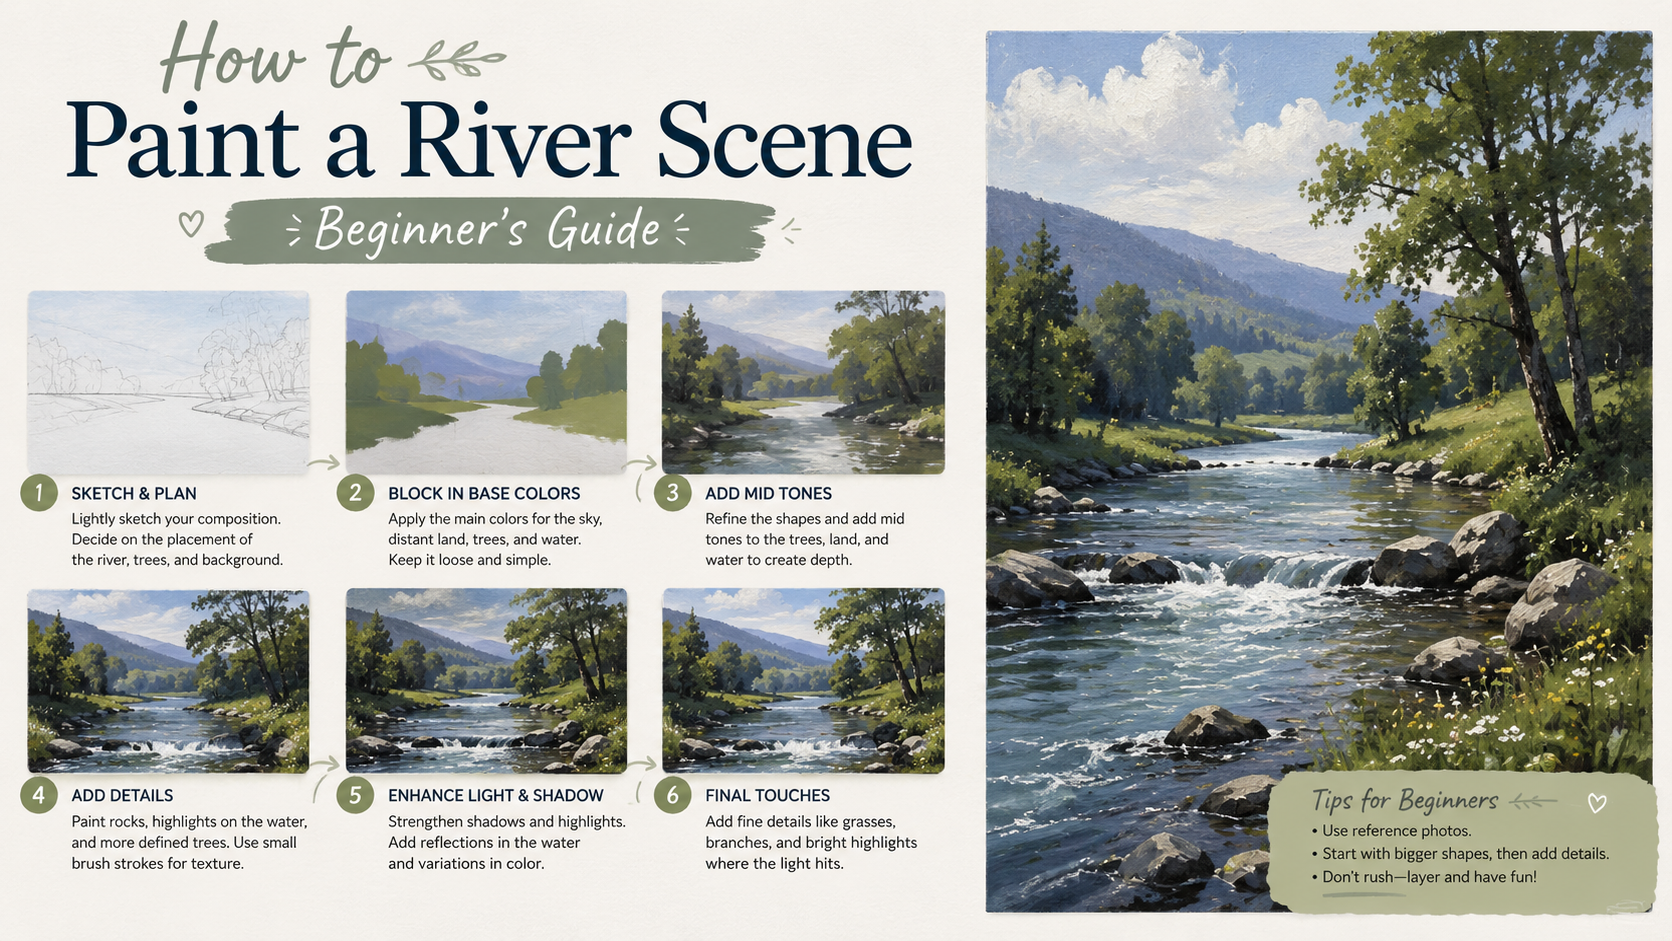
Step by step watercolor river landscape painting
Watercolor is a fantastic medium for rivers because it is naturally fluid. To start your painting, follow these simple steps. First, lightly sketch your river using an ‘S’ shape. This curve helps lead the viewer’s eye into the distance. Next, wet the sky area with clear water and drop in a pale blue. While the paper is still damp, add some soft green shapes for distant trees. If you need help with the basics of this medium, our watercolor essentials page is a great resource.
Once the background is dry, it is time to paint the water. Start at the top of the river (the part furthest away) with a very light, watered-down blue. As you move toward the bottom of the page, add more paint to make the color stronger. This creates a sense of distance. Use a dry brush technique to leave little white gaps on the paper; these will look like sunlight sparkling on the ripples. Finally, add the river banks. You can learn more about painting trees and foliage to make the banks look lush and full of life.
How do you make river water look transparent in a painting
Making water look transparent is all about showing what is underneath. If the water is clear, you can see rocks, sand, and fish. The trick is to paint the riverbed first. Use warm browns and tans to paint the rocks at the bottom of the river. Make sure these shapes are a bit blurry since they are under the water. Once that layer is dry, you can paint the surface of the water over it.
To create the surface, use very thin, watery paint in a cool blue or green. Apply this over your rocks in long, horizontal strokes. Because the paint is thin, the rocks will still show through. This layering technique is also covered in our acrylic painting guide for those who prefer that medium. Finally, add a few bright white highlights on top. These highlights represent the light hitting the surface of the water. When people see the dark rocks underneath and the bright highlights on top, their brains will tell them the water is see-through.
How to paint moving water in a river
Moving water looks different than a still lake. If your river has rapids or a waterfall, you need to show energy and motion. The best way to do this is with your brush strokes. Instead of long, smooth lines, use short, choppy strokes. For white foam and bubbles, use a technique called “scumbling.” This is when you take a dry brush with a little bit of thick white paint and rub it lightly over the surface of your painting. This creates a rough, textured look that perfectly mimics splashing water.
Remember that moving water also creates shadows. Where the water curls over a rock, there will be a dark area underneath the white foam. Use a dark blue or purple to add these small shadows. This contrast between the dark shadows and the bright white foam is what makes the water look like it is actually crashing. If you are struggling with how light hits the water, our guide on mastering reflections can help you understand the physics of light on liquid surfaces.
Tips for painting river rocks and pebbles
Rocks are the “bones” of a river scene. They give the water something to flow around and add texture to your landscape. To make rocks look real, avoid making them all the same size or shape. Some should be large and jagged, while others should be small, round pebbles. Start by painting the dark shadow side of the rock first, then add the mid-tone color, and finish with a highlight on the part where the sun hits.
A great tip for making rocks look wet is to use very high contrast. A wet rock will have a very bright, almost white highlight where the sun reflects off the water on its surface. Use a small brush to add these tiny “glints” of light. Also, remember that rocks under the water will look darker and more colorful than rocks on the dry bank. By varying the colors and the amount of detail, you can create a shoreline that looks natural and rugged.
FAQs: How to Paint a River Scene
Why does my painted river look flat?
A river looks flat if you use the same color and value from the front to the back. To fix this, make the water in the foreground darker and more detailed, and make the water in the distance lighter and cooler. This creates “atmospheric perspective.”
What is the best brush for painting water?
For large areas of water, a flat brush is best because it helps you make long, horizontal strokes. For details like ripples and foam, a small round brush or a fan brush works wonders.
Should the water be the same color as the sky?
Usually, the water should be a little bit darker than the sky. While it reflects the sky’s color, the water itself has its own tint and depth, which makes it appear slightly deeper in tone. (Nico)

