
Summary: Focus matters more than talent. This post explains how a simple viewfinder eliminates visual noise to help you choose a winning subject every time. By cropping the world into a manageable frame, you can apply practical composition tips for beginner artists without feeling overwhelmed by a vast landscape. You will learn to build a DIY tool and use it to find your perfect focal point.
I stood in a field of wildflowers with my easel ready and my heart sinking. The view was gorgeous, but it was also massive. I had no idea where to start or what to actually put on the canvas. If you have ever felt that same paralysis, you don’t need more “talent.” You need better focus.
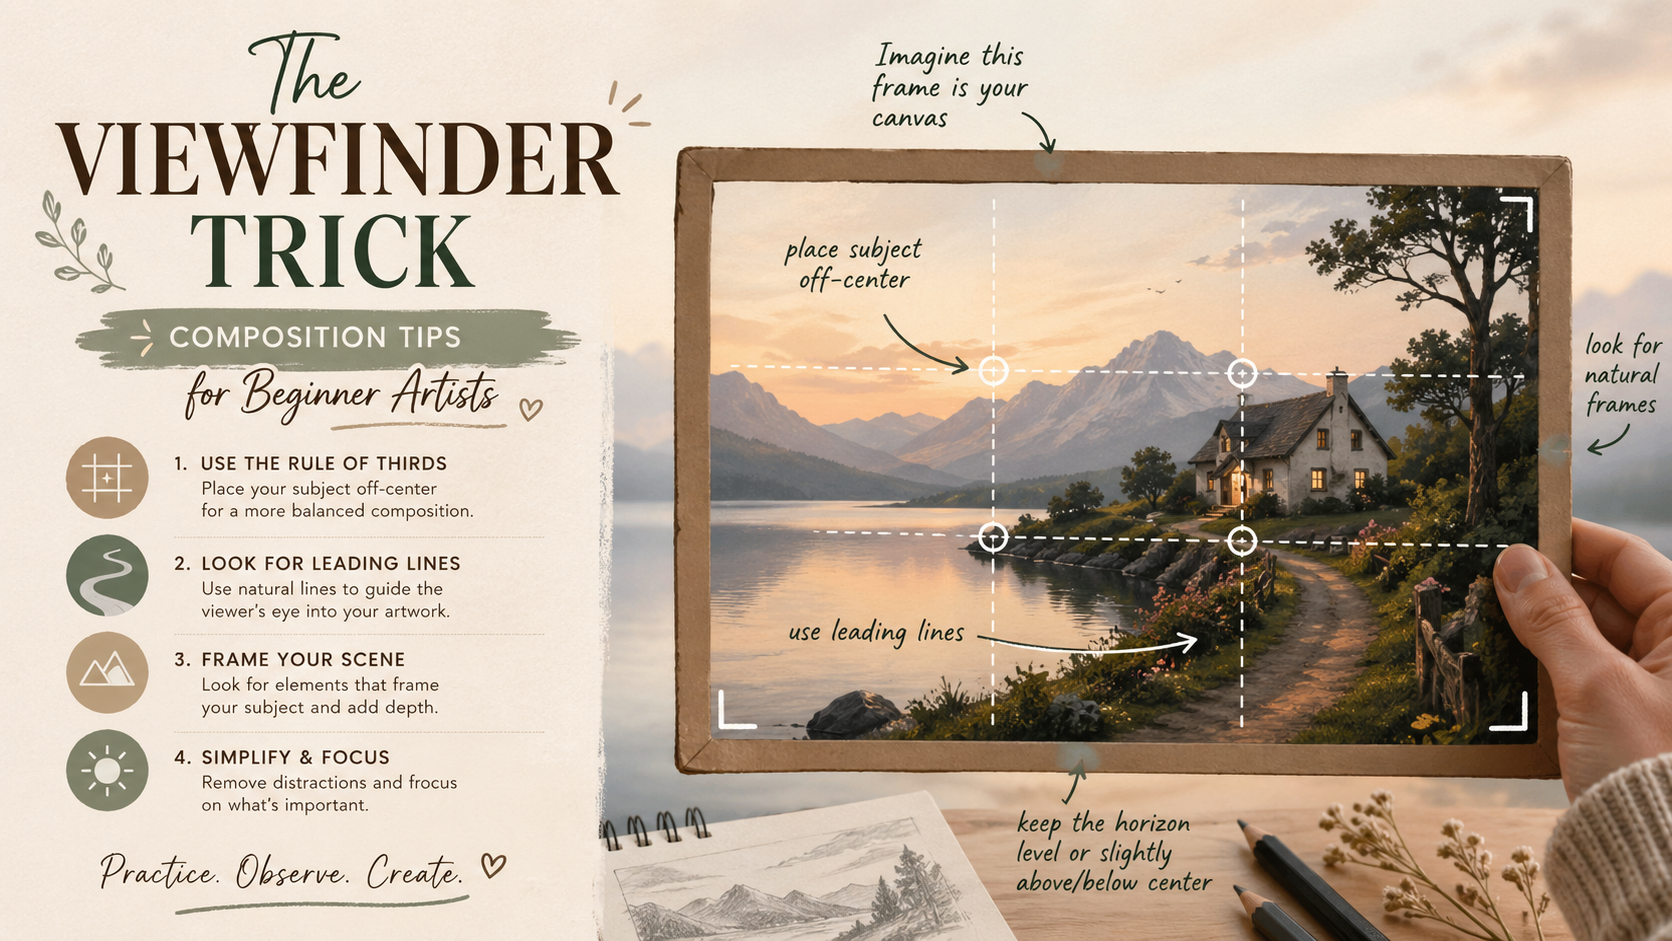
Finding the right composition tips for beginner artists is often the difference between a messy painting and a masterpiece. As an educator with a decade of teaching experience, I’ve seen how a simple cardboard frame can transform a student’s confidence. We call it the “Viewfinder Trick.” It is the ultimate tool to silence the noise and see the world as a finished painting before you even pick up a brush.
Why Do Beginners Struggle With Painting Composition?
 3")
Beginners struggle with composition because of visual overwhelm (the attempt to paint an entire scene rather than a specific focal point). Without a frame to crop reality, the brain struggles to process the massive amount of information in a landscape. This leads to a lack of clear focal points on the canvas.
A common issue in art education is the disconnect between the eye and the hand. A 2025 study on cognitive load found that beginners who are presented with complex visual data often experience higher levels of frustration and “blank canvas syndrome”. When you look at a landscape, your brain tries to see everything at once. This is great for hiking, but it’s terrible for painting.
You must learn to ignore about 90% of what is in front of you. When you force yourself to look at a small, cropped section of the world, your heart rate actually slows down. You start seeing shapes instead of “stuff.” This transition is vital for anyone following the 7 principles of painting.
What Is an Art Viewfinder and How Does It Help?
An art viewfinder is a simple physical frame, usually made of cardboard or plastic, used to isolate a specific area of a scene. It helps artists crop their surroundings to find a balanced composition before they start. This tool dates back to the “Claude Glass” used by masters of light and pigment for centuries.
The history of the viewfinder is rooted in professional practice. The Smithsonian American Art Museum notes that early landscape painters used various viewing devices to translate three dimensional space onto two dimensional surfaces. It isn’t a “cheat” code; it is a professional way to manage perspective.
By holding a frame up to your eye, you create an artificial border. This border acts like a camera lens. It tells you exactly where your painting starts and where it ends. This clarity allows you to focus on the essential elements of composition like balance, contrast, and movement.
The Two-Minute DIY Viewfinder Hack
You do not need to spend twenty dollars on a plastic gadget from an art store. In fact, the best viewfinders are the ones you make yourself in two minutes with a pair of scissors.
- Find a piece of stiff black or gray cardboard.
- Cut two identical “L” shapes out of the card.
- Each arm of the “L” should be about one inch wide.
- Overlap the two pieces to create a rectangular window.
- Use a paperclip or a piece of tape to hold them together once you find a shape you like.
The beauty of this L-shaped design is its flexibility. You can slide the pieces to create a tall portrait frame, a wide landscape frame, or a perfect square. It is the most affordable art supply you will ever own.
How Do You Use a Viewfinder for Better Framing?
To use a viewfinder, hold it at arm’s length and close one eye to peer through the opening. Move the frame closer to your face for a wide-angle view or further away to “zoom in” on a subject. Align your subject with the Rule of Thirds to create immediate visual interest.
Mastering the viewfinder requires a bit of physical movement. You should walk around your subject while looking through the frame. A recent report by the Royal Academy of Arts suggests that changing your physical vantage point can reveal compositions that are not immediately obvious from a standing position.
Look for “sweet spots” where lines intersect. If you see a tree, don’t put it right in the middle of your frame. Move the viewfinder until the tree sits slightly to the left or right. This follows the “Goldilocks Effect” of visual attention, where the human brain finds slightly off-center subjects more engaging than perfectly centered ones.
The 5-Minute Thumbnail Exercise
 4")
Before you put a single drop of paint on your canvas, do this exercise. Use your viewfinder to find three different “crops” of the same scene.
- The Wide View: Capture the overall mood and horizon line.
- The Mid Shot: Focus on a group of objects, like a cluster of trees or a building.
- The Close-Up: Zoom in on a texture or a single flower.
Draw a tiny two inch sketch of each version in your sketchbook. This is the fastest way to improve your art skills because it forces you to think like an editor. Once you see all three sketches side by side, the best composition will practically jump off the page at you.
Summary Table: Viewfinder Benefits
| Feature | Impact on Your Art | Why It Works |
| Physical Border | Eliminates visual noise | Forces the brain to focus on shapes |
| Adjustable Aspect Ratio | Matches any canvas size | Prevents awkward empty spaces |
| Arm’s Length Distance | Simulates a “zoom” lens | Helps identify the best focal point |
| Thumbnail Comparison | Reduces “start-up” anxiety | Encourages experimentation before committing |
Stop trying to paint the whole world at once. The “Viewfinder Trick” is your permission to be picky. It turns the overwhelming chaos of nature into a series of beautiful, manageable choices. Now that you know how to frame your subject, the next step is getting started with watercolors or your medium of choice. Grab some cardboard, cut your “L” shapes, and go find a view that speaks to you.
Frequently Asked Questions
Can I use a digital viewfinder on my phone? Yes, your phone camera is a great digital viewfinder, but a physical one is often better for beginners. Using a physical frame forces you to use your own eyes to judge scale and light without a screen’s interference.
What color should my DIY viewfinder be? Black or neutral gray is the best choice for a viewfinder. These colors don’t distract your eyes and they help you see the actual colors of your subject more clearly.
Should I use the viewfinder for still life painting too? Absolutely (the viewfinder is just as useful indoors as it is for landscapes). It helps you decide how much of the table or background to include in your final piece.
How big should the opening in the viewfinder be? A good starting size is a 3:4 ratio, roughly the size of a standard photograph. However, the beauty of the DIY “L” shapes is that you can adjust the size to fit any canvas you are using.
Is using a viewfinder considered “cheating” in professional art? No, using a viewfinder is a professional technique used by artists for centuries to manage elements of composition. It is a tool for better seeing, not a shortcut for painting skill.

