
The salt watercolor technique is a simple and magical way for beginners to create beautiful textures in their artwork. By sprinkling common salt over wet paint, you can easily achieve a speckled, starry effect. This guide will teach you the science behind the reaction, the best materials to use, and step-by-step instructions for success. Grab your brushes and let’s get painting!
Have you ever stared at a blank page and felt unsure of where to start? Art should be relaxing, but it can sometimes feel intimidating. If you are looking for a fun and easy way to build your confidence, the salt watercolor technique is the perfect place to begin.
When people ask me what is watercolor painting, I always highlight its playful nature. The water does a lot of the work for you. By adding salt into the mix, you combine art and science in a fun way.
Backed by over a decade of teaching experience (PGCE), I am dedicated to making painting accessible, mindful, and therapeutic for artists of all levels. When we implemented this salt technique in a recent beginner workshop, we saw students’ confidence skyrocket as they created stunning starry skies without needing advanced brush skills.

In this guide, you will learn exactly how to use salt to make incredible textures. Let us dive into the details and unlock your creative potential.
What Is the Salt Watercolor Technique?
The salt watercolor technique is a method where you sprinkle grains of salt onto wet watercolor paint. The salt absorbs the water and pushes the pigment away, leaving behind a unique, speckled texture once it dries. It is an effortless way to add visual interest to your art.
This trick is incredibly versatile for artists. You can use it to paint starry night skies or sandy beaches with ease. It also makes great texture for animal features like a furry coat or a textured nose.
The best part is that you do not need perfect brush control. The salt naturally creates the pattern for you. It takes the pressure off and lets you enjoy the painting process.
How Does Salt React With Watercolor?
Salt reacts with watercolor by acting like tiny sponges that soak up the surrounding moisture. As the salt absorbs the water, it pulls the pigment along with it to create a mottled, stippled look.
This chemical reaction is fascinating to watch. However, not all colors behave the same way. Studies show that inorganic pigments often take salt texture very well, while earth tones might be more stubborn.
The size of the salt grains also changes the reaction. Larger crystals pull more water and create larger blooms. Smaller grains create a tight, delicate texture.
Essential Supplies for the Best Results
Before you begin, you need the right tools. If you are just getting started with watercolors, you do not need to spend a fortune. However, choosing the correct paper is critical for this technique.
We highly recommend choosing watercolor paper pads that can handle heavy washes of water. Look for paper that is thick and heavy, ideally around 140lbs or 300 gsm. Cold press paper is perfect because it holds water well and has a slight texture.
Here is a quick checklist of the supplies you will need:
| Item | Recommendation | Purpose |
| Watercolor Paper | 140lb Cold Press | Absorbs water without warping |
| Paint | Liquid or Tube Watercolors | Provides rich color |
| Brushes | Soft Round Brush | Holds plenty of water |
| Salt | Table Salt or Kosher Salt | Creates the texture |
Using high-quality paints will also yield brighter results. Keep your workspace organized and well-lit to make the process as relaxing as possible.
Step-by-Step Guide to Adding Salt to Watercolor

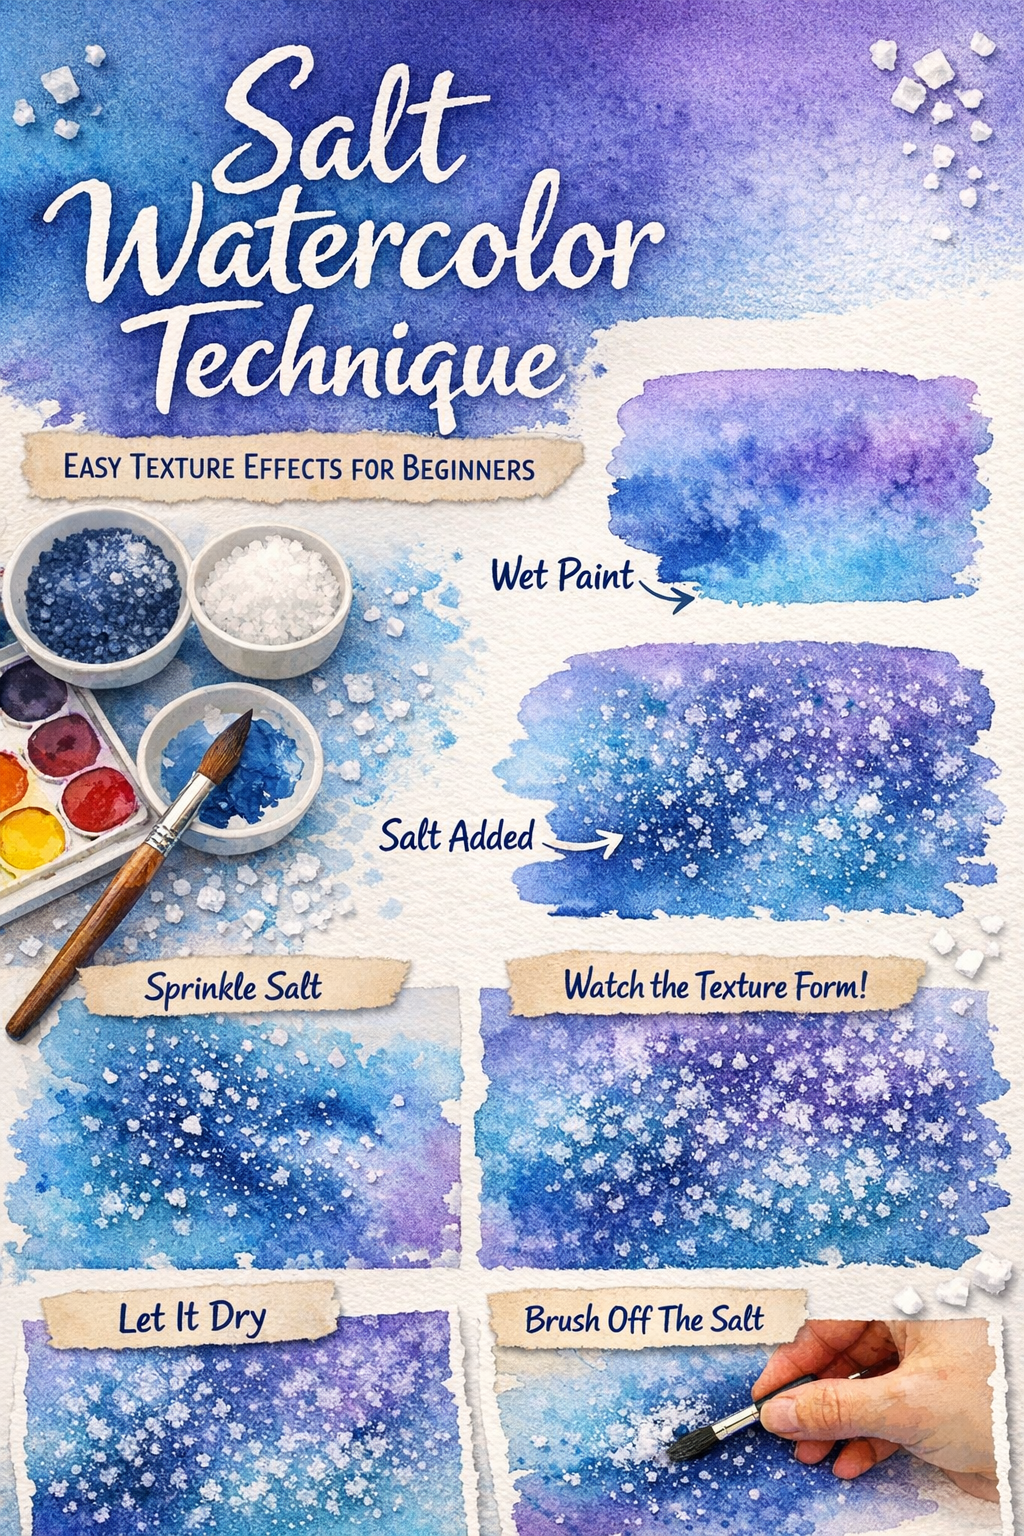
To use the salt watercolor technique, first paint a wet wash of color onto your paper. While the paint is still shiny and wet, sprinkle a pinch of salt over the surface. Let the paper dry completely before gently brushing the salt away.
Step 1: Wet Your Paper
Start by applying a generous layer of water and paint. This is a great time to practice your watercolor blending techniques. Make sure the surface is wet but not forming deep puddles.
Step 2: Add the Salt
Sprinkle the salt while the paint still has a shiny sheen. If the paper loses its shine, the salt will not work. You can drop it randomly or focus on specific areas.
Step 3: Wait Patiently
Let the painting dry entirely. It can be tempting to touch it, but patience is key. Once it is fully dry, gently rub the salt off with your fingers or a clean towel.
What Are the Best Types of Salt to Use?
The best type of salt for watercolor depends on the texture you want to achieve. Standard table salt creates fine, delicate speckles. Kosher salt or coarse sea salt produces larger, more dramatic blooms and snowflake patterns.
I encourage you to experiment with different types. You can even mix coarse and fine salts on the same painting. This variety adds depth and makes the artwork look more organic.
Remember that humidity plays a role, too. On very damp days, the salt might take longer to absorb the water. Play around and see what unique effects you can discover.
Common Mistakes to Avoid
Learning a new skill always comes with a learning curve. If your salt technique is not working, do not worry. You can easily fix watercolor mistakes by understanding a few common pitfalls.
The most frequent mistake is adding salt to paper that is too wet or too dry. If there are huge puddles, the salt will simply dissolve. If the paint has already started to dry and looks matte, the salt cannot absorb any moisture.
Another issue is removing the salt too early. If you wipe it away while the paper is still damp, it will smear the paint and ruin the crisp texture. Always remember that the amount of water controls the intensity of the effect. Let it sit until the paper is completely dry to the touch.
Conclusion
The salt watercolor technique is a beautiful reminder that art does not have to be rigid or perfect. By letting the materials interact naturally, you can create breathtaking textures with minimal effort. It is the perfect exercise for relaxing your mind and trusting the process.
Now it is your turn to try! Grab a piece of watercolor paper, mix up your favorite colors, and start sprinkling some salt. If you found this guide helpful, please share it with a fellow artist.
Frequently Asked Questions
Do you use wet or dry salt for watercolor?
Always use dry salt for this technique. The dry crystals act like sponges to absorb the wet paint on your paper. If the salt is already wet, it will not pull the pigment.
Can I use table salt for watercolor painting?
Yes, you can absolutely use standard table salt. It creates a fine, delicate texture that looks like tiny stars or sand. It is a fantastic option for subtle details in your artwork.
Why did the salt not work on my watercolor?
Your paper was likely either too wet or too dry. If the paint forms deep puddles, the salt dissolves completely. If the paper has lost its wet shine, the salt cannot absorb the pigment.
How long should I leave salt on watercolor?
You should leave the salt on the paper until the paint is completely dry. This usually takes around 30 to 60 minutes depending on the humidity in your room. Removing it too early will smear the colors.
Can I combine glue and salt for watercolor?
Yes, this is a fun variation for adding dimension. Using glue and salt creates raised textures that dry hard and pop off the page. It is especially popular for crafting and sensory projects with beginners.

