
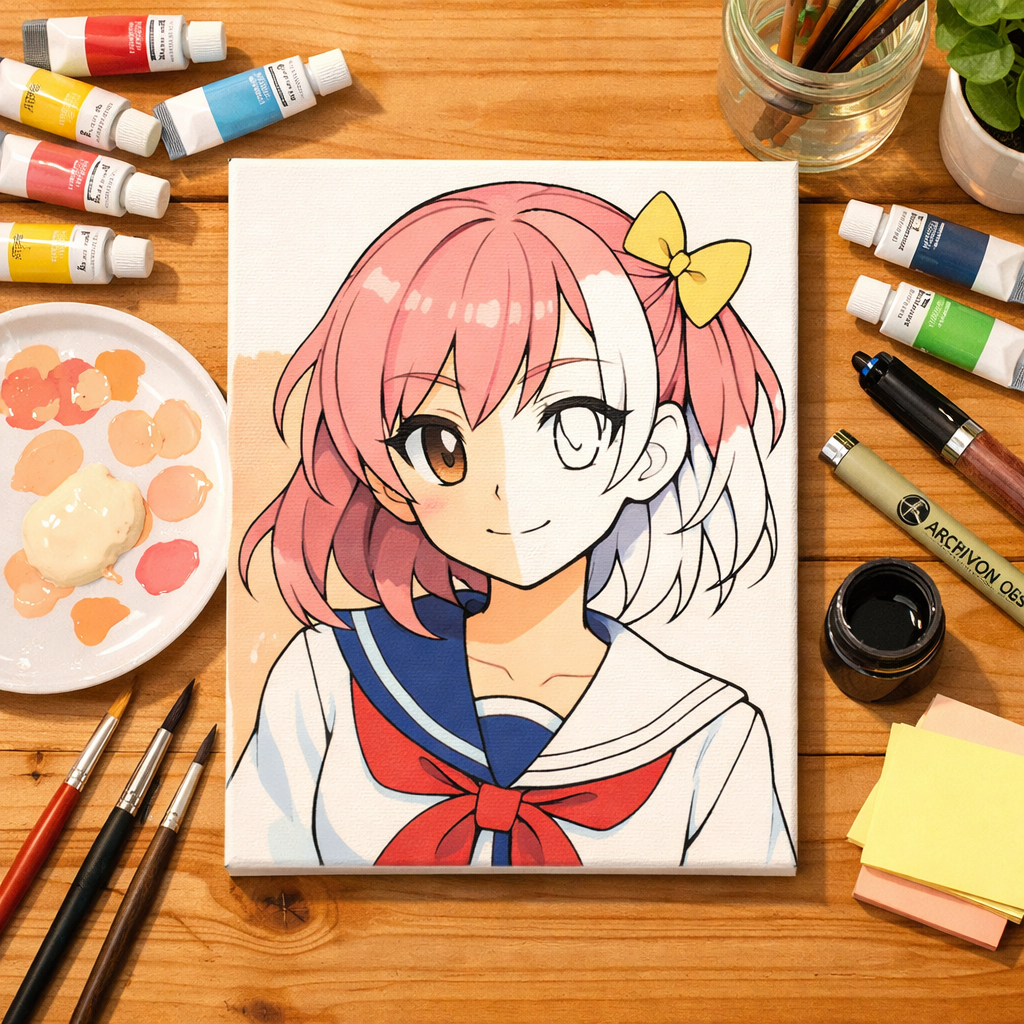
Ready to bring your favorite anime characters to life on canvas? This guide breaks down exactly how to paint anime style with acrylics using simple cel shading techniques. You will learn how to mix vibrant anime skin tones, achieve smooth color layers, and create crisp lineart. Grab your brushes and let’s dive into the colorful world of traditional anime painting.
Have you ever tried to paint your favorite characters but ended up with a streaky mess? Acrylics dry incredibly fast. This can feel like the exact opposite of the smooth, flawless look of digital anime art. But do not worry! Learning how to paint anime style with acrylics is entirely possible once you understand the right layering techniques.
When I first helped a student transition from sketching in their workbook to painting on canvas, they were so frustrated by patchy colors. We stripped it back to the basics of flat application, and suddenly everything clicked. You do not need expensive tools to get that perfect cel shaded look. You just need patience and a solid strategy.
Let’s explore how you can replicate those crisp, vibrant anime aesthetics using traditional paints. By the time you finish this guide, you will be ready to transform your blank canvas into a stunning anime masterpiece. If you need to sketch your character first, check out my guide on how to draw anime characters.
How to Draw Anime Characters: Foundation Steps
Before you pick up your brushes and tubes of paint, you must establish a solid structural foundation. In anime art, the “under-drawing” is the skeleton that supports your color work. If the proportions are off in the sketch, no amount of masterful acrylic blending can fix the final piece.
Drawing the Character First: The Essential Blueprint
Painting with acrylics is an additive process—you are layering pigment on top of a surface. By starting with a clean, light pencil sketch, you create a “map” that tells you exactly where to place your highlights, mid-tones, and deep cel-shading.
Here are the six essential steps to sketching your character before you begin the painting process:
 3")
Step 1: The Head Circle (The Cranium)
Start by drawing a perfect or near-perfect circle. This represents the top and back of the skull. Do not worry about the jaw yet. Use a light touch with a hard pencil (like a 2H or HB), as you will want these lines to be easily erasable once the paint is applied.
Step 2: The Face Cross (The Guidelines)
Draw a vertical line down the center of the circle to determine which way the character is facing. Add a horizontal line across the lower third of the circle.
- Vertical Line: Centers the nose and mouth.
- Horizontal Line: Acts as the brow line or the top of the eyes.
Step 3: Defining the Jaw and Chin
From the sides of your circle, bring lines down to meet at the vertical centerline.
- Style Tip: For standard “Shonen” or “Shojo” styles, the chin is often pointed. For a more “Chibi” or “Moe” style, keep the jawline shorter and the cheeks more rounded.
Step 4: Eye Placement and Expression
In anime, the eyes are the most communicative element. Place the bottom of the eyes on the lower edge of your initial circle.
- Spacing: A common rule of thumb is to leave exactly one “eye-width” of space between the two eyes.
- Acrylic Prep: Draw the pupils and highlights clearly. When you paint later, you will want to know exactly where to leave the white of the canvas for that “sparkle” in the eye.
Step 5: Hair Blocking (Large Shapes)
Do not draw individual strands of hair. Instead, think of the hair as solid “clumps” or “masses” that sit on top of the head circle (this creates “hair volume”).
- Identify the Vertex (the point where the hair originates).
- Draw the bangs first, then the sides, then the back.
- Keep the lines bold; these will act as the borders for your base coat of paint.
Step 6: Establishing Body Proportions
If your painting includes the torso, use the “Head Count” method.
- Proportion: An average anime character is roughly 6 to 7 “heads” tall.
- The Neck: Keep the neck relatively thin compared to the head for a classic aesthetic.
- The Shoulders: Usually 1.5 to 2 heads wide. Draw these as simple slopes connecting to the neck.
What Is Cel Shading in Traditional Art?
Cel shading is an art technique that uses flat base colors and distinct, unblended shadows to create a three-dimensional effect. It mimics the look of classic 2D animation. This method relies on sharp contrast rather than smooth gradients to give characters form and depth.
This technique originated in traditional animation studios. Artists used to paint flat colors onto clear sheets of acetate to create smooth, uniform frames for television. When we bring this to acrylic painting, the goal is to eliminate visible brush strokes.
This approach is quite different from anime watercolor, where the paint naturally blends and creates soft edges. With acrylics, you want sharp, confident boundaries between your light and dark areas.
Essential Acrylic Supplies for Anime Painting
You do not need a massive studio setup to get started. The secret lies in choosing the right consistency of paint. Heavy body acrylics are great for thick textures, but they are too chunky for smooth anime coloring. Instead, experts recommend using fluid acrylics because they level out naturally as they dry.
These thinner paints reduce the appearance of brush strokes significantly. You will also want flat synthetic brushes for laying down your base colors. For the tiny details, a fine liner brush is absolutely essential.
If you are new to this medium, reading up on mastering acrylic painting will give you a great foundation. You should also look for paints that offer high opacity to save yourself from doing endless coats.
How Do You Mix Perfect Anime Skin Tones?
You can mix a perfect anime skin tone using a base of titanium white mixed with a tiny amount of yellow ochre and a drop of red. For shadows, add a cool color like light purple or blue to create that distinct, dramatic anime shading.
 4")
Getting the skin right is often the hardest part for beginners. Anime characters usually have very pale, luminous skin. Standard color theory suggests building your palette carefully to avoid muddy results. Adding too much warm color can make the skin look unnatural.
Always mix more base color than you think you need. Acrylics dry slightly darker than they look on your palette. If your colors start getting too chalky, you might need to reconsider your supplies. Check out my thoughts on the best paints for beginners to make sure you have the right pigments.
Step-by-Step Guide to Painting Anime Eyes
 5")
Anime eyes are the focal point of the face. Start by painting the entire eye area flat white. Next, block in the base color of the iris. It is usually best to work from dark to light when painting details.
Applying darker shadows at the top of the iris gives the eye instant depth. Once the dark upper section is dry, add a brighter, saturated color to the bottom curve. Finally, use pure white to add those iconic, sparkling catchlights. Make sure your paint is completely dry between each step so the colors do not smear.
Why Do My Acrylic Colors Look Patchy?
Acrylic colors look patchy when the paint is too thick, mixed with too much water, or overworked while it is starting to dry. To fix this, apply multiple thin layers and use a flow improver medium instead of just water to maintain the paint’s binding strength.
We have all been there. You paint a solid block of color, and it dries looking like a streaky mess. Adding water seems like a logical fix, but too much water breaks down the paint binder. Professional artists rely on flow mediums because they increase fluidity without compromising color vibrancy.
Remember to paint in one direction and leave the layer alone once it starts getting tacky. Fiddling with half-dry paint is the easiest way to create clumps.
Techniques for Crisp Lineart Over Paint
Achieving crisp lineart requires waiting for your acrylic layers to dry completely. Once dry, you can use a high-quality fine liner brush with fluid black acrylic, or you can use archival ink pens to draw sharp borders around your character.
Lineart is what truly makes a painting look like an anime still. If you try to ink over wet paint, your pen will clog and your lines will bleed. Many artists prefer archival ink pens because they glide smoothly over dried acrylic surfaces.
If you prefer using a brush, make sure it is a synthetic liner with a sharp tip. Finding the best paint brushes for beginners makes this step much less frustrating. Practice your line weight on a scrap piece of paper first. Thicker lines around the outside and thinner lines inside will make your character pop off the canvas.
Conclusion
Painting anime characters with acrylics might feel tricky at first, but patience is your best friend. Remember to rely on thin layers for smooth coverage, mix your colors with care, and embrace the bold contrast of cel shading. You do not need to be a master to get started.
Every great artist started with a single brushstroke. I encourage you to set up your canvas, squeeze out some bright colors, and just have fun with the process. If you want more creative ideas, browse the rest of the blog to fuel your artistic journey. Have you tried painting your favorite character yet?
Frequently Asked Questions
- Can you use normal acrylic paint for anime figures?
Yes, you can use standard acrylics for anime art. However, you will need to thin them properly with a medium to avoid chunky brush strokes. Fluid acrylics are generally easier for achieving flat, digital-style colors. - How do you make acrylic paint look smooth like digital art?
The secret is applying three to four very thin layers of paint. You should also use a flow improver and a soft synthetic brush. Never overwork the paint while it is drying. - What is the best brush for painting anime details?
A small synthetic round brush or a fine liner brush is perfect for anime details. These brushes hold their shape well. They allow you to paint sharp eyelashes and precise eye highlights. - Should I do the lineart before or after painting?
You should do the final, crisp lineart after all the base colors and shadows are completely dry. If you ink first, the opaque acrylic paint will just cover up your lines. - How long does an acrylic anime painting take to dry?
Acrylics dry to the touch in about 10 to 20 minutes depending on the room temperature. However, you should wait at least 24 hours before applying any final varnish.

