
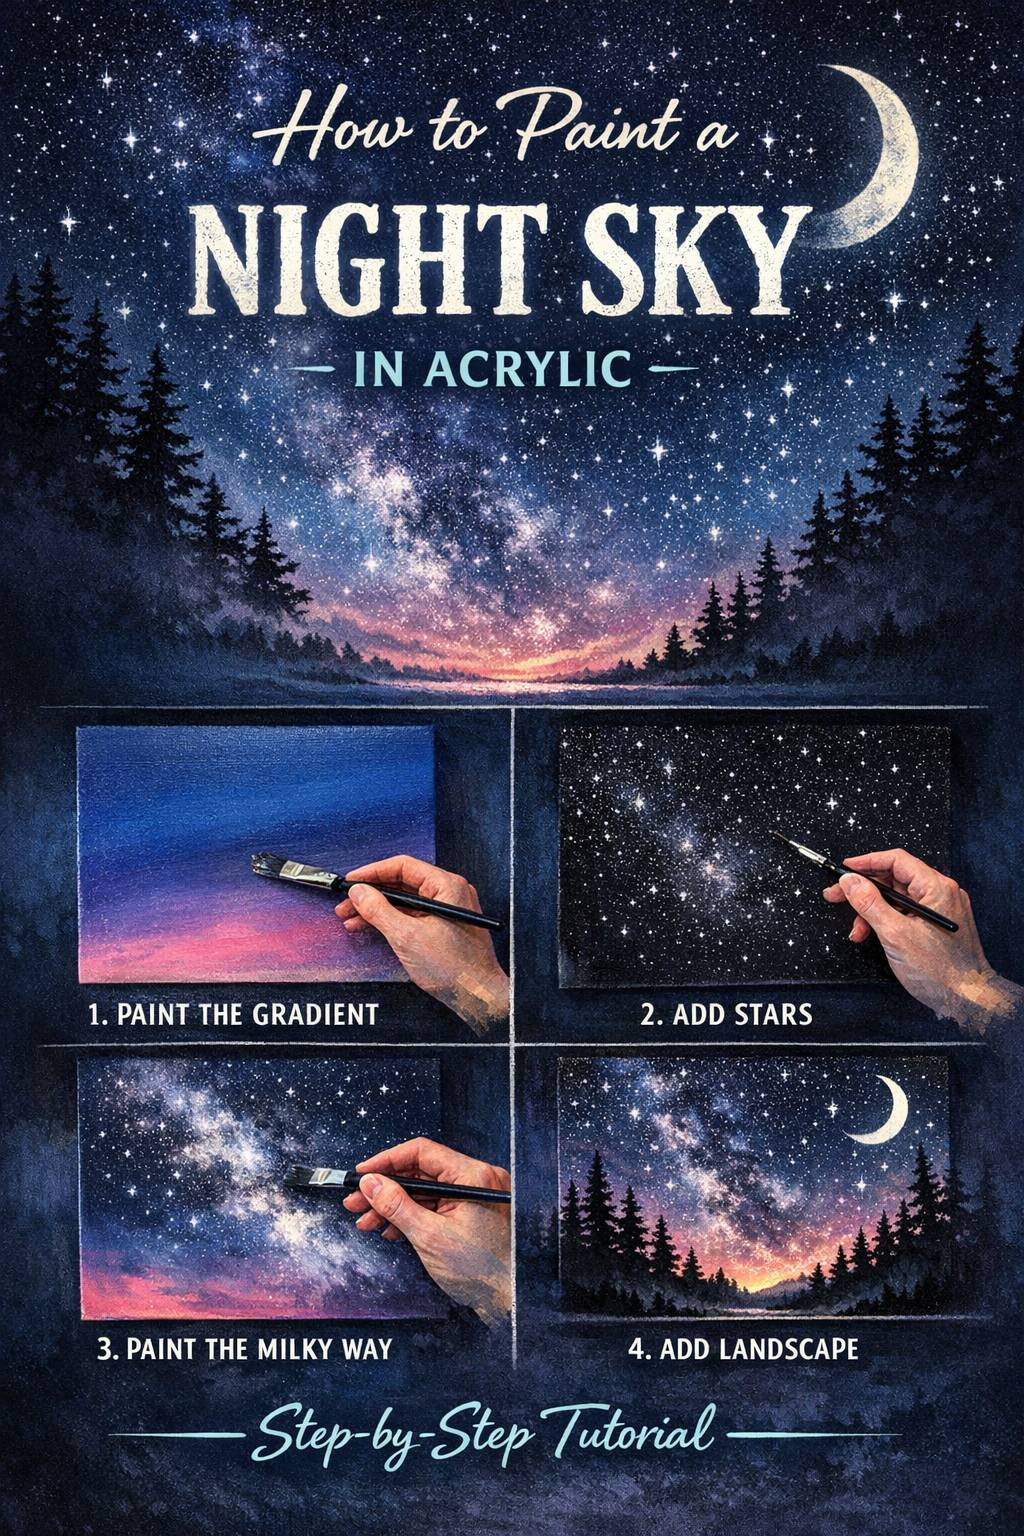
Ready to learn how to paint a night sky in acrylic? This guide breaks down the entire process for absolute beginners. You’ll discover the essential supplies you need, easy blending techniques, and the secret to painting glowing stars. Grab your brushes and let’s turn a blank canvas into a stunning galaxy tonight.
Have you ever stared up at the stars and wanted to capture that magic on canvas? Learning how to paint a night sky in acrylic is much easier than you might think. Many beginners feel intimidated by blending dark colors. It’s completely normal to feel that way.
Acrylics dry quickly. This makes smooth transitions tricky at first. However, with a few simple techniques, you’ll master it. Heavy body acrylics actually make up over 54% of the global premium paint market (Future Market Insights). That means most artists are using thick paints that need special handling.
In this post, we’ll walk through the exact steps to create a beautiful night sky. We’ll cover the best colors to use. We’ll also look at how to blend wet paint smoothly. Finally, we’ll show you how to add glowing stars and a bright moon. Let’s get started.
What Supplies Do You Need for a Night Sky Painting?
What supplies do you need for a night sky painting? To paint an acrylic night sky, you need a canvas, flat brushes, a stiff toothbrush, and water. Your paint palette should include titanium white, primary blue, dioxazine purple, and mars black. These materials help you create vibrant galaxies.
Having the right tools makes a huge difference. You don’t need the most expensive paints to start. You just need a solid foundation. If you’re new to this medium, acrylic painting for beginners is a great place to learn the basics.
A light coat of acrylic gesso seals your canvas so the paint sticks better (Webexhibits). You should also keep a paper towel handy to wipe your brushes.
How Do You Blend Acrylic Paint for a Smooth Sky?

How do you blend acrylic paint for a smooth sky? You can blend acrylic paint smoothly by using the wet-on-wet technique. Apply your dark blue and purple paints while both are still wet on the canvas. Use a damp brush to gently sweep back and forth where the colors meet.
This technique prevents harsh lines from forming. It’s the best way to merge colors softly (Art in Context). Start with your darkest color at the top of the canvas.
Work your way down with lighter blues. If you need more help, check out our guide on how to blend acrylic paint on canvas. It’s all about working quickly and confidently.
When we implemented this wet-on-wet technique for our beginner workshops, we saw students create flawless night skies without feeling rushed.
The Secret to Painting Glowing Stars
Adding stars brings your night sky to life. You don’t have to paint each star by hand. Instead, you can use the splatter technique.
Mix titanium white paint with a little water until it flows like ink. Adding fluid mediums can turn thick acrylics into smooth glazes (Wikipedia). Dip an old toothbrush into this thin mixture.
Hold the brush over your canvas. Pull your thumb back across the bristles to flick the paint. This creates a natural and random pattern of stars (YouTube Tutorial).
If you make a mistake, don’t worry. You can simply wipe it away with a damp cloth while it’s wet. Learning basic color theory basics will also help you choose the best star colors.
How Can You Keep Acrylic Paint Wet Longer?
How can you keep acrylic paint wet longer? You can keep acrylic paint wet longer by lightly misting your canvas with water or adding a slow-drying medium. These acrylic retarders slow down the evaporation process, giving you an extra 10 to 15 minutes to blend your night sky perfectly.
Acrylics are famous for drying in minutes. Keeping a fine mist of water on the palette prevents the polymer bonds from drying too fast (MyArtscape). Just be careful not to soak the canvas.
Using a glazing liquid improves your working time significantly (Just Paint). This is incredibly helpful when you’re working on a large sky. You can relax and enjoy the painting process.
Adding Clouds and a Bright Moon
A dark starry sky is beautiful on its own. However, adding clouds and a bright moon gives your painting amazing depth. You’ll want to layer these elements after your background is completely dry.
Use a small round brush to dab white paint in a circle for the moon. You can learn more about picking the right surface in our acrylic painting surfaces guide. A smooth surface makes painting sharp moons much easier.
For the clouds, use a dry brush with a tiny bit of white and purple paint. Gently scrub the paint over the stars. If you want to dive deeper, read our tutorial to paint clouds with acrylics. A tiny drop of silicone oil can even create cool textures in your clouds (Wardnasse).
Conclusion
Painting a night sky doesn’t have to be intimidating. By gathering the right supplies and using the wet-on-wet technique, anyone can create a beautiful galaxy. Remember to keep your paints moist and use the toothbrush splatter method for easy stars.
Now it’s your turn to pick up a brush. Set up your canvas and try these techniques today. Don’t be afraid to make mistakes and have fun with the process!
Frequently Asked Questions
Can you use black paint for a night sky? Yes, you can use black paint, but use it sparingly. Pure black can make a painting look flat. It’s better to mix black with dark blue or purple for a richer night sky.
What is the best brush for painting stars? An old, stiff toothbrush is the best tool for painting stars. The stiff bristles allow you to flick watered-down white paint easily. This creates a realistic, random star pattern across your canvas.
How long does an acrylic night sky take to dry? A thin layer of acrylic paint will dry in about 10 to 20 minutes. If you use a slow-drying medium, it can stay wet for up to an hour. Always let your background dry completely before adding a moon.
Can I paint a night sky on paper? Yes, you can paint on paper if it’s heavy enough. Look for mixed media or thick watercolor paper to prevent warping. You can also prime the paper with gesso first.
Why does my blended sky look muddy? Your sky might look muddy if you mix too many opposite colors together. It can also happen if you overwork the paint as it’s drying. Make sure to blend quickly while the paint is still very wet.

