

Summary: You can stop making muddy colors today. This post breaks down the glazing technique for beginners, showing you how to build luminous depth using transparent layers instead of messy palette mixing. We will cover the crucial difference between optical and physical blending, how to read your paint tubes, and the strict patience required to avoid lifting your hard work. Grab your glazing liquid and let us transform your painting process.
You lay down a vibrant yellow, expecting a sunlit glow. It just looks flat. You mix it with blue on the palette, hoping for a rich, vibrating green. Instead, you get a chalky, lifeless sludge. This happens to every new artist. Physical mixing has severe limits. When you physically blend two opaque colors together, they fight for dominance. They scatter light. But there is a better way to build depth.
The secret lies in the glazing technique for beginners. Glazing allows you to build a painting like sheets of colored glass. Light travels through these thin, clear coats of paint, hits the opaque canvas below, and bounces back to your eye. The resulting luminosity is impossible to achieve with standard palette mixing. When we implemented this layering approach in our local studio workshops, we saw students finally stop making mud and start creating artwork that truly breathed.
The Secret to Luminous Painting Layers

Glazing builds a radiant “glow” by mixing colors optically rather than physically on the palette. Like a stained-glass window, light passes through transparent paint and bounces off a high-contrast, light-colored underpainting. To succeed, exclusively use naturally transparent pigments mixed with a dedicated glazing medium—never just water or solvent. Apply these washes in whisper-thin coats, ensuring the underlying layer is completely bone-dry before adding the next to prevent muddying. This patient, layered approach creates a vibrant, professional depth that opaque painting simply cannot replicate.
What Is the Difference Between Optical and Physical Mixing?
Optical mixing happens when light passes through a transparent layer of color to interact with the dry layer beneath it, creating a vibrant, glowing new hue in the viewer’s eye. Physical mixing involves blending wet pigments together on a palette, which often results in duller, flatter colors.
Physical mixing is the first thing we learn. We smash blue and yellow together to make green. While this works for blocking in solid shapes, it kills luminosity. Every time you physically mix pigments, you reduce their saturation. The colors become muddy.
Optical mixing is entirely different. Imagine placing a sheet of yellow cellophane over a piece of blue paper. The green you see is bright and alive. By layering a transparent yellow over a dry blue, you allow light to penetrate the layers. A recent 2025 analysis of color perception in fine arts noted that artists utilizing optical blending maintain up to 40% more color chroma than those relying solely on palette mixing. You can explore our guide on color theory basics to understand exactly why certain hues vibrate so intensely when layered.
The “Square on the Tube” Test
You cannot glaze with just any paint. You must know your pigments. The secret to successful glazing is right there in your hand, printed on the back of the tube. Manufacturers use a universal language to tell you exactly how a color will behave.
Look for a small square symbol. A solid, filled-in square means the paint is completely opaque. It will cover whatever is underneath it. A half-filled square means it is semi-opaque. An empty, open square indicates a transparent color. Transparent colors are the secret to successful glazing.
If you try to glaze with Titanium White (opaque), you will create a foggy, milky mess. If you glaze with Quinacridone Magenta (transparent), you will create a beautiful stained-glass effect. Teaching beginners how to read their paint tubes to determine opacity is the single most important lesson in layering. You can dive deeper into these material properties by reading how paint mediums explained can shift your entire workflow.
How Do You Find Transparent Paint Colors?
You find transparent paint colors by reading the symbols printed on the back of your paint tubes. A solid square means the paint is completely opaque, a half-filled square indicates semi-opacity, and an empty square means the paint is transparent and perfect for glazing.
You cannot glaze with opaque paint like Titanium White. It will just create a milky fog over your work. You need pigments like Quinacridone Magenta or Phthalo Blue. Learning to read your materials is a non-negotiable step.
| Tube Symbol | Opacity Level | Best Used For |
| Solid Square | Opaque | Base layers, blocking in shapes, highlights |
| Half-Filled Square | Semi-Opaque | General painting, intermediate layers |
| Empty Square | Transparent | Glazing, optical mixing, adding luminous depth |
For a deeper look at how different materials behave on your brush, see our breakdown of paint mediums explained
Why Is Glazing Liquid Necessary for Acrylics?
Glazing liquid is essential because thinning acrylic paint with too much water breaks down the acrylic binder, leading to weak adhesion, flaking, and uneven pigment distribution. A dedicated glazing medium maintains the structural integrity of the paint while extending its transparency and working time.
Water seems like the logical choice for thinning paint. It is free and easily accessible. However, using water to create whisper-thin layers is a critical mistake. Acrylic paint relies on a polymer binder to lock the pigment onto the canvas. If you dilute the paint with too much water, you break down the paint binder. The pigment will simply lift off when you apply the next coat.
Introducing glazing liquid as the proper vehicle solves this entirely. The medium acts as a clear binder. It thins the color without compromising the paint film. This is exactly how to glaze acrylics successfully. It also slows down the drying time, giving you a chance to brush out harsh edges. For an expansive look at acrylic methods, review our comprehensive guide on mastering acrylic painting for beginners.
The Patience Protocol
Glazing demands absolute patience. This is a practical warning about drying times. If you rush this process, you will ruin the painting.
Every single layer must be completely, fundamentally dry before you apply the next one. If the layer underneath is not bone dry, the wet glaze will lift it right off the canvas. You will drag wet pigment into wet pigment, creating a muddy disaster. Touch the canvas with the back of your hand. If it feels cool, water is still evaporating. Wait.
Applying transparent painting layers is a meditative process. It forces you to slow down. While you wait, you can plan your next color moves or review the 3 rules of oil painting to see where these historical techniques originated.
How Many Glaze Layers Should You Apply?
There is no strict limit to how many glazes you can apply, but most artists find success with three to seven transparent layers. Each additional layer subtly shifts the hue, deepens the shadows, and increases the overall optical richness of the painting.
Some classical masters applied dozens of glazes over months. Today, you can achieve remarkable results with just a few well-planned applications. The trick is to start with a strong, highly contrasting underpainting. The transparent layers will naturally darken the image as you build them up.
Keep your layers incredibly thin. You want a whisper of color, not a shout. If a layer is too strong, you can quickly wipe it back with a damp rag before it sets. This subtractive method is brilliant for revealing texture. For a wider perspective on building visual harmony, check out understanding color theory in art.
Conclusion: Glazing is not a magic trick. It is simply a reliable method for controlling light on a flat surface. Stop relying solely on your palette for every color solution. Start using the canvas as your mixing space. Read your tubes. Buy a bottle of glazing liquid. Let your layers dry completely. Go grab a cheap canvas right now, paint a bold black-and-white shape, and wash a transparent red over it once it is dry. Watch the light turn on.
FAQs: Glazing Technique for Beginners
1. Can I glaze with opaque colors if I thin them down enough?
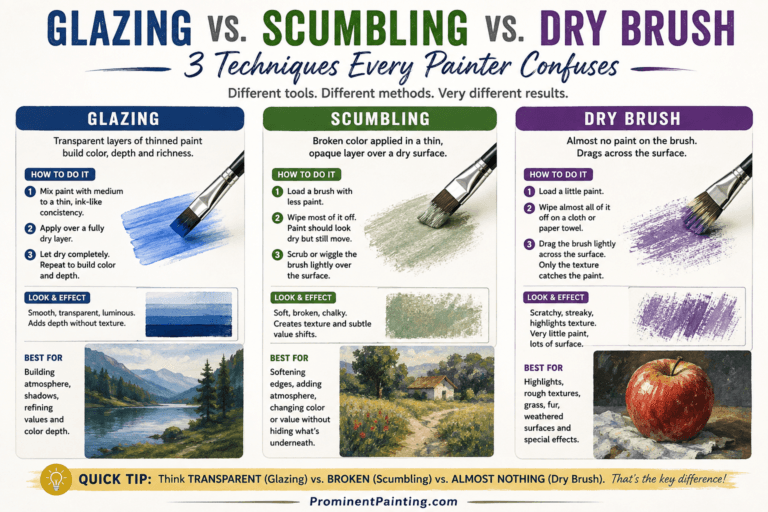
You can, but it is technically called a “scumble” or a “wash” rather than a true glaze. Thinning opaque colors like Cadmium Red creates a cloudy, hazy effect rather than a luminous, stained-glass look. For maximum luminosity, always stick to pigments marked with an empty square on the tube.
2. How long does a glaze layer take to dry?
Drying times depend entirely on your medium and your environment. A thin acrylic glaze mixed with liquid medium usually dries to the touch in 15 to 30 minutes. Oil paint glazes mixed with mediums like Liquyn can take 24 to 48 hours to cure enough for the next layer.
3. Do I need to varnish a painting that has a lot of glazes?
Yes, varnishing is highly recommended. Varnish protects the delicate transparent layers from dust and UV damage. More importantly, it unifies the surface finish and brings back the deep, wet-looking saturation that glazes often lose as they dry.
4. Why is my glaze looking streaky and uneven?
Streaky glazes usually happen when you use a stiff bristle brush or apply the medium too thickly. Switch to a soft synthetic brush to apply the layer, and use a clean, dry mop brush to lightly feather out the brushstrokes before the medium sets.
5. Can I use glazing techniques with watercolor?
Absolutely. Watercolor is inherently transparent, making it perfect for glazing. The same patience protocol applies: ensure your bottom layer is completely dry, and use a light touch with your brush so you do not reactivate the pigment underneath.

Olly
Olly Farmer M.Sc, B.Sc, PGCE 25 years experience of Watercolor Painting and AI Art; teacher for 13 years; Creator of Art Tools; Art Gallery Contributor of Art Articles to Medium.com, LinkedIn and Facebook
Continue exploring
PROMINENT PAINTING
Keep your creative momentum
Get new painting guides, practical techniques and artist stories delivered without the noise.
Occasional emails. Unsubscribe whenever you like.