
Have you ever felt so overwhelmed that your brain feels like a tangled ball of yarn? We have all been there. In 2025, finding a way to untangle that mental knot is more important than ever. Enter Neurographic Art for Beginners – a fascinating blend of psychology and art that does exactly that.
Unlike traditional sketching where you might worry about perspective or shading, Neurographic art is not about drawing what you see; it is about drawing what you feel. It is a method designed to transform your stress into a beautiful, abstract creation while literally rewiring your brain.
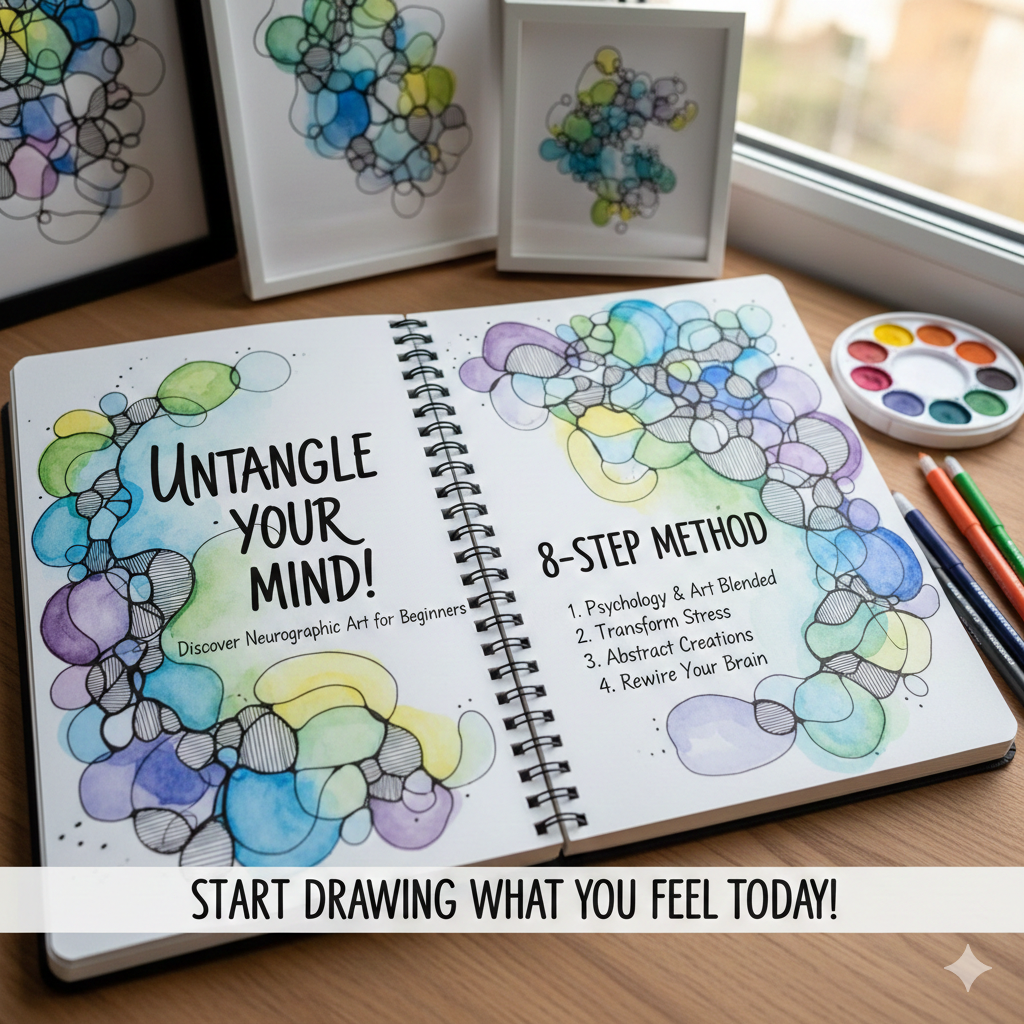
Whether you are an experienced artist or someone who hasn’t picked up a marker since kindergarten, this guide will walk you through the science, the supplies, and the strict 8-step algorithm that makes this technique work.
Key Takeaways:
- It is Science, Not Just Art: Based on the principles of neuroplasticity and created by psychologist Pavel Piskarev.
- The “Mosaic” Mistake: Beginners often color incorrectly; we will teach you the rule of “Archetyping” to fix this.
- Strict Algorithm: There are 8 specific steps to follow for the method to be effective therapeutically.
- Low Cost: You can start with a simple sharpie and paper, though we will cover the best tools for the job.

What is Neurographic Art? (And What It Isn’t)
To understand Neurographic Art for Beginners, you first need to separate the “pretty picture” from the “psychological tool.” While the results often look like stained glass or microscopic cells, the process is rooted in a specific methodology called Neurographica®.
The Origin Story: Pavel Piskarev and the 2014 Flight
The concept was born on a flight from Moscow to Zurich in 2014. Pavel Piskarev, a Russian psychologist, architect, and creative entrepreneur, sketched a spontaneous, intuitive line. He felt a shift in his mental state and realized he had stumbled upon a graphical alphabet that could communicate with the subconscious. Since then, the Psychology of Creativity Institute has formalized this into a teachable method.
The Science: Neuroplasticity and Rewiring Neural Pathways
Why does drawing lines help with anxiety? The secret lies in neuroplasticity. This is your brain’s ability to change and reorganize itself by forming new neural connections.
When you draw a “Neurographic Line” (a line that does not repeat itself and goes where you don’t expect it to), you force your brain to break its habitual patterns. If you are stressed, your brain is likely stuck in a “loop” of worry. By drawing these unpredictable lines and smoothing out the sharp corners (a process called conjoining), you mimic the creation of new neurons and soften your internal conflicts. It is essentially drawing for beginners with a PhD in psychology attached to it.
Critical Distinction: Neurographica® vs. NeuroArt
This is where many blogs get it wrong.
- Neurographica®: This is the trademarked, strict psychological method (The Algorithm for Removing Limitations) taught by certified instructors. It is a coaching tool.
- NeuroArt: This is the aesthetic style derived from the method. It uses the visual language (curved lines, rounding corners) for artistic expression rather than deep psychological therapy.
If you are looking for abstract art movements, NeuroArt fits right in. But if you want the mental health benefits, you must follow the algorithm we outline below.
The Core Benefits: Why Draw Lines?
Stress Reduction & Mindfulness
Drawing these bio-bionic lines engages your mirror neurons. Because the lines look organic—like rivers, lightning, or cracked earth—your brain recognizes them as natural. This induces a state of calm similar to meditation. It is an active form of mindfulness that keeps your hands busy, which is often easier for anxious people than sitting still.
Problem Solving via Subconscious Access
Have you ever had a problem you couldn’t “think” your way out of? That is because you were using logic. Neurographic Art for Beginners taps into the subconscious. By focusing on a topic (like “My Career” or “Health”) while drawing, you bypass your logical defenses. The drawing becomes a map of your problem, and as you round the corners and integrate the shapes, you are subconsciously modeling a solution.
Emotional Catharsis (The Safety Warning)
A fair warning: This process can be intense. The step known as Catharsis involves releasing pent-up energy. Some beginners report feeling sudden waves of emotion, heat in their body, or even a headache. This is normal—it means the method is moving energy. If you feel overwhelmed, do not stop; finishing the “Rounding” step usually resolves the tension.

Essential Supplies for Beginners
You do not need an expensive studio to start. In fact, limiting your tools can help focus your mind. However, using the right materials makes the process smoother.
Best Paper Choices
While you can use printer paper, the heavy ink saturation of Neurographic art often bleeds through.
- Mixed Media Paper: Ideal. It handles markers and watercolors without buckling.
- Cardstock: Good for strictly marker-based drawings.
- Avoid: Thin copy paper if you plan to use heavy markers.
Marker Recommendations
Line weight is crucial in Neurographica. You are creating a hierarchy of lines.
- Thick Permanent Marker (1.0mm – 3.0mm): Used for the main “Field Lines” and the initial catharsis. Sharpies work well here.
- Fine Liner (0.4mm – 0.5mm): Essential for the rounding process and adding detailed neural lines.
Coloring Tools
How you add color changes the energy of the piece.
- Highlighters: Excellent for beginners because they are transparent and blend easily over black lines.
- Colored Pencils: Allow for soft transitions and shading.
- Pastels: If you are debating soft pastel vs oil pastel, soft pastels are better here for large areas of smooth color, though they can be messy.
The 8-Step Basic Algorithm (The Golden Standard)
This is the heart of Neurographic Art for Beginners. This specific sequence is known as the “Algorithm for Removing Limitations” (ARL). Do not skip steps!
Step 1: Topic 1.0 (Setting the Intention)
Before you make a mark, set a timer for 2 minutes. Write down a list of words related to a topic that is stressing you out or a goal you want to achieve.
- Example: “Job Interview,” “Anxiety,” “New House.”
- Goal: You want to activate the neural networks related to this topic.
Step 2: Catharsis (The Discharge)
Focus on the stress of your topic. Take a deep breath. Now, transfer that feeling into your hand and release it onto the paper in a rapid, chaotic scribble.
- Time: 3-4 seconds max.
- Action: It should be fast and explosive. This creates the “chaos” we will now organize.
Step 3: Rounding (Conjoining)
This is the magic step. Look at your chaotic scribble. You will see many lines crossing each other, creating sharp angles (corners). In psychology, a sharp corner represents conflict (think of a spear or a thorn).
- The Technique: Use your marker to smooth out every single intersection. Fill in the corners so they become curves.
- The Effect: This transforms the conflict into harmony. It tells your brain, “Everything is safe; everything is connected.”
Step 4: Integration (Figure & Background)
Right now, your drawing is a floating knot in the middle of the page. You need to connect it to the world.
- Action: Extend the loose ends of your scribble to the edges of the paper using Neurographic lines.
- Visual: The drawing should look like it dissolves into the background. This symbolizes that you are not alone; your problem is connected to the resources of the universe.

Step 5: Archetyping (The Big Color Rule)
This is where Neurographic Art for Beginners differs from a coloring book.
- The Mistake: Do not color each tiny cell a different color. This creates a “Mosaic Effect,” which increases fragmentation (and anxiety).
- The Rule: You must color across the lines. One color should flow through at least 2-3 adjacent sections.
- Why? You are grouping small details into larger shapes (Archetypes). This helps your brain see the “big picture” rather than getting lost in the details.
- Tip: If you need inspiration, look at top 10 abstract artists to see how they use color blocks.
Step 6: Field Lines (The Power Lines)
Now, take your thickest marker. Draw 2 to 4 heavy, bold Neurographic lines across the entire drawing (usually from bottom to top or left to right).
- Meaning: These represent “divine energy,” the flow of the universe, or a power greater than yourself. They should pass through your existing drawing, picking up some lines and ignoring others.
Step 7: Fixation (The Solution Shape)
Look at your drawing. Can you see a circle, oval, or strong shape emerging?
- Action: Outline this shape with a thick marker. This represents the solution to your problem, even if you don’t logically know what it is yet. It fixes the energy of the drawing.
Step 8: Topic 2.0 (Reflection & Insight)
Turn your paper over. Write down how you feel now. Has your anxiety decreased? Did a new idea pop into your head? This reflection solidifies the neural changes.
Common Beginner Mistakes to Avoid
Even with the algorithm, it is easy to slip into old habits. To truly master Neurographic Art for Beginners, watch out for these traps.
The “Sine Wave” Trap

A true Piskarev Line is unpredictable. Beginners often draw “sine waves” (repetitive wavy lines like a snake).
- The Fix: If you feel your hand wanting to go up, force it to go slightly down. Surprise yourself. A repetitive line puts the brain to sleep; a Neurographic line wakes it up.
Floating Figures
Never leave your initial scribble “floating” in the center of the white space. In conceptual art, negative space is fine. In Neurographica, it represents isolation. Always extend lines to the edge of the page to ground your drawing.
Stopping Too Early
Many people stop after Step 5 (Coloring) because it looks pretty. However, the deep psychological power comes from Step 6 (Field Lines). These lines bring energy and movement that turns a static drawing into a dynamic one.
Neurographic Art FAQ
Here are the most common questions we get about Neurographic Art for Beginners.
Do I need to be an artist to do this?
Absolutely not. In fact, trained artists sometimes struggle more because they are trying to make it “look good” rather than “feel right.” If you can hold a marker, you can do this. It is one of the most accessible forms of art therapy techniques.
How long should one drawing take?
For a full “Algorithm for Removing Limitations,” expect to spend 45 to 90 minutes.
- Important: Once you start Step 3 (Rounding), try not to stop until that step is finished. Leaving a drawing full of sharp corners (conflicts) can leave you feeling unsettled.
Can I use digital tools?
Yes, you can use apps like Procreate. (See our guide on best digital painting and drawing apps). However, Piskarev recommends analog tools for beginners. The friction of the marker on paper provides tactile feedback to the brain that a smooth glass screen cannot replicate.
Moving Forward: Certification & Resources
If you find this method transforms your life, you might wonder about teaching it. Be careful—Neurographica is a protected trademark. You cannot teach the method without certification from the Psychology of Creativity Institute.
Official Courses vs. YouTube Tutorials
YouTube is great for learning the basics (like the rounding technique), but deep work requires a structured course. There is a hierarchy of learning:
| Level | Title | What You Can Do | Approx Cost |
|---|---|---|---|
| Level 0 | Beginner | Learn from free videos. Personal use only. | Free |
| Level 1 | Basic User | Official certificate. Learn 3 versions of the Algorithm. Personal use only. | $150 – $200 |
| Level 2 | Specialist | Use the method with clients (coaching/therapy). Cannot teach the method. | $850 – $1,000 |
| Level 3 | Instructor | Can teach the method and certify others. Deep dive into 9 algorithms. | $3,500+ |
If you are looking for free resources to get started, there are excellent free online art courses that touch on mindful drawing, though for official Neurographica, stick to certified instructors.
Conclusion: Your First Line Starts Now
Neurographic Art for Beginners is more than just a trend; it is a tool for self-management in a chaotic world. By following the algorithm, you aren’t just doodling—you are performing surgery on your own neural pathways, smoothing out the sharp edges of your anxiety, and coloring in a new reality.
The beauty of this art form is that there are no “bad” drawings. Every line you draw is a step toward a more integrated, peaceful self. So, grab a marker, think of a challenge you are facing, and let the line lead you to a solution.

