
Are you tired of spending half your studio time washing brushes? Do you look at the thick, juicy swirls on a Van Gogh canvas and wonder, “How did he do that?” If you are ready to trade soft blending for bold texture, it is time to master palette knife painting.
For many artists, the palette knife is just a tool for mixing colors on the palette. But in the hands of a master, it becomes a painting instrument capable of creating architectural ridges, sweeping landscapes, and the stunning 3D effect known as impasto.
In this guide, we are going to ditch the bristles and dive deep into the steel. We will cover everything from the physics of why thick paint cracks to the specific hand movements that prevent your vibrant colors from turning into mud.
Key Takeaways
- The Tool: Why you need a “cranked handle” painting knife, not a flat mixing knife.
- The Science: Understanding “Alligatoring” and drying times to save your work.
- The Technique: How to use Sgraffito and Broken Color for professional effects.
- The Fix: Solving the “muddy color” problem with the “Lay Amongst” method.

The Complete Guide to Palette Knife Painting: From Mixing to Masterpiece
Introduction: Why Ditch the Brush?
When you paint with a brush, the bristles absorb some of the paint and drag it across the canvas, naturally blending colors together. This is great for soft skin tones, but it can rob a painting of its energy. A palette knife, however, is a hard surface. It lays paint down exactly as it sits on the blade. The result? Pure, unadulterated color brilliance.
Historical Context
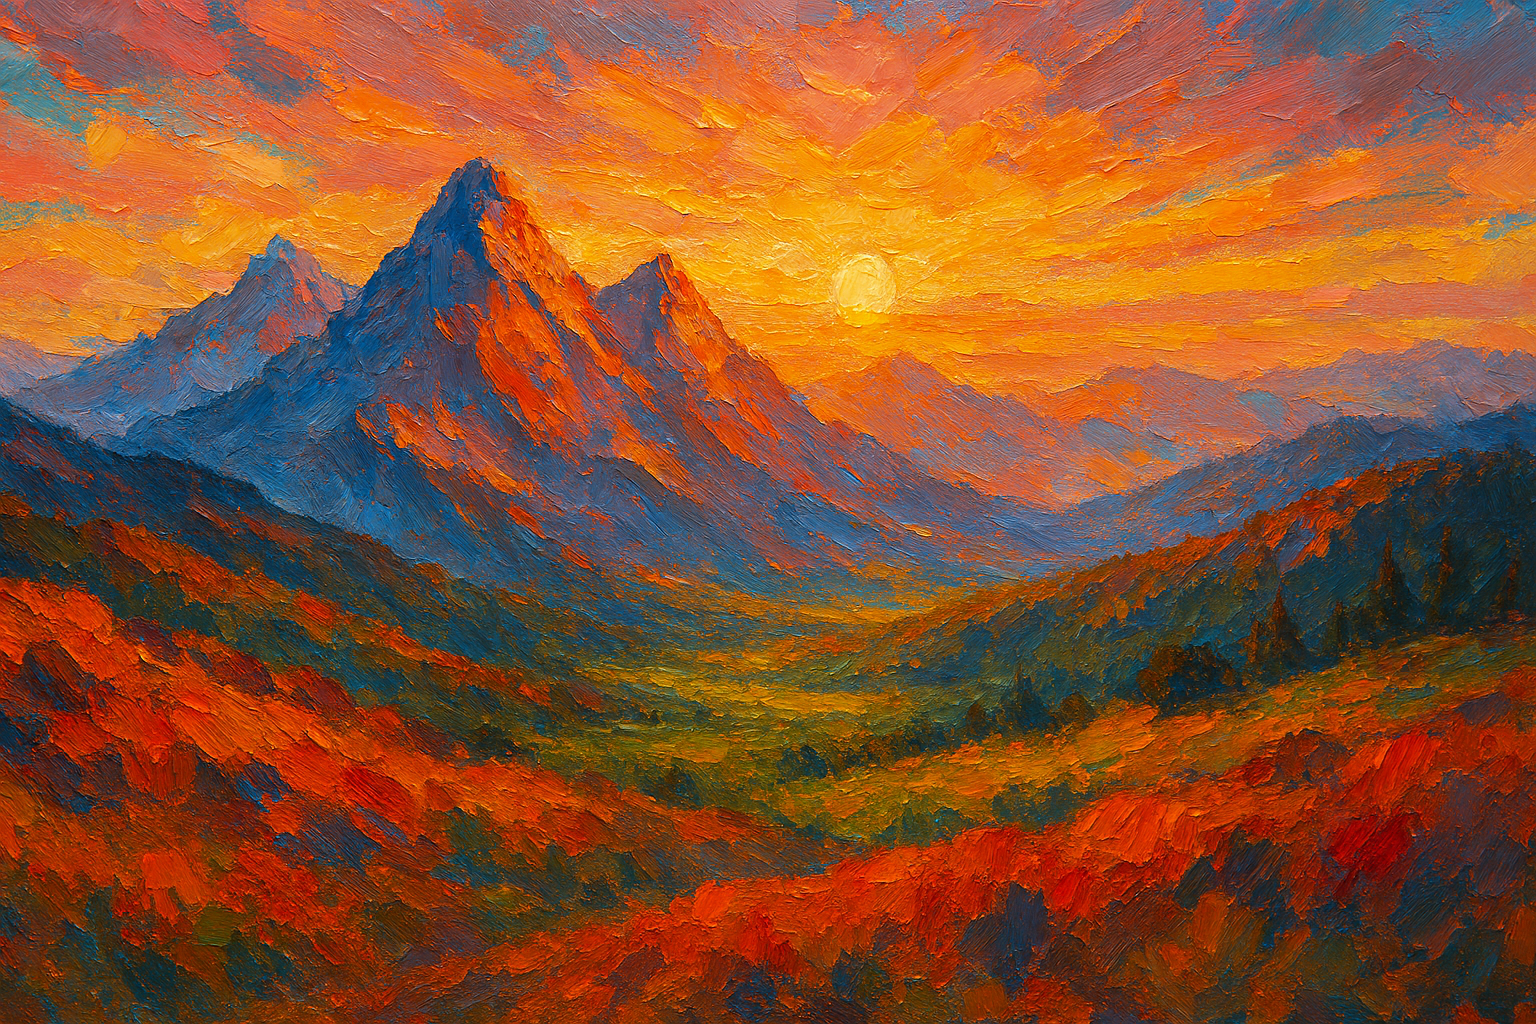
While artists have always used tools to mix paint, the shift to using the knife as a primary brush replacement really took off in the 19th Century. Gustave Courbet, a leader of the Realism movement, famously used a palette knife to pack thick layers of paint onto his landscapes. He wanted the paint to look like the rocks and earth he was depicting. Later, Vincent van Gogh and modern masters like Leonid Afremov utilized this technique to create emotional, vibrating movement in their work.
The Visual Difference
If you compare a brush painting to a knife painting, the difference is structural. Brush marks are fluid and soft. Knife marks are architectural; they have hard edges, flat planes, and physical height. This is called Impasto—an Italian word meaning “dough” or “mixture.”

Tools of the Trade: A Technical Buyer’s Guide
Not all knives are created equal. If you search for “palette knives” online, you will see hundreds of options. Here is how to filter out the junk.
Painting Knife vs. Palette Knife
This is the most common mistake beginners make.
- Palette Knife (Mixing Knife): These usually have a straight handle and a long, straight blade (like a spatula). They are designed for mixing piles of paint on your palette. If you try to paint on canvas with them, your knuckles will drag through your wet painting.
- Painting Knife: These have a cranked handle. The metal bar bends down and then out, lifting your hand away from the canvas surface. This is what you need.
Material Science: Plastic vs. Steel
You will see packs of white plastic knives for $5. Do not buy them.
- Plastic: The edges are jagged (microscopically), meaning they don’t scrape clean. They stain instantly, and they lack “snap.” You cannot control the pressure, and they eventually snap in half.
- Tempered Steel: Brands like RGM Italy or Liquitex use tempered steel. These blades are flexible but spring back to being perfectly straight. They have a sharp, smooth edge that allows for precise lines. They last a lifetime if cared for.
Blade Shapes & Their Specific Uses
Your knife shape dictates the mark you make. Here is a breakdown of the essentials:
| Blade Shape | Visual Description | Best Uses |
|---|---|---|
| Trowel / Teardrop | Rounded tip, wide belly. | The workhorse. Great for petals, leaves, and general coverage. |
| Diamond | Sharp pointed tip, angled sides. | Precision work. Creating thin lines (tree branches), sharp corners, and scratching. |
| Spatula / Straight | Long, rectangular, flat end. | Mixing on the palette. Large background blocks. creating horizon lines. |
| Fan / Offset | Wide, spreading shape. | Soft blending, large skies, painting clouds with a palette knife. |

Essential Materials & Mediums
You cannot just squeeze cheap paint onto a knife and expect a masterpiece. The consistency (viscosity) of the paint is critical.
Oil Paint Requirements
If your paint is too runny, it will just slide off the canvas. You need Heavy Body paints. If you are using standard tube oils, you might need to “bulk them up.”
- Liquin Impasto (Winsor & Newton): This is a gel medium that thickens the paint, speeds up drying time, and retains crisp brush/knife marks.
- Cold Wax Medium (Gamblin): A paste made of beeswax and solvent. It creates a matte finish and adds incredible volume to the paint without making it heavy.

For more on choosing the right paints, check out our guide on oil painting for beginners.
Acrylic Paint Requirements
Can you use a palette knife with acrylic paint? Yes, but acrylic shrinks when it dries. If you pile pure acrylic paint an inch thick, it might stay soft in the middle or pull away from the canvas.
To fix this, mix your acrylics with Modeling Paste or Heavy Gel Medium. These additives contain marble dust or polymers that provide structure, preventing the paint from shrinking significantly. Learn more about mastering acrylic painting here.
Core Techniques for Beginners to Pros
The Grip
Hold the knife like a conductor’s baton or a bicycle handle, not like a pen. Your thumb should be on top of the metal ferrule or the wooden handle, with your fingers wrapped loosely underneath. This grip keeps your knuckles elevated and allows you to use the flexibility of the blade.

Basic Strokes
- The Spread: Imagine buttering toast. Load paint on the underside of the blade. Place it flat against the canvas and drag.
- The Edge Line: Load a small roll of paint on the edge of the knife. Touch the canvas vertically to stamp a thin, straight line. Perfect for ship rigging, grasses, or tree trunks.
- The Press & Lift: Load the flat face of the knife with thick paint. Press it into the canvas and pull it straight off (like a suction cup). This creates an organic, rough texture ideal for rocks or foliage.
Advanced Techniques
- Sgraffito: This is the art of scratching away. Apply a thick layer of wet paint (e.g., dark blue). Take the sharp point of a diamond knife and scratch through it to reveal the dry layer underneath (e.g., yellow). This is great for signing your name or adding veins to leaves.
- Broken Color: Load your knife, then lightly skim it over the texture of the canvas weave. The paint will catch on the high points of the canvas but skip the valleys. This creates a vibrating optical effect where the underlayer shows through.
- Wet-on-Wet Blending: Instead of mixing orange on your palette, place a blob of red and a blob of yellow directly on the canvas. Swirl them once or twice with the knife. You get a marbled, fiery mix that looks far more interesting than a flat orange.

Solving the “Muddy Color” Problem
One of the biggest complaints from users on Reddit and art forums is: “Why is my palette knife paint muddy?”
Mud happens when you over-mix warm and cool colors, or when you apply too much pressure.
The “Lay Amongst” Technique
When painting with a knife, stop trying to blend everything. Use the “Lay Amongst” technique. If you are painting a sunset, place a stroke of pink next to a stroke of orange. Do not mash them together. Your eye will optically blend them from a distance.
The Pressure Rule
- Light Pressure: Use this when you want to lay a new color on top of a wet layer. Think of it like icing a cake—you don’t want to scrape up the crumbs.
- Heavy Pressure: Use this only when you want to scrape paint off or mix it into the layer below.
If you struggle with colors turning brown, review our color mixing primer.

Drying Times & Conservation Science
When you apply paint thickly (Impasto), you change the chemistry of how the painting cures. This is where physics comes in.
The Science of Cracking
Alligatoring is a nasty defect where the top layer of paint dries faster than the bottom layer. As the bottom layer eventually shrinks, it pulls the dry “skin” on top apart, creating cracks that look like reptile skin.
To prevent this, follow the Fat over Lean rule, even with knives. Ensure your bottom layers are lean (less oil, faster drying) and your top layers are fat (more oil/medium, slower drying). However, with Impasto, the sheer thickness is the variable.
Drying Time & Tech Specs
Below is a comparison of drying times for thick (3mm+) application layers.
| Medium Type | Touch Dry Time (Impasto Layer) | Full Cure Time | Risk of Cracking | Notes |
|---|---|---|---|---|
| Standard Oil Paint | 7 – 14 Days | 6 months – 2 years | High | Outer skin dries, inside stays wet. |
| Oil + Liquin Impasto | 1 – 3 Days | 3 – 6 months | Low | Speeds drying evenly throughout the layer. |
| Oil + Cold Wax | 2 – 5 Days | 4 – 8 months | Medium | Wax hardens but oil still needs to oxidize. |
| Heavy Body Acrylic | 24 – 48 Hours | 2 weeks | Low | Acrylics shrink! Use gel medium. |
| Alkyd Paints (Griffin) | 18 – 24 Hours | 2 – 4 months | Low | Great for fast knife work. |
Note: Drying times vary based on humidity and pigment type (e.g., Umbers dry fast, Reds dry slow).
If your painting does crack, don’t panic. There are ways to fix painting mistakes.
Step-by-Step Projects

Beginner: Simple Abstract Horizon
This project focuses on the Spread and Blending.
- Sky: Take a large trowel knife. Load white and blue. Spread it across the top half of the canvas using long, horizontal strokes. Let the colors marble.
- Horizon: Use the edge of a long spatula knife to press a dark line across the middle.
- Foreground: Use a “buttering” motion with yellows and greens. Don’t smooth it out—leave the ridges to catch the light.
Intermediate: Textured Floral
This focuses on Shape and Pressure.

- Background: Scrape a thin layer of neutral color over the canvas (scrape it hard so the texture of the canvas shows).
- Stems: Use the sharp edge of a diamond knife with green paint to stamp vertical lines.
- Petals: Load a rounded trowel knife with a lot of red paint. Press the knife gently against the canvas and pull inward toward the center of the flower. Lift the knife at the end of the stroke to leave a thick tip of paint.
For more inspiration on floral and landscape styles, explore our section on Impressionism.
Maintenance & Safety
One of the best parts of palette knife painting is the cleanup. You don’t need to wash bristles.
- Wiping: Simply wipe the metal blade with a paper towel or rag. It’s clean in 2 seconds.
- Dried Paint: Did you leave paint on your knife for a week? No problem. Since it’s metal, you can use a razor blade or a glass scraper to chip the dried paint right off. Do not do this with plastic knives.
- Safety: If you use solvents like Odorless Mineral Spirits (OMS) to clean your palette, ensure good ventilation. Even “odorless” solvents emit fumes.
Conclusion
Mastering palette knife painting is about letting go of perfection. It is about embracing the physical nature of the paint. It teaches you to be bold with your color and decisive with your strokes.
If you have been struggling with muddy colors or lack of depth in your work, put the brushes in the drawer for a week. Buy a single, high-quality, cranked-handle steel knife (like an RGM #5), a tube of heavy body paint, and see what happens. You might just find that the knife is the tool that finally unlocks your artistic voice.
Ready to stock up? Check out our recommendations for painting mediums to get that perfect impasto texture.
FAQ
What is the best palette knife size for large canvases?
For large canvases (24×30 inches and up), look for a large trowel or spatula knife with a blade length of 3 to 4 inches. This allows you to cover large areas quickly and create sweeping gestures that match the scale of the artwork.
How do I stop impasto oil paint from cracking?
Use a flexible support (like a high-quality canvas or rigid panel) and mix your paint with a flexible impasto medium like Liquin or a dedicated Impasto gel. Avoid applying fast-drying Alkyd mediums on top of slow-drying oils.
Can you use a palette knife with watercolor?
Generally, no. Watercolors are too fluid. However, you can use a palette knife to apply masking fluid or to scratch (sgraffito) into wet paper for texture. For thick application, Gouache is a better water-based alternative.
How do I clean dried acrylic paint off a palette knife?
If the knife is metal, soak it in warm soapy water for a few minutes, then use a razor blade to carefully scrape the paint off. If the knife is plastic, the dried acrylic may bond permanently; flexing it might snap the dried paint off, but the knife may break.
Why is my palette knife painting muddy?
You are likely over-working the paint on the canvas. Place the stroke and leave it alone. If you keep scraping and spreading wet colors over wet colors, they will eventually turn brown/gray.

