
Are you captivated by the ethereal beauty of watercolors but unsure where to start? Do you find yourself overwhelmed by the techniques and materials available? Perhaps you’ve admired J.M.W. Turner’s stunning landscapes and wondered how you could capture such vibrancy and emotion in your own work. If these questions resonate with you, you’re not alone. Many aspiring artists face the same challenges, and this guide is here to help you navigate the enchanting world of Turner’s watercolors.
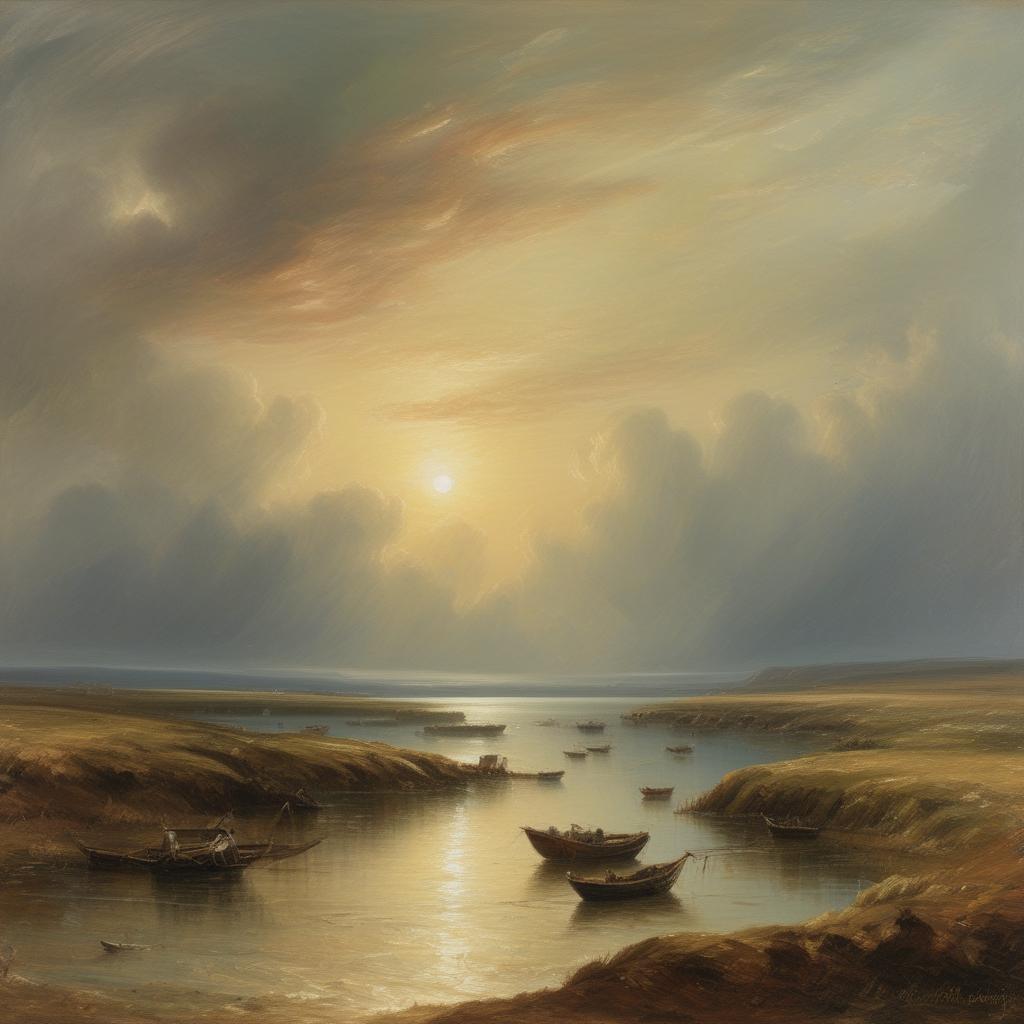
Turner, a master of light and color, transformed the medium of watercolor into a powerful tool for expressing the sublime beauty of nature. His innovative techniques and unique approach can inspire any beginner looking to explore watercolor painting. So, let’s dive into the art of Turner’s watercolors and discover how you can harness his methods to create your own masterpieces.
Understanding Turner’s Watercolors
Turner’s Legacy
Joseph Mallord William Turner (1775-1851) is often celebrated as one of the greatest watercolorists in history. His works are characterized by their dramatic use of light, color, and atmosphere. Turner’s watercolors were not merely preparatory sketches; they were standalone pieces of art that showcased his extraordinary ability to convey emotion through landscape.
Turner’s approach to watercolor was revolutionary. He often painted en plein air, capturing the fleeting effects of light and weather. This technique allowed him to develop a unique style that combined precision with spontaneity. His works often depict turbulent seas, glowing sunsets, and serene landscapes, all infused with a sense of movement and life.
The Materials Turner Used
To replicate Turner’s style, it’s essential to understand the materials he favored. Here’s a brief overview:
- Paper: Turner primarily used high-quality, thick watercolor paper that could withstand multiple washes and layers of paint. Look for 100% cotton paper with a rough or cold-pressed texture for a similar effect.
- Pigments: Turner’s palette was rich and varied, often using vibrant pigments that provided transparency and luminosity. He favored natural pigments, which are less lightfast than modern synthetic ones but offer a depth of color that is hard to replicate.
- Brushes: Turner used a variety of brushes, including round and flat brushes, to achieve different effects. A good set of brushes will allow you to experiment with both fine details and broad washes.
- Water: The quality of water can affect your painting. Use clean, filtered water to maintain the purity of your colors.

Table showcasing some of the most famous Watercolor Paintings by J.M.W. Turner
| Title | Year | Description | Gallery |
|---|---|---|---|
| Fishermen at Sea | 1796 | This watercolor depicts fishermen battling the waves off the Isle of Wight under a moonlit sky, showcasing Turner’s mastery of light and movement. | Fishermen at Sea |
| Calais Pier | 1803 | This watercolor captures a tumultuous scene of a storm at sea, reflecting Turner’s personal experience of nearly drowning during his travels. | Calais Pier |
| Sunrise with Sea Monsters | 1845 | An unfinished watercolor featuring a hazy sunrise over a turbulent sea, with hints of mythical creatures, showcasing Turner’s imaginative approach to natural phenomena. | Sunrise with Sea Monsters |
| The Slave Ship | 1840 | A poignant watercolor portraying the horrors of the slave trade, showing a ship in turbulent waters with human figures struggling against the waves. | The Slave Ship |
| Approach to Venice | 1844 | A breathtaking watercolor view of Venice, capturing the ethereal quality of light reflecting off the water, demonstrating Turner’s fascination with atmospheric effects. | Approach to Venice |
| Venice – Sunset, a Fisher | 1845 | This watercolor illustrates a serene sunset over the Venetian canals, highlighting Turner’s skill in creating mood and atmosphere through color. | Venice – Sunset, a Fisher |
| The Storm | 1840-1845 | A powerful watercolor depicting a storm at sea, showcasing Turner’s dramatic use of color and light to evoke emotion and movement. | The Storm |
This table highlights some of Turner’s most significant watercolors, providing visual references that enhance your understanding of his style and technique. Each image captures the essence of Turner’s innovative approach to watercolor painting, showcasing his ability to convey emotion and atmosphere through color and light.
Techniques to Emulate Turner
1. Embrace Transparency
Turner’s watercolors are known for their transparency. To achieve this, use a wet-on-wet technique, where you apply wet paint onto wet paper. This allows colors to blend beautifully, creating soft edges and luminous effects.
- Tip: Start with a light wash of color and gradually build up layers, allowing each layer to dry before adding more. This technique helps maintain transparency and depth.
2. Capture Light and Atmosphere
One of Turner’s hallmarks is his ability to capture the effects of light. To emulate this, focus on the following:
- Color Mixing: Use complementary colors to create shadows and highlights. For instance, mixing a bit of purple with yellow can create a stunning glow in a sunset.
- Glazing: After your initial wash dries, apply a thin layer of color over it. This glazing technique enhances depth and vibrancy.
3. Experiment with Movement
Turner often depicted movement in his landscapes, whether it was the crashing of waves or the fluttering of clouds. To capture movement:
- Brush Strokes: Use quick, sweeping strokes to suggest motion. A fan brush can be particularly effective for creating the illusion of waves or foliage.
- Dry Brush Technique: For texture, use a dry brush on dry paper. This technique can create the appearance of rough surfaces, such as rocky cliffs or tree bark.
Practical Steps for Beginners
Getting Started with Your First Painting
- Choose Your Subject: Start with a simple landscape, perhaps inspired by one of Turner’s works. Look for scenes with interesting light or weather effects.
- Sketch Your Composition: Lightly sketch your scene on the watercolor paper. Keep it simple; the focus should be on the colors and light.
- Select Your Palette: Choose a limited palette of colors that reflect the mood you want to convey. Turner often used a few key colors to create harmony in his works.
- Begin with a Wash: Apply a light wash of color to establish the background. Use a large brush for this step, allowing the colors to blend naturally.
- Layer and Detail: Gradually add layers, working from background to foreground. Use smaller brushes for details, and don’t be afraid to experiment with different techniques.
- Final Touches: Once you’re satisfied with your painting, step back and assess. Add any final highlights or details to enhance the overall composition.

Common Concerns for Beginners
What if I make a mistake?
Mistakes are part of the learning process. Turner himself often painted over areas he was dissatisfied with. Embrace the unexpected; sometimes, happy accidents can lead to stunning results.
How do I know when to stop?
It can be challenging to know when a painting is finished. A good rule of thumb is to step away for a moment and return with fresh eyes. If you feel the piece captures the emotion you intended, it’s likely complete.
Can I replicate Turner’s style?
While you can learn from Turner’s techniques, remember that your unique voice as an artist is what will set you apart. Use Turner’s methods as a foundation, but allow your individuality to shine through.
Conclusion
Exploring the art of Turner’s watercolors can be a rewarding journey for any beginner. By understanding his techniques and materials, you can develop your skills and create works that resonate with the same emotional depth and vibrancy. Remember, the key is to practice, experiment, and most importantly, enjoy the process of painting.

