

Watercolor pencils offer artists the unique ability to bridge the gap between drawing and painting, creating versatile artwork that combines the precision of pencil work with the flowing beauty of watercolor. Unlike regular colored pencils, these special tools activate with water, transforming crisp pencil lines into soft, fluid color washes that can rival traditional watercolor paints. Whether you’re a beginner just starting your artistic journey or an experienced artist looking to expand your repertoire, watercolor pencils provide exciting possibilities that go well beyond basic drawing techniques.
Key Points:
- Watercolor pencils combine the control of drawing with the fluidity of paint
- They can be used dry like regular colored pencils or activated with water
- Various techniques exist beyond basic drawing including wet-on-dry, wet-on-wet, and mixed media approaches
- Suitable for both beginners and experienced artists
- Require minimal supplies compared to traditional watercolor painting
Understanding Watercolor Pencils
Watercolor pencils look similar to regular colored pencils but contain water-soluble binders that activate when touched with water. This unique property allows artists to create artwork with crisp lines that can then be transformed into soft watercolor effects. The beauty of these versatile tools lies in their dual nature – they can be used completely dry for detailed line work or activated with water to produce painterly effects.
These pencils are particularly useful for artists who enjoy detail work but want the luminous qualities of watercolor. They’re also excellent for travelers, as they eliminate the need to carry liquid paints, water containers, and multiple brushes. With just a small set of watercolor pencils, a brush, and a water container, you can create stunning artwork anywhere.
Basic Techniques for Using Watercolor Pencils
Before diving into advanced methods, it’s important to master the fundamental techniques that make watercolor pencils so versatile:
Dry Application
The simplest approach is using the pencils dry, just like regular colored pencils. This gives you precise lines and detailed control. You can always activate the pigment later or leave parts of your drawing dry for interesting contrast.
Wet-on-Dry Technique
Apply your watercolor pencil to dry paper, then use a damp brush to activate and spread the pigment. This technique offers excellent control and is perfect for precise color placement. You can activate small areas at a time, making it ideal for detailed work.
Wet-on-Wet Technique
For a softer, more diffused effect, you can wet your paper first, then apply the watercolor pencil directly to the damp surface. The color will instantly bloom and spread in beautiful, unpredictable ways. This creates soft edges and flowing transitions.
Dipping the Pencil
For intense, saturated color, try dipping the tip of your watercolor pencil in water before drawing. This creates bold, vibrant lines that can be further blended with a brush.
Color Lifting
Unlike traditional colored pencils, watercolor pencil pigment can be lifted even after it dries. Use a clean, damp brush to lift color from your paper, creating highlights or correcting mistakes.
Advanced Texturing Techniques
Once you’ve mastered the basics, explore these texturing methods to add depth and visual interest to your artwork:
Hatching and Cross-Hatching
Create texture by drawing parallel lines (hatching) or crossing those lines (cross-hatching) before activating with water. The water will soften these marks while preserving some of the texture, creating interesting dimensional effects.
Stippling
Make numerous small dots with your pencil, varying the density to create shadows and form. When activated with water, these dots will blend slightly while maintaining a unique textured appearance.
Sgraffito
After applying and activating watercolor pencil, use a pointed tool to scratch into the damp surface, revealing the paper beneath. This creates fine white lines that add detail and highlights.
Salt Technique
Apply salt crystals to wet watercolor pencil areas. As the paper dries, the salt absorbs pigment creating a speckled, organic texture perfect for landscapes, stone textures, or starry skies.
Layering
Build depth by applying multiple layers, activating each one with water before adding the next. This creates rich, complex colors and can help achieve realistic effects in your artwork.
Mixed Media Integration
Watercolor pencils truly shine when combined with other art materials. This ability to integrate with various media makes them extraordinarily versatile for artistic expression.
Watercolor Pencils with Traditional Watercolors

Use watercolor pencils for detailed work and traditional watercolors for large washes and backgrounds. The combination allows for both broad atmospheric effects and precise details in the same piece.
Adding Ink
Waterproof ink pens work beautifully with watercolor pencils. Try creating an ink outline, then filling in with watercolor pencil and activating with water. Alternatively, apply and activate watercolor pencil first, then add ink details once the paper is completely dry.
Incorporating Collage Elements
Watercolor pencils can be used to color around and blend with collage elements, creating seamless mixed media artwork. Try adding decorative papers, photographs, or found objects to your watercolor pencil pieces.
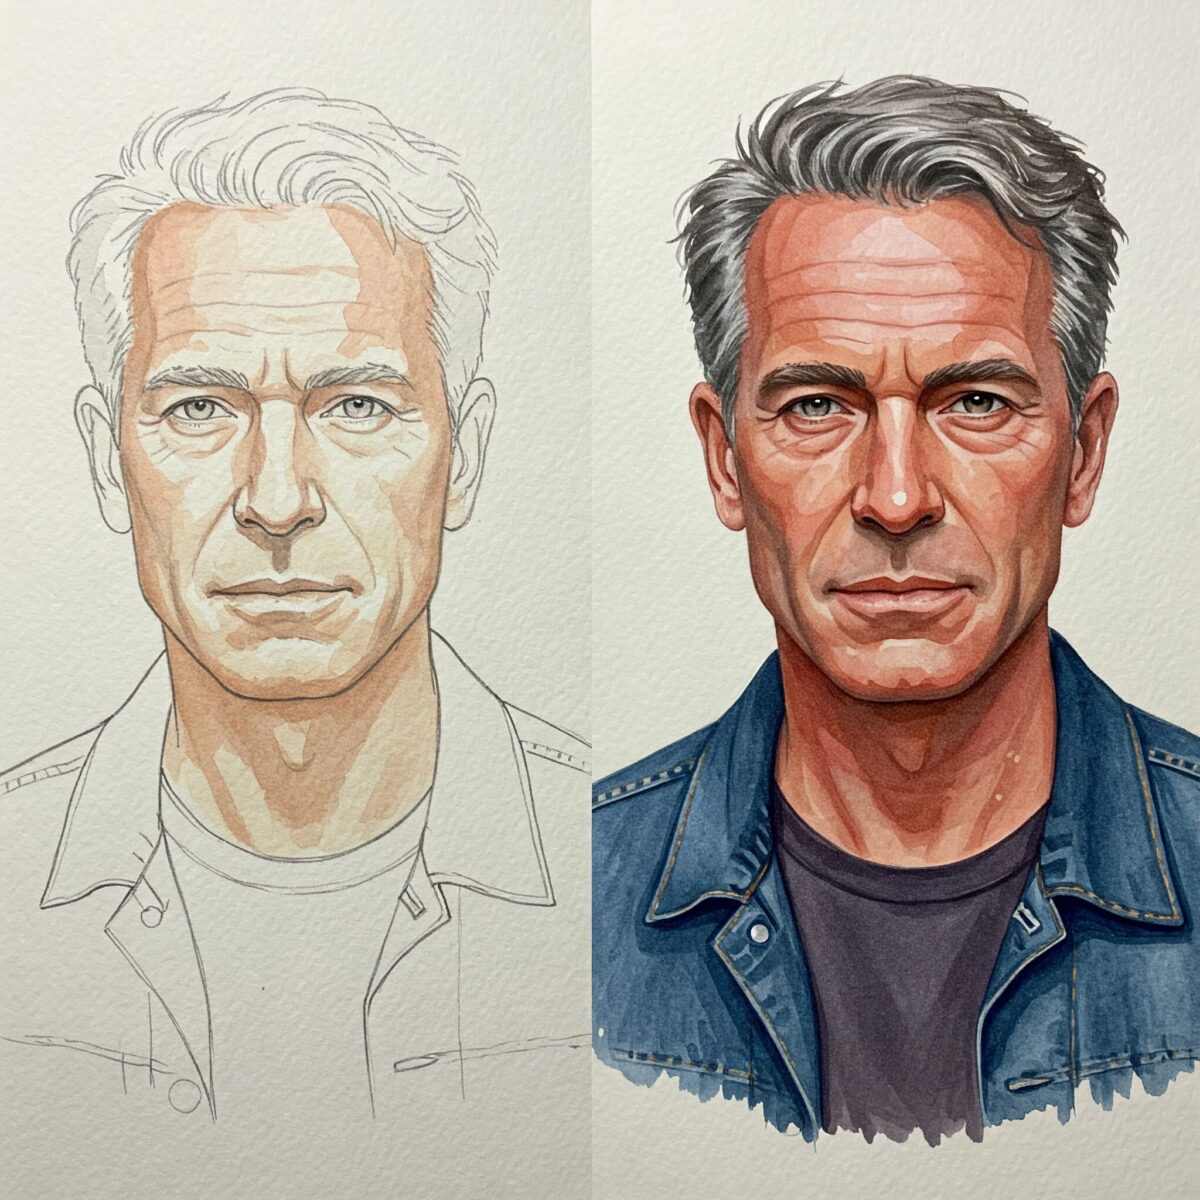
Portrait Techniques Using Watercolor Pencils
Portraits present unique challenges, but watercolor pencils are particularly well-suited for capturing the subtleties of the human face.
Building Skin Tones

Layer complementary colors to create natural-looking skin tones. For example, layer soft pinks, yellows, and even hints of blue or green beneath your main skin tone to create depth and realism. Activate with a light touch of water for subtle blending.
Creating Realistic Hair
Use dry pencil strokes to establish hair direction, then selectively activate certain areas while leaving others dry. This creates the illusion of individual strands while maintaining the overall flow of the hair.
Eye Details
For eyes, use dry pencil for precise details like eyelashes and pupil definition, with light water activation around the iris to create depth without losing the crisp details that make eyes look realistic.
Experimental Approaches to Consider
Don’t limit yourself to conventional techniques—watercolor pencils invite experimentation!

Watercolor Pencil Shavings
Sharpen your pencils over your paper and spray the shavings with water to create splatter effects and interesting textures.
Soluble vs. Permanent Media Resistance
Try using waterproof materials like wax crayons or oil pastels to create resist areas, then apply watercolor pencil over and around them. When activated with water, the pencil will only affect non-resistant areas.
Alternative Activation Methods
Beyond brushes, try using spray bottles, sponges, or even dipping portions of your paper in water for unique activation patterns and effects.
Working on Alternative Surfaces
While watercolor paper is standard, experiment with other surfaces like wood, fabric, or treated canvas to discover interesting interactions between the material and your watercolor pencils.
Best Practices and Tips
To get the most from your watercolor pencil artwork:
- Choose the right paper: A good quality watercolor paper (140lb/300gsm or heavier) will prevent buckling and allow proper pigment activation.
- Test your colors: Create a color chart to understand how each pencil looks both dry and when activated with water.
- Layer light to dark: Build up color gradually for more control and depth.
- Keep pencils sharp: A sharp point allows for precise detail work.
- Control water amount: Use a barely damp brush for subtle effects or a wetter brush for more flowing color.
- Be patient: Allow layers to dry completely before adding more detail to prevent unwanted blending.
- Protect finished work: Consider using a fixative spray designed for water-soluble media to protect your completed artwork.

Overcoming Common Challenges
Even experienced artists face challenges when fixing painting mistakes. Here are solutions to common watercolor pencil problems:
Problem: Muddy Colors
Solution: Work from light to dark, allow layers to dry completely between applications, and limit your palette to prevent overworking.
Problem: Paper Damage
Solution: Use appropriate watercolor paper and control water application. For very wet techniques, consider stretching your paper first as described in getting started with watercolors.
Problem: Hard Edges Where You Don’t Want Them
Solution: Keep edges wet if you want soft transitions, or work in smaller sections to maintain control over where and how your pigment flows.
Problem: Loss of Detail After Water Application
Solution: Apply water with precision using a small brush, or reserve your darkest lines and details for after the initial water activation has dried.
/
Finding Inspiration for Your Watercolor Pencil Art
Looking for creative ideas? Consider these starting points:
- Botanical illustrations combining precise line work with soft color washes
- Urban sketching with watercolor pencil details over loose watercolor backgrounds
- Wildlife art using textural techniques to capture fur, feathers, and scales
- Fantasy landscapes that utilize the full range from precise to atmospheric effects
- Abstract explorations focusing on color relationships and textures
You might also find inspiration in the work of contemporary artists featured in 25 amazing watercolor artists on Instagram.
“Watercolor pencils are like having the best of both worlds—the control of drawing with the magic of watercolor, all in one simple tool.”
Artist and educator Jane Davenport
Choosing Quality Watercolor Pencils
When selecting watercolor pencils, consider:
- Pigment quality: Higher-quality pencils contain more pigment for more vibrant colors.
- Lightfastness: Look for pencils rated for lightfastness if creating artwork for display or sale.
- Softness: Softer leads produce more pigment but wear down faster; harder leads offer more precision.
- Open stock availability: Being able to replace individual colors is cost-effective in the long run.
- Set size: Begin with a small set of 12-24 pencils to learn the techniques before investing in larger sets.
For beginners, brands like Faber-Castell, Derwent, and Prismacolor offer quality options at different price points, similar to recommendations in affordable art supplies.
Conclusion: The Endless Possibilities of Using Watercolor Pencils
Watercolor pencils truly represent a unique artistic medium that offers endless creative possibilities beyond just drawing. Their ability to transform from precise pencil marks to flowing watercolor washes makes them incredibly versatile for artists of all skill levels. Whether you’re creating detailed botanical illustrations, expressive portraits, or experimental abstract pieces, watercolor pencils provide a portable, accessible way to combine drawing and painting techniques. As you explore the various approaches covered in this guide, remember that experimentation is key to discovering your own unique style. With practice and a willingness to try new techniques, you’ll find that watercolor pencils can become one of the most rewarding and versatile tools in your artistic arsenal.
FAQ: Using Watercolor Pencils
What are the differences between watercolor pencils and regular colored pencils?
Watercolor pencils contain water-soluble binders that activate when touched with water, allowing the pigment to dissolve and behave like traditional watercolor paint. Regular colored pencils use wax or oil-based binders that resist water. Watercolor pencils can be used both dry (like regular colored pencils) or activated with water for painterly effects.
What are the best watercolor pencil brands?
Popular quality brands include Faber-Castell Albrecht Dürer, Derwent Inktense, Caran d’Ache Supracolor, Prismacolor Premier Watercolor Pencils, and Staedtler Karat Aquarell. The “best” brand depends on your budget and specific needs regarding color intensity, lightfastness, and softness.
Can you use watercolor pencils without water?
Absolutely! Watercolor pencils work perfectly well as standard colored pencils when used dry. Many artists use them this way for detailed work or combine both dry and wet techniques in the same piece for interesting visual variety and textural contrast.
How do watercolor pencils compare to watercolor paints?
Watercolor pencils offer more precision and control than traditional watercolor paints, making them excellent for detailed work. They’re also more portable and less messy. However, traditional watercolors typically provide more even washes for large areas and can be more easily diluted for transparent effects. Many artists use both mediums together to capitalize on their different strengths.
What’s the best way to fix mistakes in watercolor pencil art?
For minor corrections, use a damp brush to lift color (watercolor pencil pigment remains somewhat soluble even when dry). For larger mistakes, try lifting color with a slightly damp paper towel. Very stubborn marks might require light erasing when completely dry or covering with opaque media. In some cases, you can incorporate the “mistake” into your design by adding additional elements.

