
Imagine spending weeks perfecting a portrait. You’ve blended the skin tones to perfection, captured the light in the eyes, and varnished it with pride. Two years later, you look at it, and your heart sinks. The surface looks like a cracked desert floor. The paint is lifting. Your masterpiece is ruining itself in slow motion.
Why did this happen? You likely broke the golden law of oil painting: the Fat Over Lean rule.
If you are new to the medium, “fat over lean” might sound like diet advice, but it is actually the most critical technical concept you need to learn. Understanding how oil paint dries, how layers interact, and how to use mediums like Linseed Oil and Gamsol will ensure your art lasts for centuries, not just seasons.
In this comprehensive guide, we will break down the science of oil painting layering, debunk myths about modern mediums like Liquin Original, and provide you with an exclusive 2025 drying time chart.
Key Takeaways
- The Rule: Always apply flexible, oil-rich paint (Fat) over stiff, fast-drying paint (Lean).
- The Science: Oil paint doesn’t evaporate; it cures through oxidation, meaning layers must breathe.
- The Exception: Alkyd resins (like Liquin) are fast-drying but flexible, making them a modern exception to the traditional timeline.
- The Fix: Prevention is better than cure. Once cracking oil paint starts, it is nearly impossible to reverse.
What is the Fat Over Lean Rule?
 3")
At its simplest level, the Fat Over Lean rule is a structural strategy to keep your painting from falling apart. Oil paint films are not static; they move, expand, and contract as they age. If you construct your painting incorrectly, the layers will fight each other, and the painting will lose.
The Core Concept: Flexible over Rigid, Slow over Fast
To prevent paint film elasticity issues, every new layer of paint you put on a canvas needs to be more flexible than the layer underneath it.
- Lean Paint: Has less oil and more pigment (or solvent). It dries quickly and forms a rigid, matte surface.
- Fat Paint: Has more oil (medium) mixed in. It dries slowly and forms a flexible, glossy skin.
If you put a fast-drying, rigid layer (Lean) on top of a slow-drying, squishy layer (Fat), the bottom layer will keep moving as it cures. The top layer, unable to stretch, will snap and crack.
The “Sandwich” Analogy
Think of your painting like a sandwich to visualize oil painting layering:
- The Bread (Canvas/Gesso): The foundation. It needs to be stable.
- The Lean Meat (Underpainting): This is your first layer of paint mixed with a solvent like Turpentine or Gamsol. It grips the canvas and dries hard and fast.
- The Cheese (Fatty Glazes): These are your final layers, mixed with Linseed Oil or Stand Oil. They are shiny, flexible, and sit on top of the meat.
If you tried to put the bread on top of the cheese, and the cheese started to melt and move, the bread would tear apart.
Why it Matters: The Science of Oxidation
Unlike acrylics, which dry by evaporation (water leaving the paint), oil paint dries by oxidation and polymerization. The oil absorbs oxygen from the air and hardens into a solid plastic-like film.
- Why oil paint drying times vary: Different pigments absorb oxygen at different rates.
- The Danger Zone: A “fat” layer takes a long time to absorb oxygen. If you seal it off with a fast-drying “lean” layer, the oil underneath gets trapped. It will struggle to cure, and eventually, the pressure will shatter the top layer.
For more on getting started, check out our Introduction to Painting: A Beginner’s Guide.
The Science Behind the Rule (Simplified)
You don’t need a chemistry degree to paint, but understanding why materials behave the way they do gives you total control.
Oil Content & Flexibility (Young’s Modulus)
 4")
In physics, “Young’s Modulus” measures how easily a material stretches. In archival painting techniques, we look at the Pigment Volume Concentration (PVC).
- High PVC (Lean): Lots of pigment particles, very little oil. These particles pack together tightly. The film is strong but brittle.
- Low PVC (Fat): Lots of oil floating between pigment particles. The oil acts like a cushion. The film is weaker but very stretchy.
Stand Oil, for example, creates a film with 20-30% more elasticity than raw linseed oil. This makes it perfect for top layers that need to “ride” the movement of the canvas without breaking.
Drying vs. Curing
This is the most common mistake beginners make.
- Touch Dry: The paint feels dry to your finger. This happens in days.
- Chemically Cured: The oxidation process is complete. This takes 6 months to 100 years.
Just because an underlayer feels dry doesn’t mean it has stopped moving. Fat over lean ensures that the top layers remain flexible enough to handle the microscopic shifts of the bottom layers for decades.
The Cracking Mechanism
Imagine tectonic plates. If the ground beneath a city (the bottom layer) shifts, and the buildings (the top layer) are made of rigid glass, everything shatters. If the buildings are made of rubber, they sway and survive.
- Wide Cracks: Usually caused by painting a fast-drying layer (like Umber mixed with Gamsol) over a slow-drying layer (like Ivory Black mixed with oil) that hasn’t fully cured.
If you are struggling with layering, you might find our guide on Mastering Depth in Oil Painting helpful.
Fat vs. Lean: The Ultimate Material Guide
 5")
To follow the rule, you need to know which of your supplies are “fat” and which are “lean.”
Lean Materials (The Foundation)
These materials evaporate quickly or contain high pigment loads. Use these for your first layers.
- Solvents: Turpentine, Odorless Mineral Spirits (OMS), and Gamsol. These have zero fat content. They break down oil and evaporate completely.
- Acrylic Gesso: This is the ultimate lean surface. It is water-based and absorbent. Does gesso count as a fat layer? No, it is the leanest layer possible.
- “Dry” Pigments: Earth tones (Burnt Umber, Sienna) naturally dry faster and absorb more oil, making them naturally leaner than other colors.
Fat Materials (The Finish)
These add flexibility and gloss. Save these for the final stages.
- Drying Oils: Refined Linseed Oil is the standard. Walnut oil is slightly slower drying. Poppy oil is very slow drying (very fat).
- Stand Oil: This is linseed oil that has been heated to thicken it. It is the “fattest” medium available. It creates a smooth, enamel-like finish perfect for glazing.
- Heavy Impasto: Thick blobs of paint contain a lot of oil volume. Even without added medium, a thick stroke of Cadmium Red is “fatter” than a thin wash of it.
The “Confusing” Middle: Alkyds & Liquin
Here is where the research gets interesting. Millions of artists ask: “Is Liquin fat or lean?”
The Answer: Liquin (and other Alkyd Resin mediums) is a hybrid.
- Drying Time: Fast (Lean characteristic).
- Flexibility: High (Fat characteristic).
How to use it: Because Liquin Original dries overnight, it breaks the “Slow over Fast” part of the rule. However, because it creates a flexible plastic-like film, it adheres to the “Flexible over Rigid” rule.
- Strategy: Treat Liquin as a “Fat” medium in terms of layering order, but realize you can paint over it relatively quickly. Do not paint a pure solvent wash over a dried Liquin layer. The solvent will attack the resin.
For a deeper dive into supplies, read our Essential Guide to Painting Supplies.
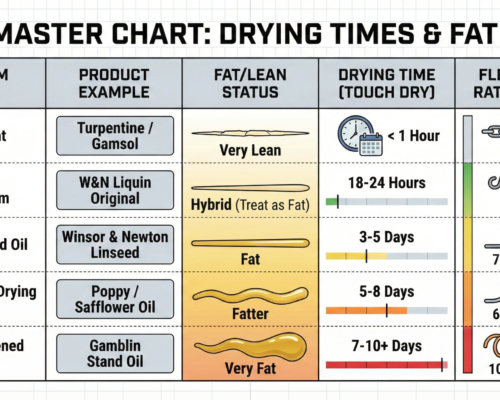
2025 Master Chart: Drying Times & Fat Index
Based on current formulations from major manufacturers like Winsor & Newton and Gamblin, here is the definitive guide to drying times and flexibility.
 6")
Table 1: The ‘Fat Index’ & Drying Times (2025 Standard)
| Medium Type | Product Example | Fat/Lean Status | Drying Time (Touch Dry) | Flexibility Rating (1-10) |
|---|---|---|---|---|
| Solvent | Turpentine / Gamsol | Very Lean | < 1 Hour | 0 (Brittle) |
| Alkyd Medium | W&N Liquin Original | Hybrid (Treat as Fat) | 18-24 Hours | 8 (High) |
| Refined Oil | Winsor & Newton Linseed | Fat | 3-5 Days | 7 (Moderate) |
| Semi-Drying Oil | Poppy / Safflower Oil | Fatter | 5-8 Days | 6 (Moderate) |
| Thickened Oil | Gamblin Stand Oil | Very Fat | 7-10+ Days | 10 (Very High) |
Table 2: Comparative Cost of Materials (2025 Estimates)
Quality matters. Artist grade vs student grade isn’t just about color vibrancy; it’s about oil content.
- Student Grade (e.g., Winton, 1980): $6.00 – $12.00. Often contains excess oil or stabilizers to extend shelf life. This makes the “fat” content unpredictable.
- Professional Grade (e.g., Artists’ Oil, Williamsburg): $20.00 – $45.00+. Precise pigment/oil ratios.
- Efficiency: A professional tube often covers 30% more area because of the high pigment load.
Tip: If you use student-grade paint, be extra careful with adding oil. The paint is already quite “fat” straight out of the tube due to fillers.
Need help choosing paints? See Choosing the Best Paints for Beginners.
Step-by-Step Layering Strategy
 7")
To ensure you never have cracking, follow this workflow for every session.
Layer 1: The Sketch / Imprimatura
- Mixture: Paint + Solvent (Gamsol/Turps).
- Texture: Watery, matte, dries in minutes.
- Goal: Establish composition. This is your leanest layer.
Layer 2: The Block-In / Underpainting
- Mixture: Straight paint from the tube (or very minimal solvent).
- Texture: Creamy but stiff.
- Goal: Establish color and value. Since the solvent has evaporated from Layer 1, this straight paint is “fatter” than the sketch.
Layer 3: Developing Form
- Mixture: Paint + Medium (e.g., 50% Gamsol / 50% Linseed Oil mix).
- Texture: Fluid, spreadable.
- Goal: Refining details. By adding oil, you are increasing the flexibility.
Layer 4: Final Glazes & Details
- Mixture: Paint + High Fat Medium (Pure Linseed Oil or Stand Oil).
- Texture: Glossy, transparent.
- Goal: Depth and saturation. This layer takes the longest to dry and is the most elastic.
Video Guide: For a visual walkthrough of this process, check out this tutorial:
Learn more about specific techniques in our article on Basic Still Life Techniques.
Common Pitfalls & Myth-Busting
 8")
Even experienced artists get tripped up by conflicting advice. Let’s clear the air.
“Thick over Thin” vs. “Fat over Lean”
Do they contradict? Generally, no.
Impasto (thick paint) usually forms a skin on the outside while staying wet inside for years. If you paint a thin, solvent-heavy wash over a thick impasto layer, the thin wash will crack as the impasto shifts beneath it.
- Rule: Thick layers should generally be on top. If you need a thick underpainting, ensure it is fully cured (waiting months) or use a fast-drying alkyd white.
The “Bone Dry” Myth
- Myth: “I can paint lean over fat if the bottom layer is dry.”
- Reality: No! As we learned, “touch dry” is not “cured.” If you paint a lean layer (brittle) over a dry-to-the-touch fat layer (flexible), the fat layer will continue to oxidize and move for years. The top layer will eventually crack.
The Cost of Quality
Using cheap “cooking oil” or non-drying oils (like Olive Oil) is a disaster. These oils satisfy an Iodine Value of <115, meaning they never truly harden. They will rot your canvas and turn rancid. Always use artist-grade oils.
If you are dealing with mistakes, read How to Fix Overworked Paintings.
FAQ: Troubleshooting Your Layers
 9")
Here are the answers to the most common questions regarding oil painting mediums.
Does Gesso count as a fat layer?
No. Acrylic Gesso is a polymer emulsion that dries by evaporation. It is considered a “lean” support. It is the perfect foundation for oil paint. Never apply gesso on top of oil paint; the oil will repel the water in the gesso, and it will peel off.
Can I paint lean over fat if it is dry?
We touched on this, but it bears repeating: No. The risk of delamination (layers peeling apart) is too high. If you accidentally made a layer too oily and need to paint over it, you should sand it down gently to create a “tooth” and use a medium that is equally flexible.
How do I fix a painting that cracked?
If the cracking is minor (hairline cracks), you might be able to stabilize it with a final varnish. However, wide “alligator” cracks are structural.
- Wait: Let it dry completely (1 year).
- Fill: Use an oil-based putty or wax-resin to fill the cracks.
- Retouch: Paint over the fill.
- Better option: Learn from the mistake and start fresh.
What is the best oil painting medium for beginners?
For simplicity and adherence to the rule, a mixture of 50% Linseed Oil and 50% Odorless Mineral Spirits (Gamsol) is the gold standard. It balances flow, drying time, and fat content perfectly for middle layers.
For more tips on starting out, visit Oil Painting for Beginners: Your Step-by-Step Journey.
Conclusion
 10")
Mastering the Fat Over Lean rule is the difference between a hobbyist and a craftsman. It ensures that the time, emotion, and money you pour into your art is preserved for future generations to enjoy.
Your Session Checklist:
- Start Lean: Solvents and thin paint first.
- Add Fat: Gradually add oil or medium to each subsequent layer.
- Watch the Alkyds: Remember Liquin is flexible but dries fast—treat it as a fat layer.
- Patience: Let layers dry to the touch before adding the next one.
Now that you understand the science, you are ready to paint with confidence. Grab your brushes, mix your mediums, and create something that lasts forever.

