
Have you ever looked at a painting and felt like you could step right into its world? That feeling of immense depth and distance often comes from a clever artistic trick called atmospheric perspective. It’s a technique used for centuries by master artists to make flat surfaces look three-dimensional and realistic. Whether you’re gazing at Leonardo da Vinci’s misty mountain backgrounds or Claude Monet’s hazy garden scenes, atmospheric perspectives create that magical sensation of endless space.
Key Takeaways
- Atmospheric perspective creates depth by mimicking how the atmosphere affects distant objects
- Objects far away appear lighter, bluer, less detailed, and less saturated than nearby elements
- The technique is based on real science: air particles scatter light over long distances
- Renaissance masters like Leonardo da Vinci perfected this method in works like the Mona Lisa
- You can apply atmospheric perspective in any medium, from traditional oil painting to digital art
- Combining this technique with other depth-creation methods produces the most convincing results

What is Atmospheric Perspective? Understanding the Basics
Atmospheric perspective, sometimes called aerial perspective, is a visual art technique that creates the illusion of depth by simulating the effects of the atmosphere on objects viewed from a distance. Think about standing at the edge of a valley and looking at a mountain range: the mountains close to you are sharp, vibrant, and full of detail, but those far away seem hazy, less colorful, and blend more with the sky. This natural phenomenon is what artists replicate to create depth in paintings.
Artists achieve this effect by making distant objects appear lighter in value (closer to white), cooler in color (more blue or purple), and less saturated (less intense color). They also reduce the contrast and sharpness of details on faraway objects. By subtly changing these elements, the artist guides your eye to perceive objects as being at different distances from the viewer.
The beauty of atmospheric perspective lies in its universality—whether you’re painting landscapes, portraits with backgrounds, or even abstract scenes, this technique helps establish spatial relationships that feel natural to our eyes.
The Science Behind the Art: How Our Eyes See Distance
The reason atmospheric perspective works so well is rooted in real-world optics and how our atmosphere interacts with light. Air isn’t perfectly clear; it’s filled with tiny particles like dust, water vapor, and pollutants. When light travels through these particles, especially over long distances, it scatters.
Blue light scatters more easily than other colors, which is why the sky often appears blue. As objects get further away, more of their light is scattered or absorbed by the atmosphere before it reaches our eyes. This scattering causes distant objects to:
- Lose their original color intensity
- Take on a bluish tint
- Appear less sharp and defined
- Show reduced contrast between light and dark areas
Understanding color theory in art helps explain why cool colors like blues and purples naturally seem to recede, while warm colors like reds and yellows appear to advance toward us. This scientific reality is what makes atmospheric perspective such a powerful and convincing technique.
Key Differences Between Atmospheric and Linear Perspective
Many beginning artists confuse these two essential depth-creation techniques. While both create the illusion of three-dimensional space on a flat surface, they work in fundamentally different ways:
| Feature | Atmospheric Perspective | Linear Perspective |
|---|---|---|
| Primary Focus | Illusion of depth through atmospheric effects | Illusion of depth through geometric construction |
| Key Elements | Color, value, saturation, detail, contrast | Vanishing points, horizon line, converging lines |
| Visual Changes | Distant objects appear lighter, bluer, less detailed, less saturated | Distant objects appear smaller, lines converge |
| Application | Best for landscapes, creating mood and scale | Best for architectural scenes, interiors, precise structures |
| Effect on Viewer | Creates a sense of haze, air, and emotional distance | Creates a sense of measurable distance and structured space |
| Historical Development | Refined during Renaissance, observed in nature | Mathematically developed in Renaissance Italy |
| Learning Curve | Requires color sensitivity and observational skills | Requires understanding of geometry and construction |
The most effective paintings often combine both techniques. For instance, Renaissance art masters used linear perspective for architectural elements while employing atmospheric perspective for distant landscapes visible through windows or in backgrounds.

Famous Artists and Masterpieces Employing Atmospheric Perspective

The use of atmospheric perspective dates back to ancient Greek and Roman art, but it was truly refined during the Renaissance. Leonardo da Vinci is perhaps the most famous exponent of this technique. His masterpiece, the Mona Lisa, famously uses sfumato, a soft, hazy technique closely related to atmospheric perspective, to blur the lines of the background mountains, creating immense depth and mystery.
Leonardo’s understanding of how atmosphere affects our vision was revolutionary. In his notebooks, he wrote extensively about how “the air between the eye and the object seen modifies the color of that object.” This scientific observation became the foundation of his painting technique, visible in works like Virgin of the Rocks where distant rock formations fade into cool, hazy tones.
Beyond the Renaissance, artists like J.M.W. Turner embraced atmospheric effects to capture dramatic weather and vast landscapes in his Romantic paintings. His seascapes and mountain scenes showcase extraordinary mastery of how light and atmosphere interact, often pushing the technique to its limits with ethereal, almost abstract effects.
Later, the Impressionists, such as Claude Monet, used broken color and light to evoke the fleeting atmospheric conditions of their outdoor scenes. Impressionism light techniques relied heavily on atmospheric perspective principles, with artists painting en plein air to directly observe how distance and atmosphere affected color and clarity.
“I want to paint the air in which the bridge, the house, and the boat are to be found – the beauty of the air around them, and that is nothing less than the impossible.”
Claude Monet
Contemporary landscape artists continue to utilize this powerful tool to create believable and immersive environments, demonstrating that atmospheric perspectives remain as relevant today as they were five centuries ago.
Understanding Atmospheric Perspective in Different Art Forms
While most commonly associated with traditional landscape painting, atmospheric perspective principles extend far beyond oil paintings on canvas.
In Watercolor Painting
Watercolor naturally lends itself to atmospheric effects due to its transparent nature. Artists can create beautiful gradations by diluting pigments and layering thin washes, allowing the white paper to contribute to the sense of lightness in distant areas.
In Digital Art
Digital artists have powerful tools for creating atmospheric perspective through layer adjustments, gradient overlays, and selective desaturation. Programs like Photoshop, Procreate, and Krita allow precise control over every aspect of atmospheric effects.
In Photography
While photographers capture real atmospheric effects, they can enhance them through:
- Adjusting contrast curves to reduce distant detail
- Applying selective color grading
- Using depth-of-field effects
- Adding subtle atmospheric haze in post-processing
In Three-Dimensional Art
Sculptors and installation artists can create atmospheric perspective through:
- Gradual size reduction of similar elements
- Progressive simplification of surface detail
- Strategic use of materials (transparent vs. opaque)
- Lighting techniques that fade distant areas
Applying Atmospheric Perspective in Your Own Art: A Step-by-Step Guide
Ready to add stunning depth to your own paintings, drawings, or digital art? Here are practical techniques to effectively use atmospheric perspectives in your work:
1. Reduce Contrast & Value
Make distant objects lighter and less contrasting. The darkest darks and lightest lights should be reserved for the foreground. As elements recede into the distance:
- Reduce the difference between shadows and highlights
- Lighten overall values progressively
- Avoid pure blacks in background elements
- Keep the strongest value contrasts in the foreground
2. Cool Down Colors
As objects recede, add more blue or purple to their base color. Warm colors (reds, yellows, oranges) tend to advance toward the viewer, while cool colors (blues, greens, purples) recede. This temperature shift should be gradual and natural.
For example, if you’re painting green trees:
- Foreground trees: Warm yellowy-greens
- Middle ground trees: Neutral greens
- Background trees: Cool blue-greens
3. Lessen Saturation
Desaturate colors for objects further away. Make them less vibrant and more muted. This doesn’t mean making everything gray—it means reducing the intensity while maintaining the essential color character.
4. Simplify Details
Avoid intricate details on distant elements. Use broader strokes and less defined forms. Sharp details belong in the foreground where they naturally draw the viewer’s eye. Think of it as visual storytelling: the foreground is where the action happens, and the background sets the stage.
5. Use Haze or Mist
Literally add hazy or misty effects to enhance the illusion, especially in landscapes. This can be achieved with:
- Thin washes or glazes in traditional media
- Light layering of semi-opaque colors
- Digital overlay layers with reduced opacity
- Scumbling techniques in oil or acrylic
Here is a step-by-step progression showing how atmospheric perspective transforms a flat landscape into a realistic scene.
1. The “Before” Scene: A Flat, Unrealistic View
This initial image is a flat landscape. All elements, from the rocks in the foreground to the mountains in the distance, are painted with the same level of detail, color saturation, and value (brightness). There is no sense of depth or distance, making the scene appear unnatural and cartoon-like.

2. Step 1: Progressive Value Changes
The first step in applying atmospheric perspective is to create a sense of depth using value. Objects that are further away appear lighter due to the scattering of light in the atmosphere. In this image, the distant mountains have been made lighter, while the foreground remains dark and contrasted.

3. Step 2: Color Temperature Shifts
Next, we introduce color temperature changes. The atmosphere scatters shorter, blue wavelengths of light more than longer, red wavelengths. As a result, distant objects appear cooler and bluer. This image takes the previous one and shifts the color of the distant mountains towards a cooler blue tone.

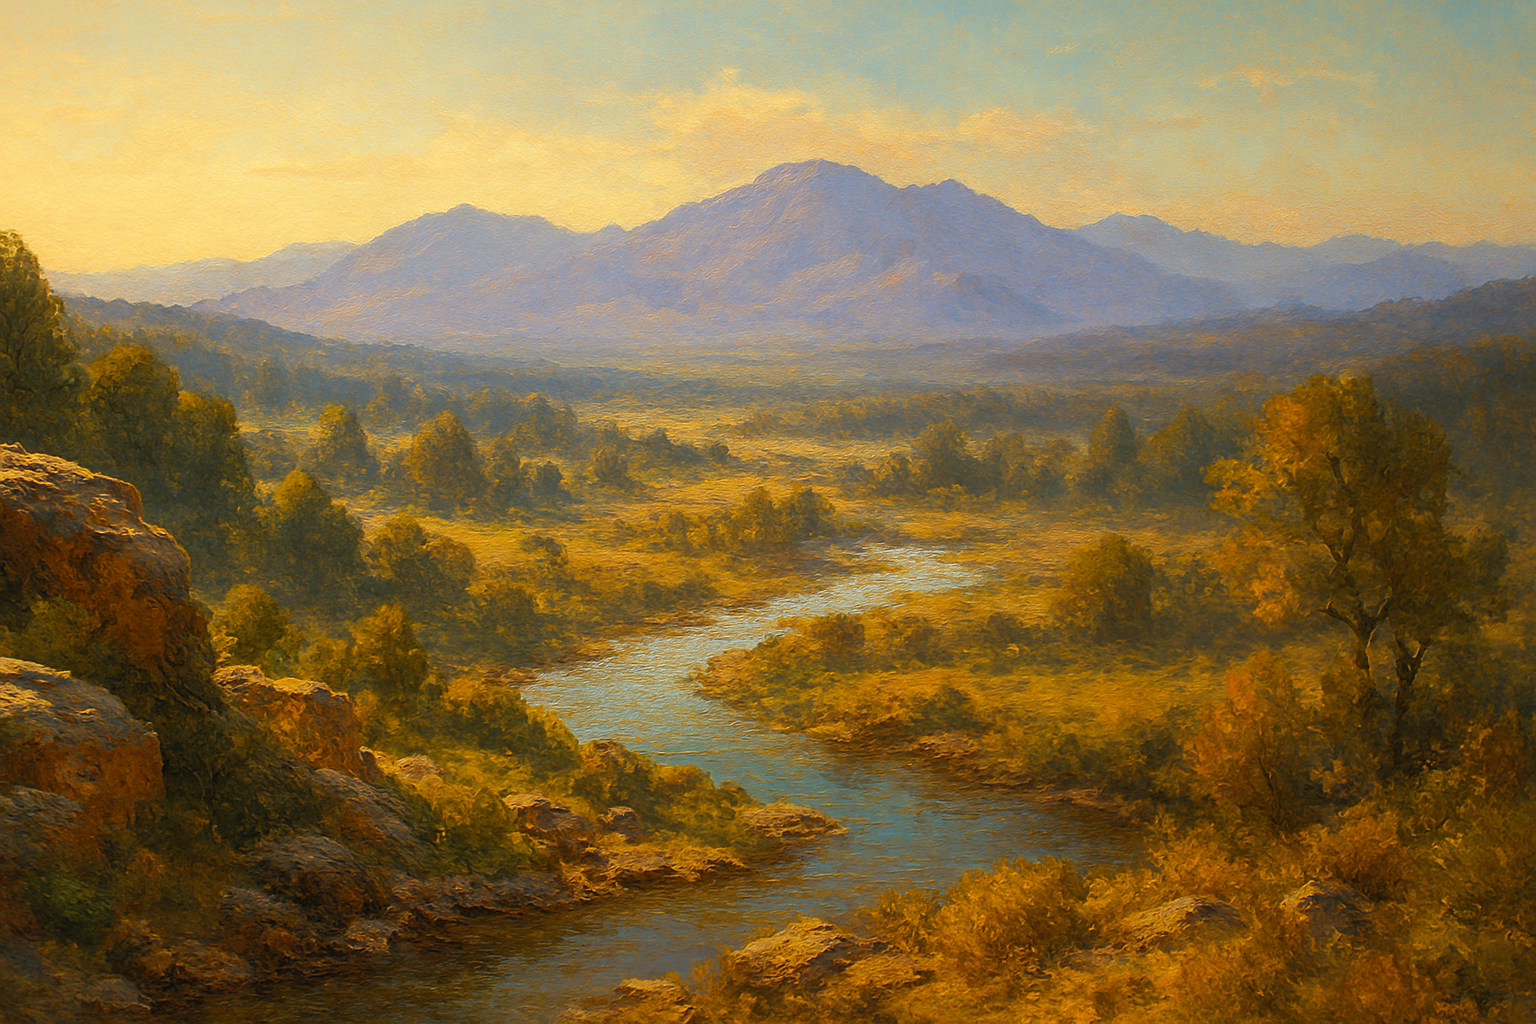
4. Step 3: Detail Reduction and Saturation Decrease
The final principles are detail reduction and saturation decrease. As objects recede into the distance, the atmosphere obscures details and makes colors appear less vibrant. This image completes the effect, making the distant mountains appear hazy, indistinct, and less saturated than the foreground. This final image is a finished landscape that demonstrates all the principles of atmospheric perspective.

Common Mistakes to Avoid When Using Atmospheric Perspectives
Even experienced artists can fall into these traps when working with atmospheric perspective:
Equal Detail Throughout
The Problem: Painting every element with the same level of detail flattens your composition and confuses the viewer’s eye about what’s important.
The Solution: Be intentional about where you place detail. Reserve your finest brushwork and sharpest edges for foreground elements.
Ignoring Color Temperature
The Problem: Using the same warm colors for both near and far objects makes everything feel like it’s on the same plane.
The Solution: Make a conscious effort to cool down your palette as you move toward the background, even if it feels exaggerated at first.
Insufficient Value Changes
The Problem: Not lightening distant objects enough results in a cramped, shallow space.
The Solution: Push your value changes further than you think necessary. Distant mountains should often be surprisingly light.
Inconsistent Light Source
The Problem: Having atmospheric effects that contradict your lighting direction confuses the viewer.
The Solution: Remember that atmospheric perspective works with your light source, not against it. Hazy effects should still respect where your light is coming from.
Over-Applying the Technique
The Problem: Making everything too hazy and light can result in a washed-out painting with no focal point.
The Solution: Use atmospheric perspective purposefully. Not every painting needs extreme depth, and sometimes a limited spatial range is more effective.
Practical Exercises for Mastering Atmospheric Perspective
Exercise 1: Value Scale Practice
Paint the same simple object (like a tree or building) five times across your canvas, progressively lightening each repetition. This trains your eye to see the value changes necessary for convincing depth.
Exercise 2: Color Temperature Gradient
Create a series of color swatches moving from warm to cool. Practice adding blue to various colors to see how they change. This builds your intuition for cooling colors naturally.
Exercise 3: Three-Plane Landscape
Divide your composition into three distinct planes: foreground, middle ground, and background. Paint each with deliberately different characteristics:
- Foreground: Dark values, warm colors, high saturation, sharp detail
- Middle ground: Medium values, neutral colors, moderate saturation, some detail
- Background: Light values, cool colors, low saturation, minimal detail
Exercise 4: Photo Study
Find a photograph of a landscape with clear depth and try to identify:
- Where value contrasts decrease
- Where colors cool down
- Where details simplify
- Where saturation reduces
Then create a simplified painted study emphasizing these observations.
Atmospheric Perspectives in Different Weather Conditions

The effects of atmospheric perspective change dramatically based on weather and time of day. Understanding these variations allows you to create more nuanced and realistic paintings.
Clear, Sunny Days
On bright days with low humidity, atmospheric effects are subtle. Colors remain relatively saturated even at moderate distances, though they still cool and lighten far away. Use this for paintings that need clarity and vibrancy.
Misty or Foggy Conditions
Fog dramatically accelerates atmospheric perspective effects. Objects become indistinct much closer to the viewer, and value contrasts reduce quickly. This creates mysterious, moody atmospheres perfect for emotional landscapes.
Overcast Days
Cloud cover softens light and reduces shadows, making atmospheric perspective effects more pronounced in terms of detail loss but less dramatic in value changes. Colors appear more muted throughout the scene.
Golden Hour
During sunrise or sunset, atmospheric perspective takes on warm tones rather than cool blues. Distant objects may appear golden, orange, or pink. This requires adapting the traditional cooling principle to match the warm ambient light.
Combining Atmospheric Perspective with Other Techniques
For truly masterful paintings, atmospheric perspectives work best when integrated with other depth-creation techniques:
With Linear Perspective
Use linear perspective for architectural elements and structured objects, while applying atmospheric perspective to natural elements and distant areas. This combination appears frequently in plein air art painting.
With Overlapping Forms
Overlapping clearly establishes which objects are in front of others. Combine this with atmospheric perspective to reinforce the depth relationship and create even stronger spatial cues.
With Size Variation
Objects naturally appear smaller as they recede. When you also apply atmospheric perspective to these increasingly small objects, the sense of vast distance becomes powerful and convincing.
With Edge Quality
Painting backgrounds with softer edges while keeping foreground edges crisp enhances the effects of atmospheric perspective and draws focus to your main subjects.
The Role of Atmospheric Perspective in Composition
Beyond just creating depth, atmospheric perspectives plays a crucial role in compositional design:
Creating Focal Points
By reserving your strongest contrasts, warmest colors, sharpest details, and highest saturation for specific areas, you naturally draw the viewer’s eye to those focal points. The atmospheric treatment of surrounding areas supports this visual hierarchy.
Establishing Mood
The degree and intensity of atmospheric effects directly influences the emotional tone of your painting. Heavy atmospheric perspective creates mystery and romance, while minimal atmospheric effects feel crisp and immediate.
Guiding the Eye
Progressive atmospheric changes create visual pathways that lead the viewer’s eye through the composition, from foreground to background, in a natural and pleasing way.
Conclusion: Seeing the World with New Depth Through Atmospheric Perspectives
Atmospheric perspective is more than just an art technique; it’s a reflection of how we naturally perceive the world around us. By understanding how the atmosphere affects our vision, artists can skillfully manipulate color, value, saturation, and detail to transport viewers into expansive, realistic scenes. Whether you’re an aspiring artist looking to master painting techniques or simply an art enthusiast deepening your appreciation, recognizing this powerful tool enriches your understanding of masterpieces from the past and empowers you to create your own works with incredible depth and visual impact.
The next time you look at a landscape—whether in nature or in a painting—pay attention to how objects change as they recede into the distance. Notice how that mountain range takes on a bluish cast, how those distant trees lose their individual leaves, how the fence posts become progressively lighter as they march toward the horizon. This is atmospheric perspectives at work, both in reality and in art. Start experimenting with these principles in your own work, and see the amazing difference it makes. The journey from flat surfaces to dimensional worlds is one of the most rewarding experiences in art.

FAQs:
What is the main purpose of atmospheric perspective?
The main purpose of atmospheric perspective is to create the illusion of depth and distance on a two-dimensional surface, making a painting or drawing appear more realistic and three-dimensional by mimicking how our eyes naturally perceive distant objects through layers of atmosphere.
Who invented atmospheric perspective?
While elements of atmospheric perspective can be seen in ancient art, it was extensively studied and formalized during the Renaissance, particularly by artists like Leonardo da Vinci, who developed and documented its principles in his notebooks and perfected its application in his paintings.
How does color change with atmospheric perspective?
With atmospheric perspective, colors of distant objects tend to become lighter in value (closer to white), cooler in hue (more blue or purple), and less saturated (less intense or vivid) compared to objects closer to the viewer. This mimics how the atmosphere affects light traveling long distances.
Is atmospheric perspective the same as aerial perspective?
Yes, ‘atmospheric perspective’ and ‘aerial perspective’ are two terms that are often used interchangeably to describe the same artistic technique for creating depth through atmospheric effects. Both refer to how air and atmosphere affect the appearance of distant objects.
Can atmospheric perspective be used in all types of art?
While most commonly associated with landscape painting, atmospheric perspective principles can be applied to any genre where depicting depth and distance is desired, including portraits with backgrounds, cityscapes, seascapes, interior scenes with windows, and even abstract art to create a sense of space.
What’s the difference between atmospheric perspective and linear perspective?
Atmospheric perspective creates depth through changes in color, value, and detail (mimicking atmospheric effects), while linear perspective uses geometric principles like vanishing points and converging lines to show distance. They’re complementary techniques often used together.
How do I know if I’m using enough atmospheric perspective in my painting?
Step back from your work and ask: Can I clearly distinguish foreground from background? Do distant objects appear lighter and cooler? Is there a gradual progression of detail from sharp to soft? If these elements are present and the painting feels spatially convincing, you’re likely using atmospheric perspective effectively.
Does atmospheric perspective work the same way in digital art?
Yes, the principles remain the same in digital art. Digital artists use layer adjustments, color modifications, and selective blurring to achieve atmospheric perspective effects, though the tools differ from traditional media. The visual result should appear identical to traditional techniques.
Should I always use blue for distant objects?
While blue is the most common color for atmospheric perspective (since the sky scatters blue light), the atmospheric color can vary with weather and lighting conditions. During sunset or sunrise, distant objects might appear warm (orange or pink), and in foggy conditions, they might be gray or white.
Can I use atmospheric perspective in portrait painting?
Absolutely! While portraits focus on the subject, any background elements benefit from atmospheric perspective. If you’re including a landscape behind your subject, distant elements should follow atmospheric perspective principles to create proper depth and keep focus on the portrait.
Citations
- The Art Story Foundation – Sfumato technique and atmospheric effects in Renaissance art
https://www.theartstory.org/techniques/sfumato/ - Khan Academy – Atmospheric Perspective in Art History
https://www.khanacademy.org/humanities/ap-art-history/introduction-to-art-historical-analysis/a/atmospheric-perspective - National Gallery of Art – Art Terms and Techniques Glossary
https://www.nga.gov/learn/teachers/lessons-activities/glossary.html - The Metropolitan Museum of Art – Leonardo da Vinci’s Painting Techniques
https://www.metmuseum.org/toah/hd/leon/hd_leon.htm - Tate Gallery – Art Terms: Atmospheric Perspective
https://www.tate.org.uk/art/art-terms/a/atmospheric-perspective

