
Have you ever looked at a portrait from the Renaissance and wondered how artists like Leonardo da Vinci achieved such glowing, lifelike skin tones? It feels like the light is coming from within the painting itself. For many budding artists, painting realistic skin that doesn’t look flat or doll-like is a huge challenge. But what if I told you the secret isn’t just about the final colors you see, but about a hidden layer of greenish-gray paint? This is the magic of Verdaccio underpainting, a classic technique that can transform your oil portraits from good to breathtaking.

This guide will walk you through everything you need to know about the Verdaccio underpainting technique. It’s a game-changer for any artist struggling with skin tones, and it’s easier than you might think. We will explore this historical method that has been a secret weapon for artists for centuries.
Key Points of This Article:
- What Verdaccio Is: We’ll define Verdaccio underpainting and look at its origins in the studios of the Italian Renaissance masters.
- Why It Works: Discover the color theory secret behind using a green base to create vibrant, realistic skin tones.
- Step-by-Step Guide: A clear, easy-to-follow process for creating your own verdaccio, from mixing the paint to applying the final color glazes.
- Comparison of Techniques: See how Verdaccio stacks up against other underpainting methods like Grisaille and Bistre.
- Tips for Success: Learn how to avoid common mistakes and make your portraits pop with luminosity and depth.
What is Verdaccio Underpainting?
Imagine you’re building a house. You wouldn’t start with the wallpaper, right? You’d build a strong foundation first. In painting, an underpainting is that foundation. The Verdaccio underpainting technique, whose name comes from the Italian word for green, is a specific type of monochromatic underpainting that uses shades of greenish-gray.
This method was especially popular during the Italian Renaissance. Artists would create a complete version of their painting using only these green-gray tones. This “dead colouring” stage allowed them to figure out all the values—the lights, mid-tones, and shadows—of their subject before ever touching a flesh-toned pigment. By establishing the form and light source perfectly in the underpainting, the final layers of color could be applied with more confidence and precision. This foundational approach is a cornerstone of classical painting and is explored in many guides for oil painting for beginners.
The Surprising Science: Why Green Makes Skin Glow
So, why green? It seems strange to paint a face with what looks like a sickly gray-green color. The answer lies in the simple principles of color theory, a fundamental concept for any artist to grasp. You can dive deeper into this in our guide to understanding color theory in art.
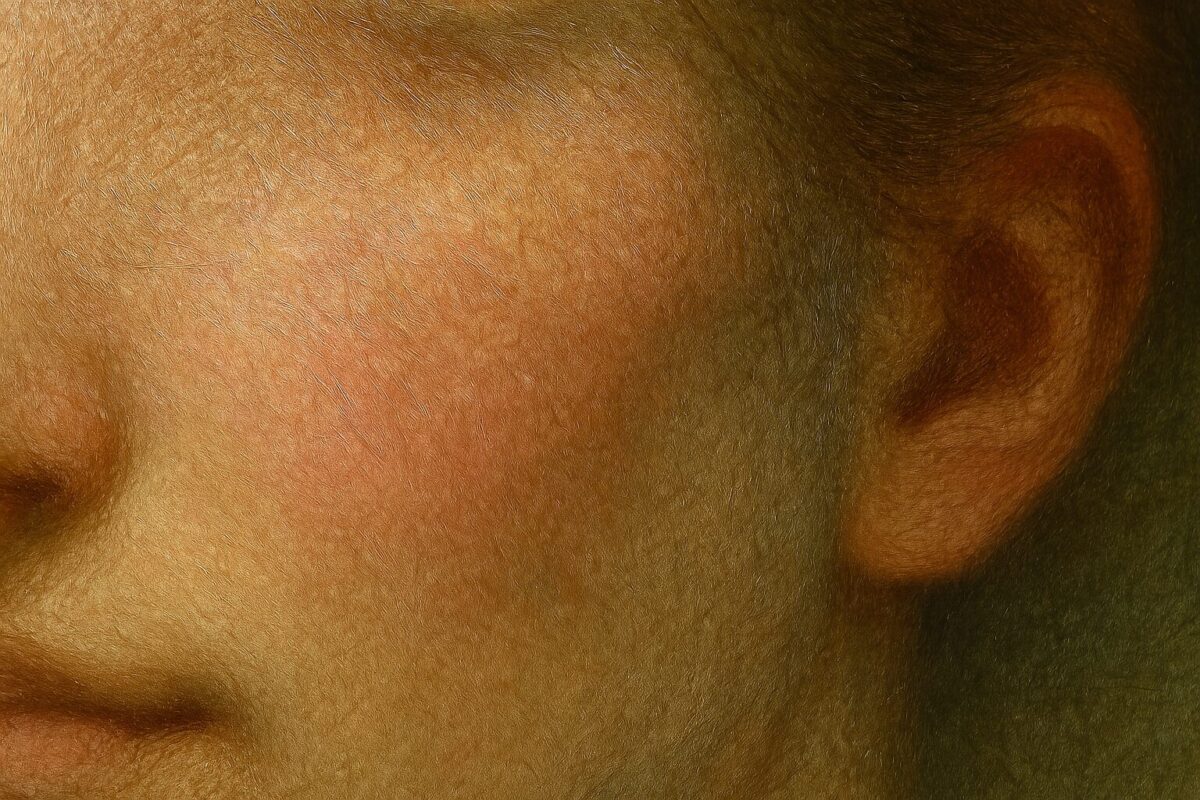
On the color wheel, red and green are complementary colors—they sit opposite each other. When you place them next to each other, they create a strong contrast and make each other appear more vibrant. But when you layer them, something magical happens. When you apply thin, transparent layers (called glazes) of reddish skin tones over a green base, the green subtly neutralizes the red.
This does two amazing things:
- It Prevents “Peachy” Skin: It stops your skin tones from becoming too saturated, fiery, or unnaturally pink. The green underneath tones down the red, resulting in a much more realistic and subtle complexion.
- It Creates Luminosity: Because the light travels through the transparent red glaze, hits the lighter green underpainting, and bounces back to your eye, it creates a visual effect of light radiating from within the skin. This gives the portrait a depth and glow that is impossible to achieve by simply mixing a flat flesh color on your palette.
This clever use of materials is a testament to the scientific minds of Renaissance artists, who were masters of the science of painting pigments.
“The noblest pleasure is the joy of understanding.”
Leonardo da Vinci
A Step-by-Step Guide to the Verdaccio Method
Ready to try this time-tested technique? Here’s a simple breakdown of the Verdaccio underpainting process.
Step 1: Gather Your Materials

You don’t need a lot of special equipment. For the verdaccio mixture itself, you’ll need:
- Mars Black: A warm, slightly brownish black that dries relatively quickly.
- Yellow Ochre: A classic, earthy yellow.
- Titanium White (or Flake White): For your lighter values.
- A Painting Surface: A gessoed canvas or panel.
- Your Usual Oil Painting Supplies: Brushes, palette, odorless mineral spirits, and linseed oil.
Step 2: Mix Your Perfect Verdaccio Green
On your palette, mix a small amount of Mars Black with Yellow Ochre. You’re looking for a muted, earthy green. From this base green, you will create a full value range from light to dark.
- For your darks: Use the green mixture with a little more black.
- For your mid-tones: Use the base green mixture.
- For your lights: Add Titanium White to your base green. Mix a few variations, going from a light minty green all the way to an off-white with just a hint of green.
You should have a range of 5-7 values on your palette, from your darkest dark to your lightest light.
Step 3: Apply the Verdaccio Underpainting

Now, using your green-gray palette, paint your subject. Focus entirely on the values and form. Don’t think about “color,” only about light and shadow. Where are the darkest parts of the face (like under the chin, in the eye sockets)? Where are the brightest highlights (on the forehead, the tip of the nose)?
This stage is all about creating a three-dimensional form. Take your time with it. Once you’re finished, you’ll have a complete monochrome portrait in shades of green. This is your Verdaccio underpainting. Now comes the most important part: you must let it dry completely. This can take anywhere from a few days to a week, depending on the thickness of your paint.
Step 4: The Magic of Glazing
Once your underpainting is bone dry to the touch, you can bring it to life with color glazes. A glaze is a very thin, transparent layer of paint. To make a glaze, mix a small amount of pigment (like Alizarin Crimson, Cadmium Red, or a flesh tone) with a glazing medium or a little bit of linseed oil.
Apply these reddish glazes very thinly over your dry verdaccio layer. Build the color up slowly. In the shadow areas, the green will cool down the reds, creating natural-looking, transparent shadows. In the lighter areas, the green will give the skin that famous luminosity. You can apply several layers of glazes, letting each one dry in between, to build up a rich and complex skin tone. This is where understanding layering techniques is key. This careful process is a hallmark of many essential portrait painting techniques.

Verdaccio vs. Other Underpainting Techniques
Verdaccio is just one of several underpainting methods developed over the centuries. Here’s how it compares to other common techniques you might hear about.
| Technique | Color Palette | Primary Use | Famous Example (Artist) |
| Grisaille | Black, white, and shades of gray. | To imitate the look of stone sculpture; a pure value study. | Jan van Eyck |
| Bistre | Brown tones (like Burnt Umber). | To create a warm, earthy, and harmonious foundation. | Rembrandt |
| Verdaccio | Greenish-gray tones. | For achieving realistic and luminous skin tones in portraits. | School of Leonardo da Vinci |
While all these methods are foundational to Renaissance art, the Verdaccio underpainting stands out for its specific and brilliant solution to the age-old problem of painting believable flesh.
See It in Action: A Verdaccio Tutorial
Reading about a technique is one thing, but seeing it done can make all the difference. This video provides an excellent visual demonstration of the verdaccio process from start to finish.
Conclusion: A Bridge to the Past and a Leap for Your Art
The Verdaccio underpainting technique is more than just a historical curiosity; it’s a practical, effective method that can revolutionize the way you paint portraits. By separating the challenge of value from the challenge of color, you can focus on creating solid, three-dimensional forms before adding the final, glowing layers of skin tones.
It teaches patience, precision, and a deeper understanding of how colors interact. It connects you to a long tradition of artists who solved complex problems with simple, brilliant ideas. So next time you’re staring at a blank canvas, ready to start a portrait, don’t be afraid to go green first. You might just unlock the luminous secrets of the Old Masters and take your own art to an entirely new level.

FAQs: Verdaccio Underpainting
1. What is the point of a Verdaccio underpainting? The main point of a Verdaccio underpainting is to establish a solid foundation of light and shadow (values) for a painting, particularly a portrait. Its unique greenish-gray color helps to neutralize the subsequent layers of reddish skin tones, resulting in more realistic, luminous, and less overly saturated complexions.
2. Is Verdaccio the same as Grisaille? No, they are different. While both are monochromatic underpainting techniques, Grisaille uses shades of gray (black and white) to create a value study that often mimics sculpture. Verdaccio uses shades of greenish-gray specifically to act as a complementary base for the reds in skin tones, creating a unique luminosity.
3. What colors do you use for Verdaccio? The traditional Verdaccio underpainting palette is mixed from Mars Black (or Ivory Black), Yellow Ochre, and Lead White (or a modern Titanium White). Some artists may add a touch of green pigment like Terre Verte or Chromium Oxide Green to enhance the green tint.
4. Do you have to let the Verdaccio layer dry completely? Yes, this is absolutely crucial. The underpainting must be completely dry to the touch before you begin applying the transparent color glazes on top. If it’s still wet, the layers will mix physically, creating a muddy mess instead of the clean, optical blending that makes the technique work.
5. Can you use Verdaccio with acrylics? Yes, you can adapt the Verdaccio underpainting technique for acrylics. The principles of color theory are the same. You would mix your green-grays using acrylic paints and let the underpainting dry completely (which is much faster with acrylics). You would then use transparent acrylic glazes or thin layers of color on top.
Resources
- Vermeer’s Painting Technique: Glazing. A detailed explanation of the glazing process, essential for the final stages of a Verdaccio painting. essentialvermeer.com
- The Grisaille Underpainting by Jeffrey Hayes. An artist’s breakdown of the Grisaille technique, which provides a useful comparison to Verdaccio. jeffhayes.com
- Understanding Verdaccio: Crafting Realistic Skin Tones in Art by Ying McLane. A focused article on the history and application of the Verdaccio technique. yingmclane.com
- Fat Over Lean: Essential Guide to Oil Painting Techniques. An important principle to follow when layering, especially when glazing over an underpainting. naturalpigments.eu
- Oil Painting Terms for Beginners by Will Kemp Art School. A glossary that defines many of the terms used in classical painting techniques. willkempartschool.com
- Portrait painting from life, underpainting by Ben Lustenhouwer. A professional artist demonstrates a simple raw umber underpainting, showing the foundational principles. paintingportraittips.com

