
Have you ever thought the secret to your next masterpiece might be sitting in your kitchen cupboard? Welcome to the wonderfully aromatic world of coffee painting! This unique art form uses one of the world’s most beloved beverages to create stunning, sepia-toned artwork with surprising depth and character. If you’re looking for a fun, accessible, and eco-friendly way to express your creativity, our guide to coffee painting for beginners is the perfect place to start. It’s easier than you think, and the results are truly captivating.
Key Points: Coffee Painting for Beginners
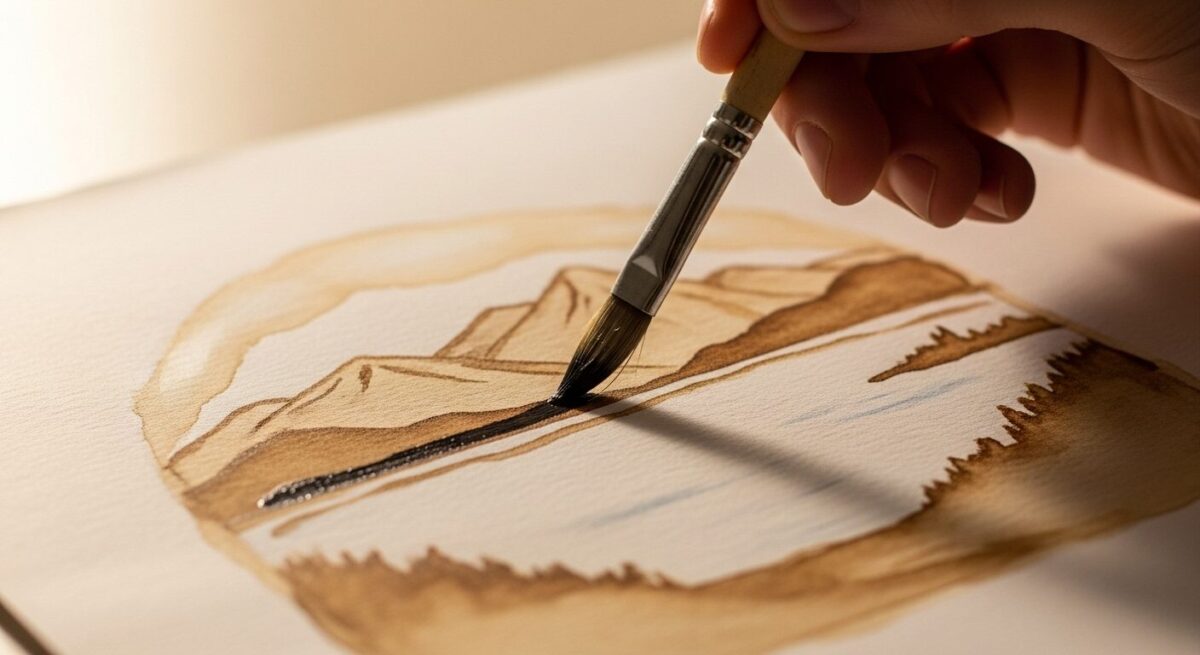
- What It Is: Coffee painting is a monochromatic art technique that uses brewed or instant coffee as a medium, similar to watercolor painting.
- Why You’ll Love It: It’s incredibly accessible (you already have the main ingredient!), affordable, and smells amazing. The process is forgiving for newcomers and produces beautiful, vintage-style artwork.
- Getting Started is Easy: All you need is instant coffee, water, paper (watercolor paper is best), and a few brushes.
- The Technique: You create different shades by varying the coffee-to-water ratio. The painting process involves layering these tones, from light to dark, to build depth and form, much like in traditional watercolor.
- Unleash Your Creativity: From simple bookmarks and greeting cards to intricate landscapes and portraits, the possibilities with coffee painting are endless.
What Exactly is Coffee Painting?

Think of coffee painting as a cousin to watercolor. Instead of using traditional tube paints or pans, your pigment comes from coffee. By simply mixing instant coffee granules with different amounts of water, you can create a whole range of brown, sepia, and sienna tones. The more coffee you use, the darker and richer your “paint” will be. The more water, the lighter the wash.
This technique allows you to play with light and shadow in a monochromatic style, which is a fantastic exercise for artists of any level. It teaches you to see the world in terms of value (the lightness or darkness of a color) rather than hue. Plus, the way the coffee settles and dries on the paper can create unique textures that are difficult to replicate with other mediums.
“Creativity is intelligence having fun.”
Albert Einstein
Gathering Your Artistic Ingredients
One of the best things about coffee painting is that you don’t need to invest in a lot of expensive materials. You likely have everything you need to start right now.
| Essential Supplies | Description | Optional (but helpful) Supplies |
| Instant Coffee | The star of the show! Dark roast instant coffee gives the richest tones. | Fine-Tipped Pen |
| Watercolor Paper | 140 lb (300 gsm) cold-press paper is ideal as it won’t buckle. | White Gel Pen or Gouache |
| Paint Brushes | A small set of round and flat brushes will do. | Salt |
| Water Jars | You’ll need at least two: one for mixing paint, one for rinsing brushes. | Masking Tape |
| Palette or Small Dishes | For mixing your different coffee shades. | Pencil and Eraser |
| Paper Towels | For blotting excess water and lifting color. | Hairdryer |
If you’re looking for the right paper, our guide on choosing watercolor paper pads can help you make the perfect choice. Having a good set of general painting supplies on hand is always a great idea for any project.
Your Step-by-Step Guide to Making Brew-tiful Art
Ready to paint? Let’s walk through the process together.
Step 1: Prepare Your Coffee “Paint”

This is the fun part! Grab your palette or a few small bowls.
- For a Light Tone: Mix about half a teaspoon of instant coffee with two tablespoons of hot water.
- For a Medium Tone: Mix one teaspoon of instant coffee with two tablespoons of hot water.
- For a Dark Tone: Mix two teaspoons of instant coffee with two tablespoons of hot water. For an almost black color, use just enough water to dissolve the granules into a thick paste.
Stir each mixture thoroughly until all the coffee granules are dissolved. You can always adjust these ratios to get the shades you want!
Step 2: Sketch Your Design
Lightly sketch your idea onto your watercolor paper with a pencil. If you’re not sure what to draw, starting with something simple like a leaf, a coffee cup, or some easy animal drawings can be a great way to practice. Remember to consider the essential elements of composition to make your artwork balanced and engaging.
Step 3: Apply the First Wash
Using your lightest coffee mixture, apply a flat wash over the largest areas of your sketch. This is similar to the wet-on-wet watercolor technique, where you apply wet paint onto a wet surface (or in this case, a dry surface to start). This initial layer establishes your base tone. Let this layer dry completely. A hairdryer can speed this up.

Step 4: Build Your Layers and Depth
Now, start using your medium and dark tones to build up shadows and define forms. This is the key to giving your painting a three-dimensional feel. Remember the golden rule of watercolor and coffee painting: work from light to dark. You can always add a darker layer, but it’s much harder to lighten an area once the coffee has stained the paper. Let each layer dry before applying the next to prevent muddying your colors. This layering process is a fundamental skill in many painting techniques for beginners.
Step 5: Add the Finishing Touches
Once your main layers are dry, use your darkest coffee mix and a small, fine-tipped brush to add the final details. This could be the veins on a leaf, the texture on a tree trunk, or the rim of a coffee cup.

For an extra “pop,” you can use a white gel pen or a tiny bit of white gouache to add highlights. Want some interesting texture? While a layer of coffee is still wet, sprinkle a little salt onto it! The salt crystals will absorb the pigment, creating a beautiful, crystallized effect when dry.
See It in Action
Sometimes, watching the process is the best way to learn. This video provides a wonderful visual guide to the basics of coffee painting.
Conclusion: A World of Art in Your Cup
Coffee painting is more than just a quirky craft; it’s a legitimate and beautiful art form that invites you to slow down, observe the world in a new light, and create something wonderful from the simplest of ingredients. It’s a perfect entry point for anyone curious about painting, offering a low-pressure, high-reward experience.
So next time you brew your morning cup, save a little. Your next masterpiece might be just a brushstroke away. Grab your supplies, put on some music, and dive into the aromatic and accessible world of coffee painting for beginners. Happy painting!
Frequently Asked Questions (FAQs)
1. Can you use brewed coffee for painting? Yes, you can absolutely use brewed coffee. For the best results, you’ll want to make it very strong—think espresso strength. You can also reduce it by simmering it on the stove to create a more concentrated, darker pigment. However, instant coffee is generally easier for beginners because you can control the pigment concentration more easily.
2. What kind of paper is best for coffee painting? Because coffee painting uses a lot of water, just like watercolors, a heavy paper is essential to prevent buckling and warping. Watercolor paper, specifically 140 lb (or 300 gsm), is highly recommended. If you’re just experimenting, thick cardstock can work, but watercolor paper will give you the best results.
3. Is coffee painting permanent? Yes, coffee acts as a natural stain on the paper and is permanent once dry. Like watercolor, it can be “reactivated” with water to a small degree, but it won’t lift completely. To protect your finished artwork from moisture and fading over time, you can seal it with a spray fixative, just as you would a charcoal or pastel drawing. For more on protecting your work, check out our guide to art preservation.
4. How do you make different shades with coffee? The key to creating a range of values is the ratio of coffee to water. More coffee granules and less water will create a dark, rich brown. More water and less coffee will create a light, transparent tan. It’s a great idea to mix 3-4 different shades in a palette before you start painting so you have them ready to go.
5. Can you mix coffee with other paints? While you can experiment with anything, it’s generally not recommended to mix coffee directly with other mediums like acrylic or oil paint due to differences in their chemical properties. However, you can use coffee as a base layer or a background wash and then draw or paint over it with other materials like ink, colored pencils, or white gouache once the coffee layer is completely dry.
Citations:
Easy Coffee Painting for the Absolute Beginner – Art by Ro
- Comprehensive beginner’s guide with step-by-step mixing techniques and free downloadable resources
How To Paint With Coffee: Easy Sunset For Beginners
- Detailed tutorial covering coffee types, paper selection, and specific techniques for beginners
Painting With Coffee: 3 Steps (with Pictures) – Instructables
- Established maker platform with clear visual instructions and professional credibility
Coffee Painting Tutorial – Magny Tjelta
- Professional artist’s tutorial with advanced texture techniques using salt and instant coffee
Coffee Painting for Beginners – Medium
- Detailed article on material preparation and shade mixing techniques
Coffee Painting – Julianna Kunstler Art Education
- Educational resource from an established art education website with detailed observational drawing techniques

