
Introduction: The Art of Paint Blending
Blending style in painting refers to the artist’s approach to mixing and transitioning colors within their work. It encompasses the techniques, tools, and methods used to create smooth gradations, soft edges, or seamless transitions between different hues or tones.
An artist’s blending style can greatly influence the mood, texture, and overall visual impact of their paintings. Some painters prefer a smooth, almost imperceptible blend that creates a photorealistic effect, while others may opt for more visible brushstrokes or palette knife work that lends a textured, impressionistic quality to their blends.

The choice of blending style can also be influenced by the subject matter, the emotional tone the artist wishes to convey, and the specific qualities of the paint medium being used. Mastering various blending techniques allows artists to develop their unique style and achieve their desired visual effects, whether it’s the soft sfumato of Leonardo da Vinci or the bold, visible brushstrokes of Vincent van Gogh.
Blending Painting Technique
Perhaps, the most important blending technique is
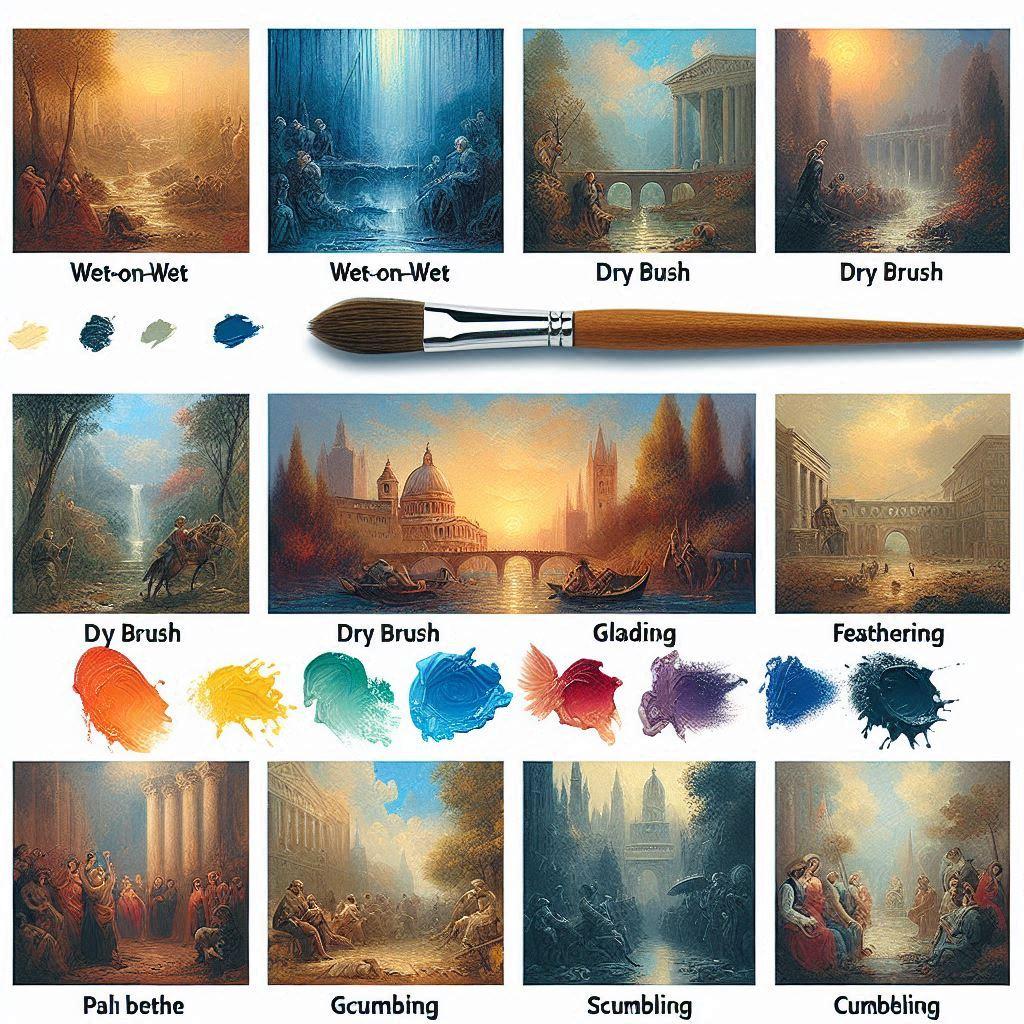
Wet-on-Dry Blending
Wet-on-dry blending is a painting technique where wet paint is applied to a dry surface or previously dried paint layer. This method allows for more control and precision in creating defined edges and shapes. It’s particularly useful for adding details, creating sharp contrasts, or layering colors without them mixing on the canvas. The technique can be used in various mediums, but it’s especially common in watercolor and acrylic painting. In watercolors, wet-on-dry results in crisp, hard edges as the paint doesn’t spread beyond where it’s applied.
Famous Artist Example: A famous artist known for mastering the wet-on-dry technique in watercolors is Andrew Wyeth. Wyeth, an American realist painter of the 20th century, used this method extensively to create his highly detailed, textured landscapes and portraits. His precise brushwork and layering of transparent washes over dry areas allowed him to achieve remarkable depth and realism in his canvases. Wyeth’s iconic work “Christina’s World” (1948) showcases his skilful use of wet-on-dry technique to render the intricate details of the grass and the textures of the subject’s clothing against the stark landscape.
Other commonly taught blending techniques include:
Wet-on-Wet Blending
One of the most popular techniques is wet-on-wet blending. This involves applying wet paint onto wet paint, allowing the colors to mix directly on the canvas. It’s perfect for creating smooth skies or soft, flowing water.
Famous Artist Example: J.M.W. Turner, the British Romantic painter, was a master of wet-on-wet blending. His painting “The Fighting Temeraire” (1839) showcases his ability to create ethereal, atmospheric effects using this technique. Turner would apply layers of thin, translucent paint while the previous layers were still wet, resulting in his signature luminous skies and misty seascapes.

To master wet-on-wet blending:
- Work Quickly: Apply your base color and immediately add your second color while the first is still wet.
- Use a Soft Brush: A filbert or mop brush works well for this technique.
- Blend in Circular Motions: This helps to seamlessly merge the colors.
Dry Brush Blending
If you’re looking for texture and subtle gradients, dry brush blending is your friend. This technique involves using a dry brush with minimal paint to create soft edges and textures.
Famous Artist Example: Andrew Wyeth, an American realist painter, frequently employed dry brush techniques. His painting “Christina’s World” (1948) demonstrates his mastery of dry brush blending, particularly in the rendering of the grass and field, creating a sense of texture and depth.
To achieve dry brush effects:
- Use a Stiff Brush: A flat or bristle brush works best.
- Lightly Drag the Brush: Move it gently across the canvas to create a textured effect.
Glazing
Glazing is all about building depth with thin, transparent layers of paint. It’s like adding a sheer veil of color over your existing work.

Famous Artist Example: Rembrandt van Rijn, the Dutch Golden Age painter, was renowned for his glazing technique. His self-portraits, such as “Self-Portrait” (1669), showcase his ability to create luminous skin tones and deep shadows through multiple layers of thin, transparent paint.
To master glazing:
- Dilute Your Paint: Use a medium to thin your paint to a translucent consistency.
- Layer Gradually: Apply multiple layers, allowing each to dry before adding the next.
Feathering
Feathering is a technique used to create soft gradients and realistic effects. It involves gently pulling the paint from one area to another.
Famous Artist Example: Leonardo da Vinci’s “Mona Lisa” (c. 1503-1506) is a prime example of feathering. The soft, subtle transitions in the subject’s face and the background demonstrate Leonardo’s mastery of this technique, creating an ethereal quality that has captivated viewers for centuries.
To achieve feathering effects:
- Use a Soft Brush: A fan brush can be particularly effective.
- Light Strokes: Gently drag the paint to blend the edges smoothly.
Scumbling
Scumbling involves applying a thin, opaque layer of paint over a dry layer, creating a hazy effect.

Famous Artist Example: Claude Monet, the French Impressionist, often used scumbling in his paintings. In works like “Water Lilies” (1919), Monet applied thin layers of lighter paint over darker base colors to create the impression of light reflecting off water.
To master scumbling:
- Use a Dry Brush: A stiff brush works well for this technique.
- Apply Light Pressure: Gently scrub the paint over the surface.
Palette Knife Techniques
For those who love texture, the palette knife is an invaluable tool. It can create bold, expressive strokes and unique textures.
Famous Artist Example: Vincent van Gogh’s later works, such as “The Starry Night” (1889), showcase his bold use of the palette knife. Van Gogh used this tool to create thick, impasto layers of paint, giving his work a three-dimensional quality and intense expressiveness.

To use palette knife techniques effectively:
- Experiment with Angles: Different angles create different effects.
- Layer Boldly: Don’t be afraid to apply thick layers of paint.
Blending Style
Blending style in painting refers to the artist’s approach to mixing and transitioning colors within their work. It encompasses the techniques, tools, and methods used to create smooth gradations, soft edges, or seamless transitions between different hues or tones. An artist’s blending style can greatly influence the mood, texture, and overall visual impact of their paintings.
Some painters prefer a smooth, almost imperceptible blend that creates a photorealistic effect, while others may opt for more visible brushstrokes or palette knife work that lends a textured, impressionistic quality to their blends.
The choice of blending style can also be influenced by the subject matter, the emotional tone the artist wishes to convey, and the specific qualities of the paint medium being used. Mastering various blending techniques allows artists to develop their unique style and achieve their desired visual effects, whether it’s the soft sfumato of Leonardo da Vinci or the bold, visible brushstrokes of Vincent van Gogh.
Tools and Materials for Blending
To achieve the best results, you’ll need the right tools:
- Brushes: Filbert, mop, flat, and fan brushes are essential.
- Palette Knives: Great for texture and bold strokes.
- Sponges: Useful for creating soft, blended backgrounds.
- Wet Palette: Helps keep your paint moist longer, giving you more time to blend.
Tips for Successful Blending
- Work Quickly: Some media dry fast, so speed is key.
- Practice on a Palette: Before applying to your canvas, practice blending on a palette.
- Experiment: Try different tools and techniques to see what works best for you.
- Study the Masters: Analyze works by artists known for their blending techniques, such as Rembrandt, Turner, or Monet.
Common Challenges and Solutions
Blending can be tricky, but here are some common challenges and how to overcome them:
- Fast Drying Times: Use a wet palette or a slow-drying medium to extend working time.
- Streaks and Uneven Blends: Use a soft brush and light pressure to smooth out transitions.
- Maintaining Color Vibrancy: Layer gradually and avoid over-blending to keep colors bright.
Exploring Mixed Media Blending
Mixed media painting offers exciting opportunities for blending techniques. Artists can combine various materials such as oil pastels, colored pencils, or acrylic paints to create unique effects.
Famous Artist Example: Robert Rauschenberg, known for his “Combines,” often blended traditional painting techniques with collage and found objects. His work “Bed” (1955) combines oil and pencil on pillow, quilt, and sheet, mounted on wood supports, showcasing an innovative approach to blending different media.
Digital Integration in Blending Techniques
In our modern, tech-driven age, according to artnews artists are now integrating digital tools into their blending techniques. This fusion of traditional and digital methods opens up new possibilities for creativity.
Example: Digital artists often use software like Adobe Photoshop or Procreate to blend colors and textures, mimicking traditional techniques like wet-on-wet or glazing in a digital environment instead of their easel.
Conclusion
Blending is an essential skill in painting that can transform your artwork from flat to fabulous, regardless of the medium you choose. By mastering various techniques and drawing inspiration from famous artists throughout history, you can achieve those smooth transitions and depth that make paintings come alive. Remember, practice makes perfect, so keep experimenting and have fun with your art!
By following these tips and techniques, and drawing inspiration from the masters, you’ll be well on your way to mastering the art of blending in painting. Happy painting!

