Understanding light and shadow is the foundation that separates amateur artwork from professional masterpieces. Whether you’re sketching with pencil or painting with oils, mastering how light behaves on different surfaces will transform your art from flat drawings into three-dimensional worlds that seem to jump off the page. This essential skill has guided artists from Leonardo da Vinci to modern masters, and with the right techniques, you can learn it too. Use our tool below to understand the concept.
Key Points Summary
- Light and shadow create the illusion of three-dimensional form on flat surfaces
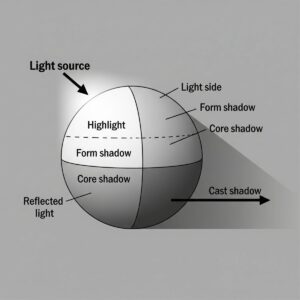
- Five basic elements form the foundation: highlight, light, mid-tone, core shadow, and cast shadow
- Value studies help artists plan tonal relationships before starting finished artwork
- Different light sources create unique shadow patterns and moods
- Practice with simple objects builds skills for complex subjects
- Classical techniques like chiaroscuro remain relevant for modern artists
What Are Light and Shadow in Art?
Light and shadow in art refer to how artists use contrast between bright and dark areas to create the illusion of depth, volume, and form. When light hits an object, it creates predictable patterns that our eyes recognize as three-dimensional shapes. Artists who understand these patterns can make flat drawings and paintings appear to have real depth and weight.
Think of it like this: without light, we couldn’t see anything. Artists use this same principle by strategically placing light and dark areas to guide your eye and create believable forms. The interplay between illuminated and shadowed areas is what makes a circle look like a sphere or a flat triangle appear as a three-dimensional cone.
The Five Essential Elements of Light and Shadow
Every form touched by light contains these five fundamental elements:
| Element | Description | Location | Purpose |
|---|---|---|---|
| Highlight | Brightest point where light directly hits | Peak of rounded forms | Shows light source direction |
| Light | Fully illuminated areas | Facing the light source | Defines the lit side of objects |
| Mid-tone | Areas receiving some light | Between light and shadow | Creates smooth transitions |
| Core Shadow | Darkest shadow on the object | Side opposite light source | Defines form and volume |
| Cast Shadow | Shadow projected onto other surfaces | Beneath and behind objects | Grounds objects in space |
Understanding Each Element
Highlights appear where light hits the surface most directly. On a shiny apple, this might be a small, bright spot. On rough bark, highlights appear more scattered and subtle.
Light areas make up the primary illuminated portions of your subject. These areas face toward your light source and should be lighter than everything else except the highlight.
Mid-tones serve as the bridge between light and shadow. They’re often the most challenging element because they require subtle gradations rather than obvious contrasts.
Core shadows represent the darkest part of the object itself. They occur where the surface curves away from the light source, creating the strongest sense of three-dimensional form.
Cast shadows are projections that objects throw onto nearby surfaces. They help establish spatial relationships and ground objects in their environment.
Light and Shadow Techniques for Different Mediums
Drawing Techniques
When working with pencil, charcoal, or other drawing materials, building up shadow painting techniques requires patience and layering:
- Hatching: Use parallel lines to create shadow areas
- Cross-hatching: Layer crossed lines for deeper shadows
- Blending: Smooth gradations with stumps or fingers
- Lifting: Remove material to create highlights

Painting Approaches
Light and shadow painting techniques vary by medium but follow similar principles:
Oil Painting: Build shadows with transparent glazes, keeping lights opaque and thick. The slow drying time allows for smooth blending of mid-tones.
Watercolor: Work from light to dark, preserving white paper for highlights. Use wet-in-wet techniques for soft shadow edges.
Acrylic: Work quickly due to fast drying time. Build up shadows in layers, keeping lights fresh with minimal overworking.
Classical Master Techniques
Chiaroscuro: The Art of Dramatic Contrast
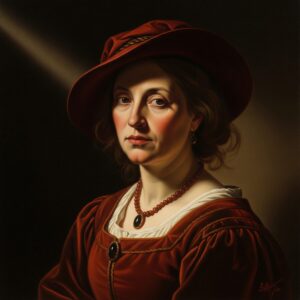
Chiaroscuro technique creates powerful drama through extreme contrasts between light and dark. Italian for “light-dark,” this approach uses minimal mid-tones, instead emphasizing the battle between bright lights and deep shadows.
Artists like Caravaggio used chiaroscuro to create emotional intensity. By placing subjects against dark backgrounds and using strong directional light, they created paintings that seemed to glow from within.
“The eye, which is called the window of the soul, is the principal means by which understanding may most fully appreciate the appearance of works of nature.”
Leonardo da Vinci
Sfumato: The Poetry of Soft Transitions
Sfumato represents the opposite approach from chiaroscuro. This technique uses subtle gradations without harsh lines or borders. Leonardo da Vinci perfected this method, creating the mysterious, atmospheric quality seen in the Mona Lisa.
Sfumato works by:
- Eliminating hard edges between light and shadow
- Creating imperceptible transitions between tones
- Building atmosphere through layered glazes
- Suggesting form rather than defining it sharply
Understanding Different Light Sources
Natural Light Sources
Sunlight creates the strongest, most directional shadows. Morning and evening light produces longer, more dramatic shadows, while midday sun creates short, intense shadows directly below objects.
Window Light provides softer, more diffused illumination. North-facing windows offer consistent, cool light ideal for detailed work, while south-facing windows provide warmer, more variable light throughout the day.
Artificial Light Sources
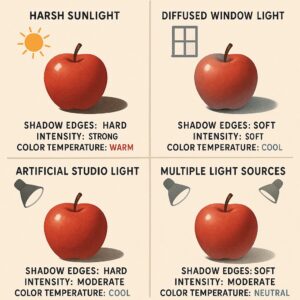
Incandescent Bulbs produce warm, yellowish light that creates soft shadows with gradual transitions.
LED Lights offer consistent, often cooler light that can be adjusted for color temperature and intensity.
Spotlights create dramatic, directional light similar to strong sunlight, perfect for studying chiaroscuro effects.
Creating Effective Value Studies
Value studies serve as the blueprint for successful light and shadow work. These simplified versions of your intended artwork help you plan tonal relationships without getting distracted by color or detail.
Steps for Effective Value Studies:
- Squint at your subject to simplify complex tones into major shapes
- Identify the lightest light and darkest dark in your composition
- Map out 3-5 value zones from light to dark
- Use simple shapes to represent major forms
- Check relationships by comparing adjacent values
Professional artists often create multiple value studies before beginning finished work, testing different lighting scenarios and compositions.
Value Study Generator Tool
This Value Study Generator is an interactive tool designed to help artists master one of the most fundamental aspects of visual art: understanding and planning light-dark relationships in their compositions.
Value studies are essential preparatory work that professional artists use to establish the tonal structure of their paintings before adding color. By focusing purely on the range from light to dark, artists can solve compositional problems, create compelling focal points, and establish the mood of their artwork.
How Artists Can Use This Tool
Pre-Planning Phase: Before starting a painting, input your subject description, lighting conditions, and desired mood. The generator analyzes these elements to create a customized value map that shows you exactly where your lightest lights, darkest darks, and mid-tones should be placed.
Composition Problem-Solving: The tool provides a visual grid showing optimal value zones for your specific subject matter. Whether you’re painting a portrait, landscape, or still life, you’ll see where to position your major light and shadow areas for maximum impact.
Learning Value Relationships: The generated value scale gives you a precise roadmap of 7 tonal steps to use in your painting. This eliminates guesswork and helps you maintain consistent value relationships throughout your work.
Style-Specific Guidance: Based on your chosen artistic approach—from realistic to impressionistic—the tool provides tailored advice on how to handle value transitions and contrast levels appropriate to that style.
This generator essentially gives you the planning insight that experienced artists develop through years of practice, helping you create stronger, more cohesive compositions from the very beginning of your artistic process.
Value Study Generator
Create perfect light-dark compositions and master the fundamentals of tonal relationships in your artwork
Your Value Study Plan
Recommended Value Scale
Composition & Value Zones
Personalized Guidelines
Explore Value Studies in Action
See how master artists use light and shadow techniques in our curated collection
Visit Our Art GalleryCommon Light and Shadow Mistakes
Overworking Mid-tones
Beginning artists often make everything the same middle value, eliminating both strong lights and deep shadows. This creates flat, muddy artwork without visual impact.
Ignoring Reflected Light
In real life, light bounces between surfaces, creating subtle illumination in shadow areas. Pure black shadows rarely exist in nature.
Inconsistent Light Sources
Mixing multiple light source directions within a single artwork creates confusion and destroys the illusion of three-dimensional form.
Fear of Dark Values
Many beginners avoid deep shadows, but strong darks are essential for creating convincing light effects.
Practical Exercises for Improvement
Exercise 1: Single Object Studies
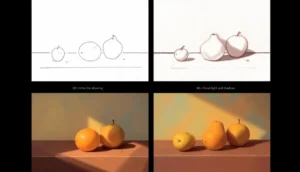
Start with simple objects like eggs, apples, or balls. Practice identifying and rendering all five elements of light and shadow.
Exercise 2: Multiple Light Sources
Set up a still life with two different light sources. Observe how shadows interact and overlap.
Exercise 3: Master Copy Studies
Study paintings by masters like Rembrandt or Caravaggio. Try to identify their light and shadow techniques and recreate small portions.
Exercise 4: Outdoor Sketching
Practice observing natural light throughout different times of day. Notice how shadow shapes and intensity change with sun position.
Advanced Concepts
Atmospheric Perspective
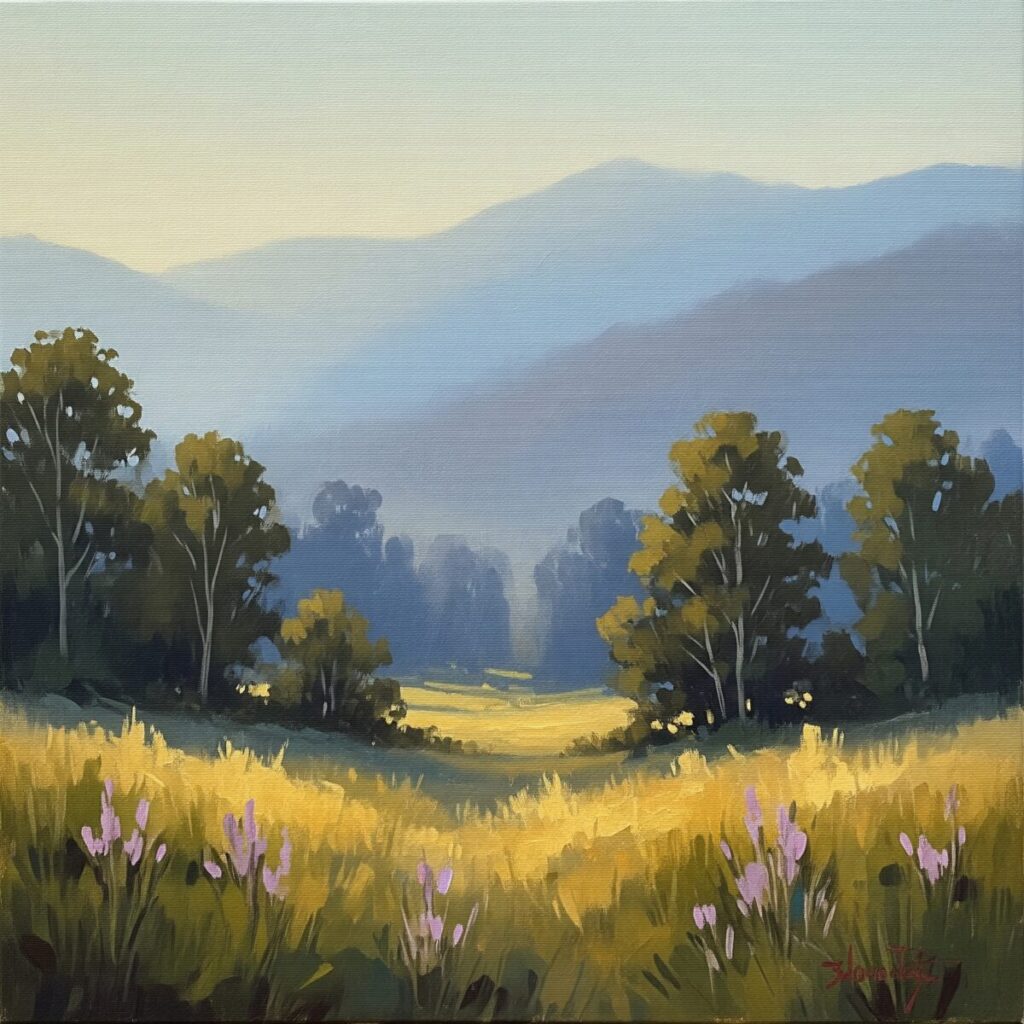
Distant objects appear lighter and less contrasted due to atmospheric interference. This principle helps create depth in landscapes and large compositions.
Color Temperature in Shadows
Shadows aren’t simply darker versions of local color. They often contain cooler temperatures, while lit areas tend toward warmer hues.
Edge Quality
The transition between light and shadow varies in hardness. Soft edges create gentle, organic feeling, while sharp edges suggest harder materials or strong directional light.
Tools and Materials for Light and Shadow Work
Essential Drawing Materials:
- Range of pencils (2H to 6B)
- Blending stumps
- Kneaded eraser
- Vine charcoal for broad shadows
Painting Supplies:
- Limited palette focusing on value rather than color
- Various brush sizes for different edge qualities
- Palette knife for mixing consistent tones
Digital Tools:
- Graphics tablets with pressure sensitivity
- Software with layer capabilities for value studies
- Custom brushes that simulate traditional media
Developing Your Eye for Light
Daily Observation Practice
Spend time each day consciously observing how light behaves in your environment. Notice shadow shapes, reflected light, and how different materials respond to illumination.
Photography as Reference
Take photos specifically focused on interesting light and shadow patterns. These become valuable reference materials for future artwork.
Study Master Paintings
Regularly examine works by artists known for exceptional light and shadow in art. Analyze their choices and techniques without copying directly.
Conclusion
Mastering light and shadow techniques transforms your artistic abilities more than any other single skill. By understanding the five fundamental elements, practicing with different light sources, and studying classical approaches like chiaroscuro and sfumato, you’ll develop the foundation for creating artwork with convincing depth and emotional impact. Remember that this skill develops through consistent practice and careful observation. Start with simple subjects, focus on accurate value relationships, and gradually work toward more complex compositions. The time invested in understanding light and shadow will reward you with artwork that truly captures the three-dimensional beauty of the world around us.
Frequently Asked Questions
What is the difference between form shadow and cast shadow? Form shadow occurs on the object itself where it curves away from the light source, while cast shadow is projected by the object onto nearby surfaces. Form shadows help define the object’s shape, while cast shadows establish spatial relationships.
How do I avoid making my shadows too dark? Remember that shadows contain reflected light from surrounding surfaces. Pure black shadows rarely exist in nature. Try using a very dark gray instead of pure black, and look for subtle light bouncing into shadow areas.
What’s the best way to practice light and shadow? Start with simple geometric forms like spheres, cubes, and cylinders under single light sources. Master these basic shapes before moving to complex subjects. Value studies are excellent practice tools.
Why do my drawings look flat even with shadows? This often happens when mid-tones dominate the artwork. Ensure you have a full range of values from very light to very dark, and that your lightest lights and darkest darks are reserved for key areas.
How important are value studies before starting a painting? Value studies are crucial for planning successful compositions. They help you solve tonal problems before investing time in finished artwork, leading to stronger, more cohesive paintings.
What lighting setup works best for beginners? Single, directional light sources like window light or a desk lamp create clear, understandable shadow patterns. Avoid multiple light sources until you’re comfortable with basic light and shadow principles.
For more advanced techniques and step-by-step tutorials, explore our comprehensive painting guides and discover how professional artists approach light and shadow in their work.
External Resources:
- Watts Atelier Drawing Fundamentals – Professional art instruction
- Bargue Plate Drawing – Classical drawing methods
- Museum of Fine Arts Collection – Study master paintings online


