
Remember when “coloring inside the lines” was just a way to keep kids busy? Those days are gone. Today, paint by numbers is a sophisticated digital detox hobby that has taken the adult crafting world by storm. But here is the hard truth: there is a massive difference between a completed kit that looks like a “paint by number” and one that looks like a piece of gallery-worthy art.
If you have ever stared at a finished canvas and felt it looked a bit “blocky” or the numbers were peeking through your light colors, this guide is for you. We aren’t just going to cover the basics; we are diving deep into the chemistry of acrylics, professional texturing, and optical illusions.
In this comprehensive guide, we will explore 35 paint by numbers tips for adults that will transform your kit into a masterpiece. Whether you are working on a Schipper replica or a custom photo kit, these techniques will elevate your art.
Key Takeaways for a Pro Finish:
- Prep is Power: Ironing and gessoing are non-negotiable for a smooth finish.
- Chemistry Matters: Use Flow Aid, not just water, to prevent streaky paint.
- Tool Upgrades: Ditch the plastic blue brushes for Golden Taklon.
- Optical Illusions: Learn zig-zag blending to kill the “blocky” look.
- The Final Seal: Varnish is the difference between a craft project and hanging art.

Phase 1: Preparation – The Foundation of a Masterpiece
Most beginners rip the box open and start painting immediately. This is the first mistake. Professional artists know that 50% of the work happens before the brush even touches the pigment. If you want your paint by numbers look professional, you have to treat the canvas like a serious artist would.
The Canvas Ironing Hack
Paint by numbers canvases usually arrive folded, resulting in deep creases that paint cannot hide. You must iron the canvas before you apply any paint. Once the acrylics harden, those creases are permanent.
The Technique:
- Flip your canvas face down onto a clean surface.
- Place a towel or a cotton t-shirt over the back of the canvas. This acts as a barrier to prevent burning.
- Set your iron to medium-high heat with NO STEAM. Moisture can warp the canvas fibers unevenly.
- Iron firmly in circular motions until the canvas is perfectly flat.
Gesso: The Secret to Professional Texture
Have you ever felt that your paint slides around the canvas too much, or conversely, drags and leaves white spots? That is a surface issue. Professional canvases are primed with “Gesso,” a binder that prepares the surface. Most kits come with a cheap primer that isn’t sufficient.
You have two professional options here:

1. Clear Gesso (The Texturizer)
Clear gesso is transparent but gritty. It adds “tooth” to the canvas. This grit grabs the paint off your brush, allowing for smoother lines and better coverage without hiding the numbers or lines. It makes the surface feel like high-quality watercolor paper rather than slick plastic.
2. White Gesso (The Eraser)
If your kit has very light colors and dark numbers, use white gesso. However, be warned: this covers the numbers. You should only use white gesso if you plan to sketch the outline again or have a reference sheet handy.
Application Tip: Apply gesso in criss-cross strokes. Once dry (about 24 hours), lightly sand it with fine-grit sandpaper for an ultra-smooth surface perfect for detailed work.
Mounting Before Painting
Painting on a flat surface seems easy, but it can lead to bad posture and warped art. Acrylic paint shrinks slightly as it dries. If your canvas isn’t secured, it can curl up like a scroll.
Stretched Canvas (Stretcher Bars):
Statistics show that 60% of the professional canvas market relies on pre-stretched canvas. Stretching your canvas onto wooden bars before painting ensures the fabric stays taut. It creates a drum-like surface that is a joy to paint on.
The Foam Board Tape-Down:
If you don’t want to buy stretcher bars yet, tape your canvas to a rigid foam board using masking tape. This keeps it flat and allows you to move the painting around easily to reach difficult angles without touching wet paint.
Phase 2: Paint Management & Chemistry

This is where we separate the amateurs from the pros. The biggest complaint with PBN kits is “dry paint” or “streaky paint.” The solution isn’t just water; it’s understanding acrylic chemistry.
The “Flow Method” (The Pro Secret)
Acrylic paint in kits is often thick, like toothpaste. When you try to paint small areas, it clumps. To fix this, you need to lower the viscosity without losing opacity.
Many people add water, but water breaks the chemical bond of the acrylic binder if you add too much (over 40%), leading to peeling paint later. The pro solution is Flow Improver (or Flow Aid). This breaks the surface tension of the water in the paint, making it slippery and fluid like ink.
Comparison of Thinning Agents:
| Feature | Water | Commercial Flow Aid | DIY Glycerin Mix |
|---|---|---|---|
| Cost | Free | High ($10-$15) | Low ($3) |
| Texture | Can become chalky | Smooth, leveling | Smooth, leveling |
| Drying Time | Fast | Moderate | Slows drying slightly |
| Binder Strength | Weakens if >40% | Maintains integrity | Maintains integrity |
DIY Flow Aid Recipe:
If you don’t want to buy Liquitex Flow Aid, you can make a chemist-approved version at home:
- 1 part Vegetable Glycerin
- 9 parts Distilled Water
- Mix in a dropper bottle. Add 1-2 drops per paint pot.
Solving the “Dry Paint” Panic
If you open a pot and it looks like rubber, don’t throw it away.
- Warm Bath: Place the closed pot in a bowl of hot water for 10 minutes. The heat softens the acrylic polymer.
- Mechanical Mixing: Use a toothpick to stir in 2-3 drops of your flow aid or warm water.
- The Nuclear Option: If it is truly hard, add a tiny drop of pure glycerin and let it sit overnight.
Using Acrylic Retarder
Sometimes the paint dries too fast, especially when you are trying to blend colors (which we will discuss in Phase 3). An Acrylic Retarder is a gel that slows down the drying time, giving you 30 to 45 minutes of working time instead of 10.
Warning: Use sparingly. If you mix in more than 15% retarder, the paint may never fully cure and will remain tacky forever.
Phase 3: Advanced Painting Techniques
Now that your canvas is prepped and your paint is chemically optimized, let’s talk about application. How do you make a paint by numbers look like real art? You stop treating it like a coloring book.
Hiding the Numbers (The #1 Pain Point)
Nothing ruins a landscape like a faint “14” showing through a yellow sun. Light colors (yellows, creams, pale pinks) have low opacity.
The White Pen Trick:
Before you paint a light section, take a Posca White Paint Pen (0.7mm extra fine) and dot out the number. Let it dry for 5 minutes. The number is gone, and you have a white base that makes your top color pop. This is much more precise than using a brush and white paint.
The White-Out Method:
In a pinch, standard office white-out works, but it can be lumpy. If you use this, dilute it slightly with water.
Layering Strategy:
Don’t try to cover a number in one thick coat. Two thin coats are always smoother than one thick glob. This aligns with the rules of oil painting which also apply to acrylics regarding layering for depth.
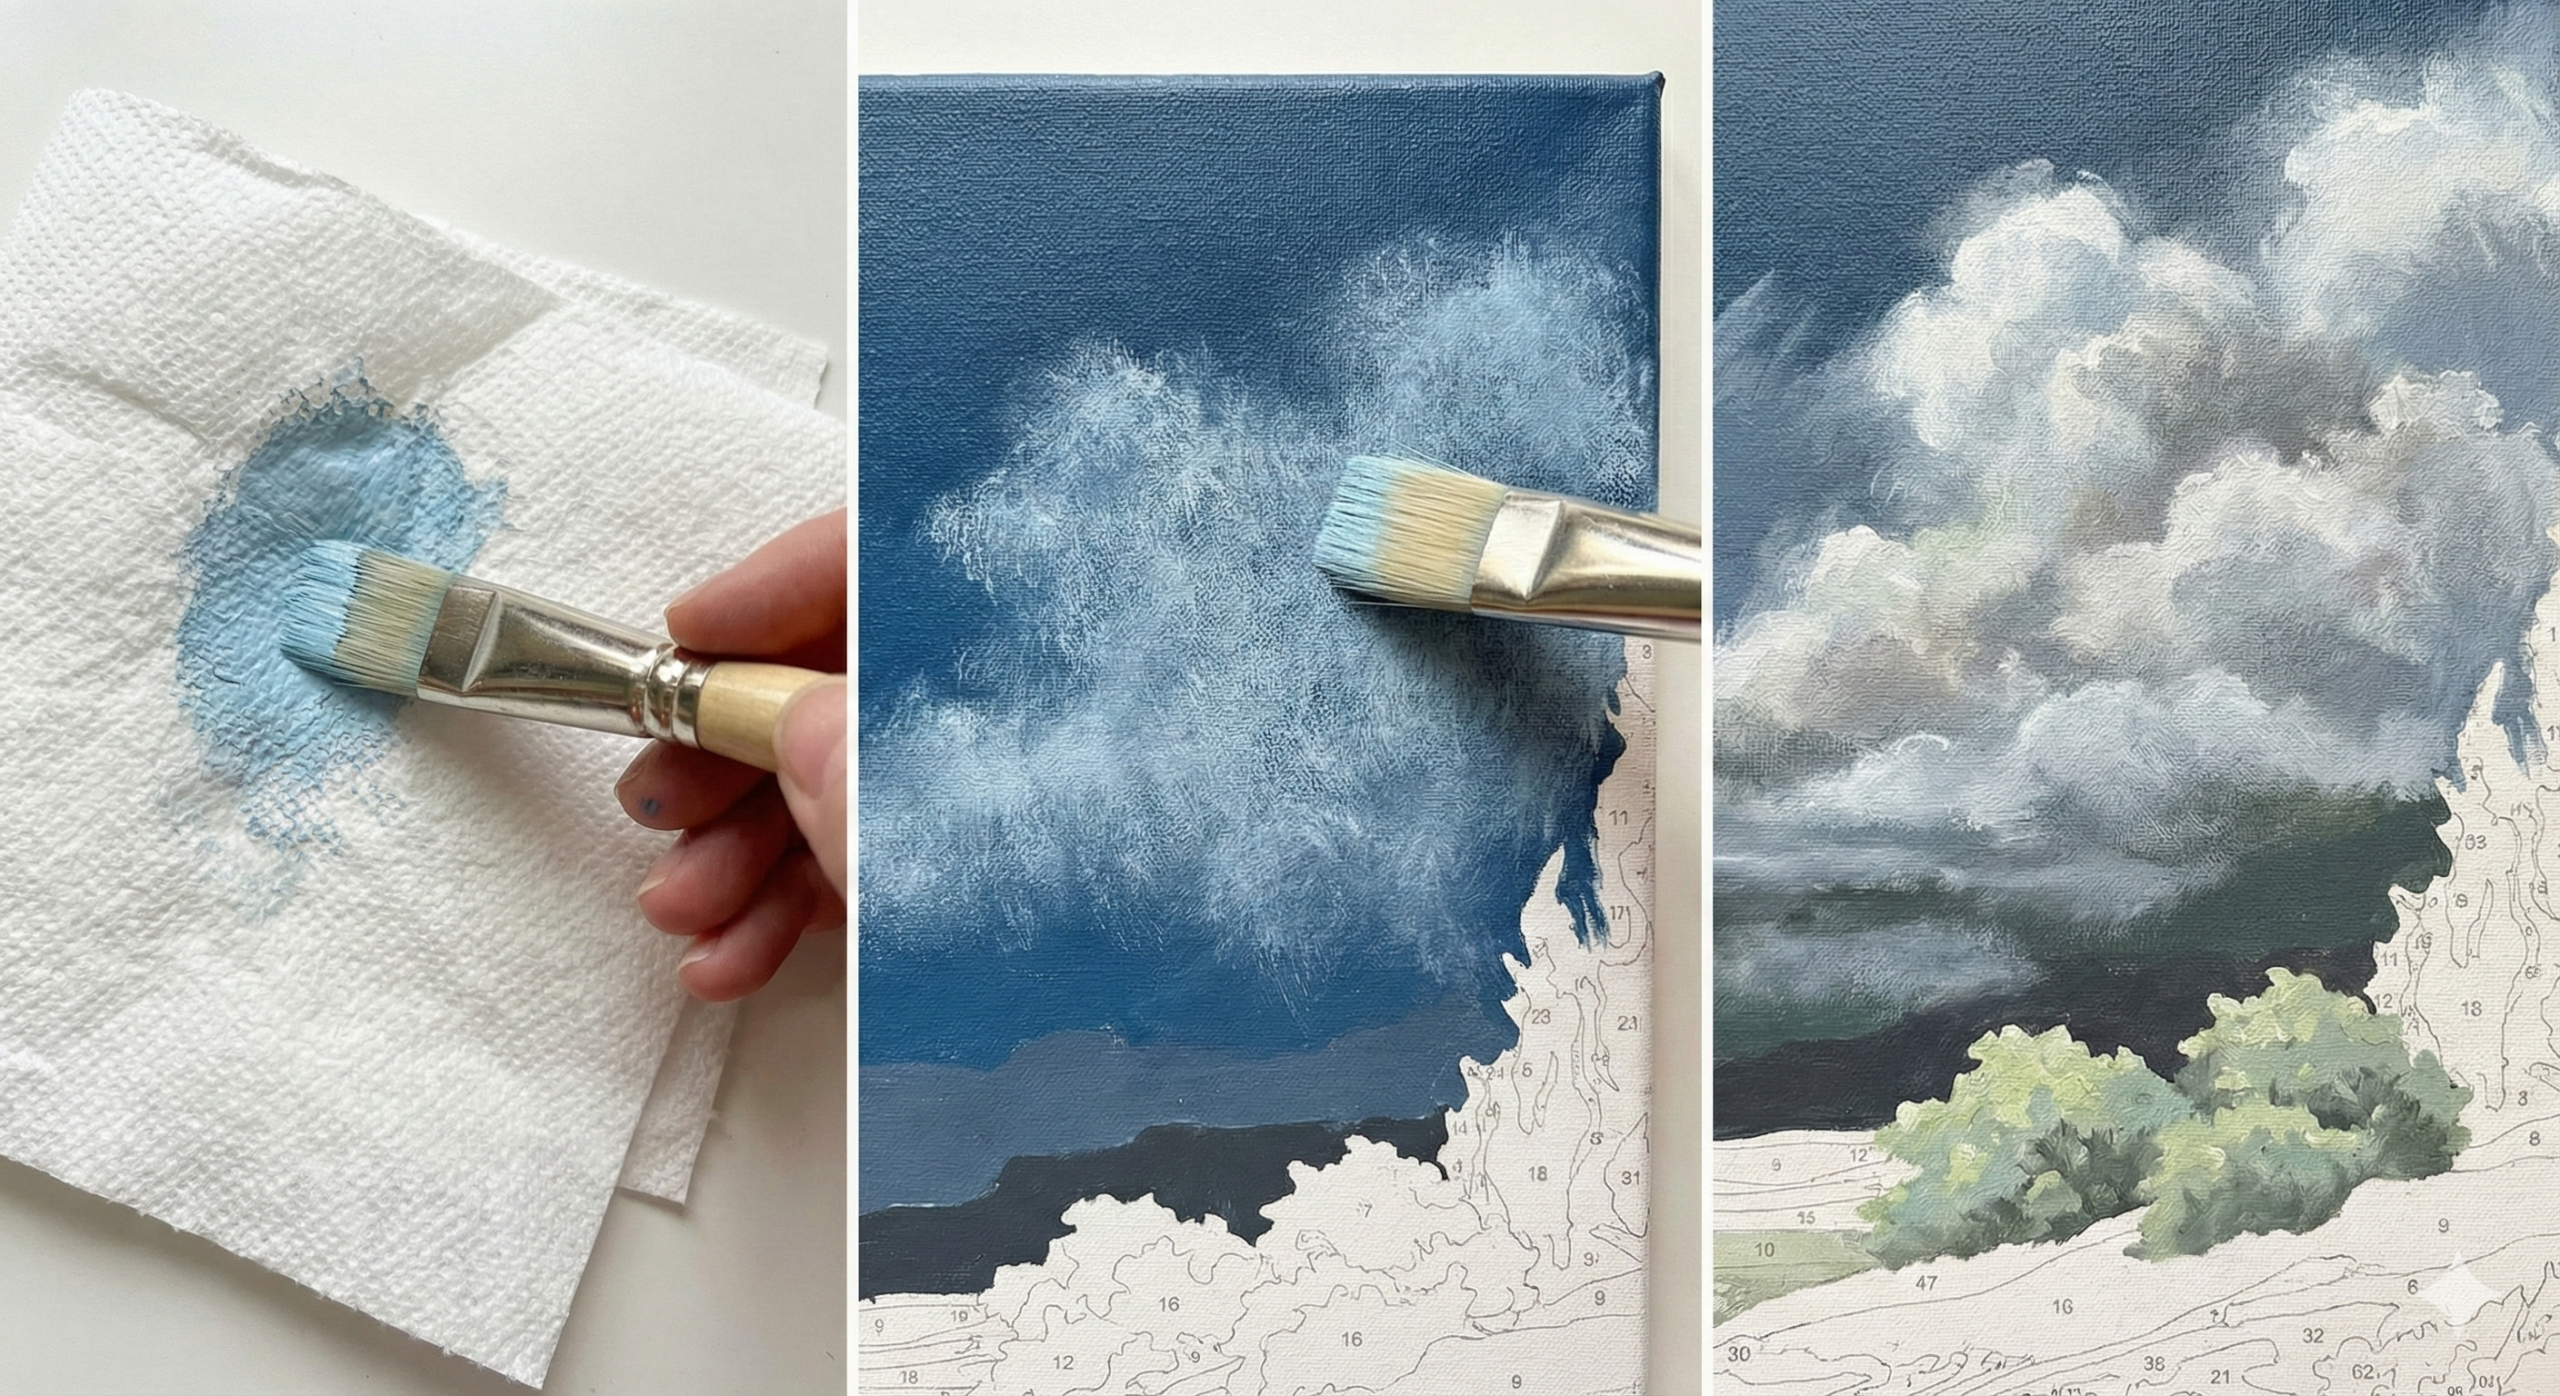
Blending Like a Pro (Say Goodbye to “Blocky” Art)
The hallmark of a PBN is “color blocking”—hard lines between shades. Real life doesn’t have hard lines. To achieve a realistic look, you need to soften these transitions.

1. Zig-Zag Blending (Wet-on-Wet)
Paint two adjacent areas with their respective colors. While both are still wet, take a clean, slightly damp brush and zigzag it back and forth across the line where they meet. The colors will physically mix on the canvas, creating a gradient.
2. Scumbling (Dry-on-Dry)
This is great for mist, clouds, or bushes. Let your base layer dry. Dip a dry brush into a lighter color, wipe most of it off on a paper towel, and then lightly scrub (scumble) it over the dark area. It creates a fuzzy, atmospheric texture. This is often used in Impressionist techniques.

3. Feathering
Paint your dark color. While wet, clean your brush and drag the paint out from the dark edge towards the empty space, letting it fade out. Then paint your light color meeting those “feathered” streaks.

Order of Operations
Should you paint dark to light? Top to bottom?
- Smudge Prevention: If you are right-handed, paint from Top-Left to Bottom-Right.
- Depth Perception: Paint the background (sky/distant mountains) first, and the foreground (flowers/people) last. This naturally helps with layering objects on top of one another.
- Color Strategy: Generally, painting dark colors first is easier because they establish the structure of the image. However, be careful not to paint dark colors into light areas, as they are hard to cover up.
Phase 4: Brushwork & Tool Upgrades
The brushes included in your kit are usually mass-produced plastic bristles. They splay, hook, and frustrate you. If you are serious about paint by numbers tips for adults, upgrading your tools is the highest ROI investment you can make ($10-$15).
Ditch the Kit Brushes?
Yes. Immediately.
You want Golden Taklon synthetic brushes. They have the perfect “snap” for acrylics.
- Size 0 and 00 (Round): For tiny details and thin lines.
- Size 1 or 2 (Round): For general filling.
- Size 4 (Flat): For large background areas like skies.
Having sharp tools allows you to cut crisp edges, which is essential for detailed styles.
Brush Care 101
Acrylic paint dries into a plastic. If it dries in the ferrule (the metal part holding the bristles), the brush is ruined.
- Never leave a brush sitting bristles-down in a water cup. It bends the bristles and dissolves the glue in the ferrule.
- Clean periodically: Every 10 minutes, swish your brush in water, even if you are using the same color. Paint creates a buildup near the metal that pushes bristles apart.
- The Masters Brush Cleaner: Use a conditioning soap like “The Masters” to reshape your brushes after every session.

Phase 5: Finishing & Sealing (The Gallery Look)
You have finished painting. Congratulations! But you aren’t done. Unsealed acrylic paint attracts dust, and over time, UV light can fade those vibrant colors. Sealing your work is crucial for art conservation.
Examining the Finish: Matte vs. Satin vs. Gloss
Acrylic varnish unifies the sheen of the painting.
- Gloss Varnish: Makes colors “wet” and vibrant. Deepens blacks.
- Pros: High contrast, professional look.
- Cons: High glare/reflection. Bad for brightly lit rooms.
- Matte Varnish: Removes all shine.
- Pros: No glare, looks very natural/velvety.
- Cons: Can make dark colors look milky or dull.
- Satin Varnish: The Goldilocks zone.
- Verdict: This is the recommended finish for most paint by numbers. It mimics the natural sheen of oil paint.
Application Tips
- Wait: Ensure the painting is bone dry (wait at least 1 week, though acrylics dry to the touch in minutes, they “cure” over days).
- Dust: Wipe the painting with a lint-free cloth.
- Stroke: Apply varnish in long, continuous strokes from one side to the other. Do not go back and forth aggressively, or you will create bubbles.
Framing & Display
How you frame your art dictates how “expensive” it looks.
- Floating Frames: These are the modern standard. The canvas sits inside the frame with a small gap, making it look like it’s floating. It requires a stretched canvas.
- Glass or No Glass? Unlike watercolors, acrylic paintings generally do not need glass. In fact, glass can obscure the texture you worked so hard to create with your gesso and heavy paint application.
For more on displaying your work, check out our guide on canvas prints and home decor.
FAQs:
Q: How long does a paint by numbers take for adults?
A: It varies by complexity. A standard 16×20″ kit usually takes between 15 to 25 hours. Highly detailed kits can take up to 40 hours.
Q: Can I mix colors if I run out?
A: Yes! This is a great exercise in color mixing. If you run out of a green, look at your remaining pots—mix a yellow and a blue to approximate the shade.
Q: What do I do if the paint doesn’t cover the number?
A: Don’t cake it on. Use the “White Pen” trick mentioned in Phase 3, or apply multiple thin layers, allowing them to dry in between.
Q: My hand shakes too much for the tiny spots. What can I do?
A: Use a “Mahl stick” or simply rest your wrist on a dry part of the canvas (or a book). Also, try a “flow aid” to make the paint glide with less pressure.
Q: Is paint by numbers considered “real” art?
A: Absolutely. It is a valid entry point into the art world. Even Leonardo da Vinci used assistants who filled in specific areas of his works!
Conclusion
Paint by numbers doesn’t have to be a simple pastime; it can be a gateway to mastering acrylics. By implementing these paint by numbers tips for adults—from the chemistry of flow improvers to the artistry of zig-zag blending—you elevate the process. You stop painting by number and start painting with purpose.
The difference between a amateur project and a gallery-quality piece often lies in the patience to prep the canvas, the knowledge to manage paint consistency, and the courage to blend outside the lines.
Grab your Golden Taklon brush, mix up some flow aid, and turn that numbered canvas into a work of art you’ll be proud to hang on your wall.

