
Painting trees in watercolor might seem challenging at first, but with a few simple techniques, you can create stunning tree artwork that captures the beauty of nature. Whether you’re a complete beginner or looking to improve your skills, learning how to paint trees in watercolor is a rewarding journey that will enhance your artistic abilities and connection to the natural world. Trees make excellent subjects because they appear in almost any landscape, come in countless varieties, and change dramatically with the seasons.
Key Points:
- Use the right watercolor paper and brushes for best results
- Master basic tree anatomy (trunk, branches, foliage)
- Learn different techniques for various tree types
- Understand how light and shadow create depth
- Practice seasonal variations to expand your skills
- Develop your own tree painting style through experimentation
Essential Supplies for Watercolor Tree Painting
Before diving into painting techniques, gathering the right supplies will set you up for success:

- Watercolor Paper: Choose 140lb (300gsm) or heavier paper that can handle water without buckling. Cold-pressed paper offers a nice texture for tree details.
- Brushes: You’ll need several sizes:
- Round brush (#8-12) for trunks and large areas
- Small round brush (#2-4) for branches and details
- Flat brush for foliage texture
- Fan brush for creating leafy effects
- Watercolor Paints: For realistic trees, have these colors ready:
- Browns (Burnt Sienna, Burnt Umber, Raw Sienna)
- Greens (Sap Green, Olive Green, Viridian)
- Blues and violets for shadows
- Yellow Ochre and Cadmium Yellow for highlights
- Additional Tools:
- Water container
- Palette for mixing colors
- Paper towels for blotting
- Masking fluid (optional)
- Salt or sponge for texture effects

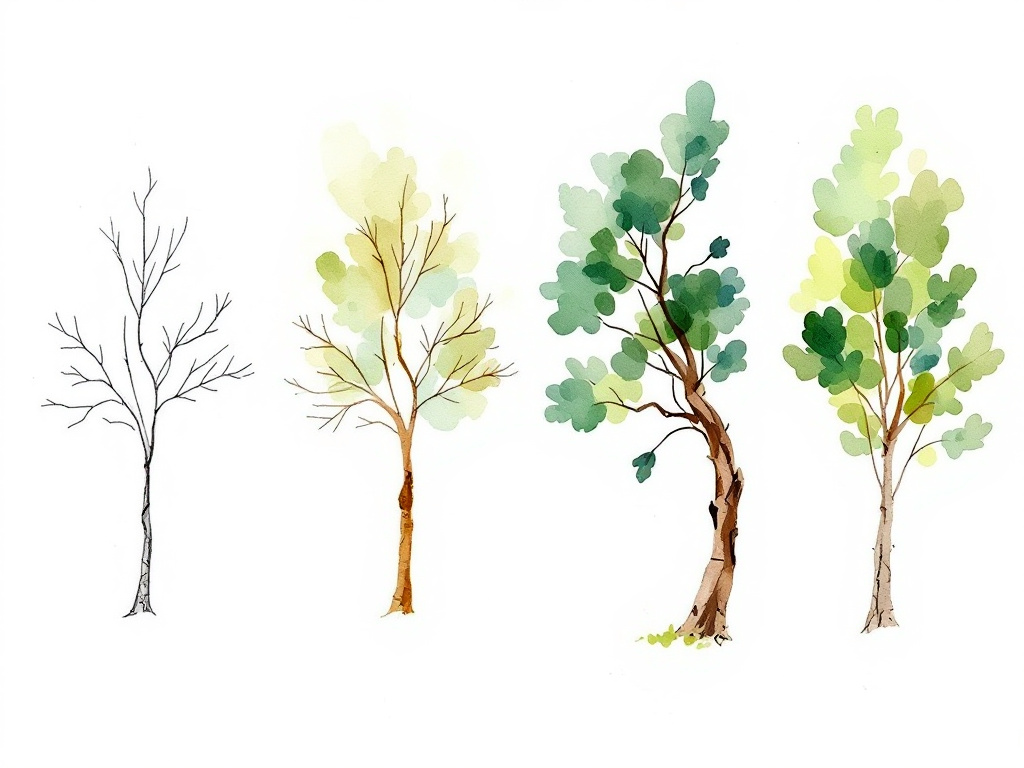
Understanding Tree Anatomy for Watercolor Painting
Before putting brush to paper, it helps to understand basic tree anatomy:
Trunk and Branches: The structure of a tree follows nature’s patterns. Trunks taper as they grow upward, and branches become thinner as they extend outward. Main branches grow at angles from the trunk, with smaller branches sprouting from them.
Foliage: Different tree species have distinctive foliage patterns:
- Deciduous trees (oak, maple) have rounded, clustered leaf masses
- Coniferous trees (pine, spruce) have triangular shapes with textured needle patterns
- Weeping trees (willow) have cascading, delicate branch structures
“To paint a tree, you must understand how it grows. Every branch reaches for light, every trunk tells the story of years of wind and weather.”
Frank Webb, watercolor master
Learning to observe real trees will dramatically improve your paintings. Notice how light filters through leaves, how shadows create depth, and how colors vary within the same tree.
How to Paint Trees in Watercolor: Basic Techniques
Now let’s explore the fundamental techniques for painting different types of trees:
Deciduous Trees (Oak, Maple, etc.)
- Start with a light sketch: Draw the basic trunk and main branch structure with a pencil.
- Paint the trunk and branches:
- Mix a warm brown (Burnt Sienna + a touch of Burnt Umber)
- Start at the base of the trunk with your darkest mix
- Use a #8 round brush, painting upward with a lighter touch as you go
- Add branches with progressively thinner lines
- Create foliage masses:
- Mix greens (try Sap Green + Yellow Ochre for a natural tone)
- Use a damp brush with a light touch
- Start with a wet-on-wet approach for the main leaf masses
- Add darker green into wet areas to create depth
- Leave small gaps for light to shine through
- Add texture and details:
- Once the initial layer is dry, add texture with a dry brush technique
- Dab with a sponge for leafy texture
- Add darker tones in shadow areas
- Dot in highlights with a lighter green mixture
Coniferous Trees (Pine, Spruce, etc.)

- Structure first: Draw a triangular shape for the overall form.
- Trunk technique: Paint a straight, narrow trunk using a mid-tone brown.
- Branch approach:
- Use downward diagonal strokes for branches
- Start heavier at the trunk connection
- Lighten pressure as you move outward
- Lower branches are longer and more horizontal
- Needle foliage:
- Mix deep greens (Sap Green + Viridian + touch of blue)
- Use short, quick strokes to suggest needles
- Work from dark to light
- Leave white spaces for snow (winter scenes)
Creating Realistic Tree Textures
Texture brings trees to life in watercolor. Here are some effective techniques:

Wet-on-Wet Technique
Perfect for creating soft, blended foliage. Wet the paper first, then apply color and let it spread naturally.
Dry Brush Technique
Use a barely damp brush with thick paint and lightly drag it across the paper’s texture. This creates a scratchy effect perfect for rough bark or textured leaves.
Salt Technique
Sprinkle table salt onto wet paint. As it dries, salt creates interesting patterns that look like clusters of leaves or dappled light.
Sponging
Dip a natural sponge in paint and dab it onto paper to create instant leaf textures.
Negative Painting
Paint around the lighter areas rather than painting the objects themselves. This is especially effective for creating light streaming through branches.
Seasonal Variations for Tree Paintings
One of the joys of painting trees is capturing their seasonal changes:
Spring Trees
- Use light, fresh greens (add yellow to your mixes)
- Add touches of pink, white, or yellow for blossoms
- Keep the foliage loose and light
- Focus on the feeling of new growth
Summer Trees
- Use rich, deep greens
- Create dense foliage with multiple layers
- Add strong shadow patterns
- Emphasize the fullness and maturity
Autumn Trees
- Use vibrant yellows, oranges, and reds
- Vary colors within the same tree
- Create scattered patterns of changing leaves
- Allow colors to blend while wet for natural transitions
Winter Trees
- Focus on the bare branch structure
- Use cooler browns for trunks
- Add subtle blue shadows on snow-covered branches
- Consider leaving white space for snow

Creating Depth with Layers and Value
To make your trees look three-dimensional:
- Work from background to foreground:
- Paint distant trees first (lighter, bluer, less detailed)
- Middle-ground trees next (medium tones, moderate detail)
- Foreground trees last (darkest, richest colors, most detailed)
- Use the value scale effectively:
- Dark values push forward
- Light values recede
- Create contrast for focal points
- Layer trees for a forest effect:
- Let each layer dry before adding the next
- Use negative painting to define tree shapes
- Create depth through overlapping
Common Challenges and Solutions
Challenge: Trees look flat and cartoon-like. Solution: Vary your color intensity and add shadows. Remember that trees aren’t one solid color.
Challenge: Tree shapes are too symmetrical. Solution: Nature isn’t perfect! Create more interesting shapes by varying branch patterns and foliage density.
Challenge: Branches look stiff and unnatural. Solution: Study real trees and notice how branches taper and curve. Practice creating fluid, natural lines.
Challenge: Foliage looks too uniform. Solution: Use multiple techniques (wet-on-wet, sponging, dry brush) within the same tree.

Project Ideas for Practice
- Tree Study Journal: Paint the same tree through different seasons or lighting conditions.
- Forest Scene: Create a simple forest with trees at different distances to practice depth.
- Single Specimen: Focus on one tree type (oak, willow, pine) and master its unique characteristics.
- Urban Trees: Paint trees in a city setting, showing their relationship to buildings.
- Stylized Trees: Experiment with more abstract or decorative tree interpretations.
Learning how to paint trees in watercolor takes practice, but the skills you develop will enhance all your landscape paintings. Remember that trees are living things with character and history. When you paint them, you’re not just depicting a generic shape but telling the story of something that has experienced seasons, weather, and time.
By mastering these simple steps and techniques for painting trees in watercolor, you’ll be able to create beautiful natural scenes that capture the essence and beauty of these magnificent parts of our natural world.
Resources for Further Learning
- Exploring Negative Painting in Watercolor – Learn this essential technique for defining trees
- Getting Started with Watercolors – Perfect for beginners
- A Beginners Guide to Watercolors – Unlock the secrets of this versatile medium
- Royal Watercolour Society – Expert tutorials and demonstrations
FAQs About Painting Trees in Watercolor
What are the best brushes for painting trees in watercolor?
For trees, you’ll want a variety of brushes: a medium round brush (#8-10) for trunks and larger areas, a small round brush (#2-4) for branches and details, and a flat brush or fan brush for foliage textures. Natural hair brushes hold more water and create smoother transitions, while synthetic brushes offer more control.
How do I add texture to watercolor tree foliage?
There are several ways to create realistic foliage texture: use a dry brush technique for leafy effects, try sponging for natural-looking leaf clusters, sprinkle salt on wet paint for interesting patterns, or use the splatter method with a toothbrush for fine leaf textures. Negative painting around lighter areas is also effective for defining leaf clusters.
What colors should I mix for realistic tree trunks?
For most tree trunks, start with a mix of Burnt Sienna and Burnt Umber for a natural brown. Add a touch of blue (like Ultramarine) for shadowed areas. For birch trees, use Yellow Ochre with touches of gray. For redwoods, mix Burnt Sienna with a bit of red. Remember that trunks aren’t a single color – they have highlights, mid-tones, and shadows.
How do I paint a watercolor forest scene with depth?
Create depth by painting background trees first using lighter, bluer tones with minimal detail. Then add middle-ground trees with medium tones and moderate detail. Finally, paint foreground trees with stronger colors and more defined features. Use overlapping and varying tree sizes to enhance the sense of distance and depth.
What’s the best watercolor paper for painting trees?
For tree paintings, 140lb (300gsm) cold-pressed watercolor paper works well as it has enough texture to create interesting bark and foliage effects but isn’t too rough. The paper should be acid-free and preferably 100% cotton for the best results. If you plan to use a lot of water for wet-on-wet techniques, consider 300lb (640gsm) paper to prevent buckling.

