
Drawing realistic eyes can seem challenging at first, but with the right techniques and a bit of practice, anyone can master this essential skill. Eyes are often called the “windows to the soul,” and learning how to draw realistic eyes will add emotional depth and life to your portraits. In this comprehensive guide, we’ll break down the process into manageable steps, from basic structure to adding those final highlights that make eyes truly come alive.
Key Points:
- Understanding basic eye anatomy is crucial for realistic drawings
- Proper proportions and structure form the foundation of lifelike eyes
- Various shading techniques create depth and dimension
- Detailed iris textures and highlights add realism
- Practice with different eye shapes and expressions expands your skills
- Common mistakes can be easily fixed with the right approach

Understanding Eye Anatomy for Realistic Drawing
Before jumping into drawing, it’s important to understand the basic structure of the human eye. The eye consists of several key parts: the eyeball, iris, pupil, upper and lower eyelids, tear ducts, and eyelashes. Each component plays a crucial role in creating a realistic appearance.
The eyeball itself is a sphere that sits in the eye socket. The visible part of this sphere is covered by the sclera (the white part), the iris (the colored part), and the pupil (the black center). The eyelids frame the eye, with the upper lid typically being more pronounced than the lower lid. Understanding these elements will help you create proper proportions in art.
“The eyes are the most important feature of a portrait. Get them right, and the rest of the drawing will fall into place.”
Portrait artist John Singer Sargent
Fun: Eye Drawing Tool
Essential Shading Techniques for Realistic Eyes
Shading is what transforms a flat outline into a three-dimensional, realistic eye. Different areas of the eye require different shading approaches:
| Eye Area | Shading Technique | Purpose |
|---|---|---|
| Eyeball | Light, even shading | Creates curvature |
| Iris | Radial shading | Shows iris texture |
| Pupil | Dark, solid black | Creates depth |
| Upper lid | Medium to dark shading | Shows lid thickness |
| Eye socket | Soft gradient | Creates orbital depth |
| Tear duct | Very light shading | Maintains moisture appearance |

Start with light pencil pressure and gradually build up layers of shading. This approach gives you more control and allows you to add depth gradually. Remember that the upper eyelid casts a shadow on the eyeball, and the eyeball itself has subtle highlights and shadows that follow its curved surface.
For beginners, an HB pencil works well for basic shading, while softer pencils (like 2B-6B) are excellent for creating darker values in areas like the pupil and under the eyelid. Check out this guide on drawing supplies for more on essential tools.
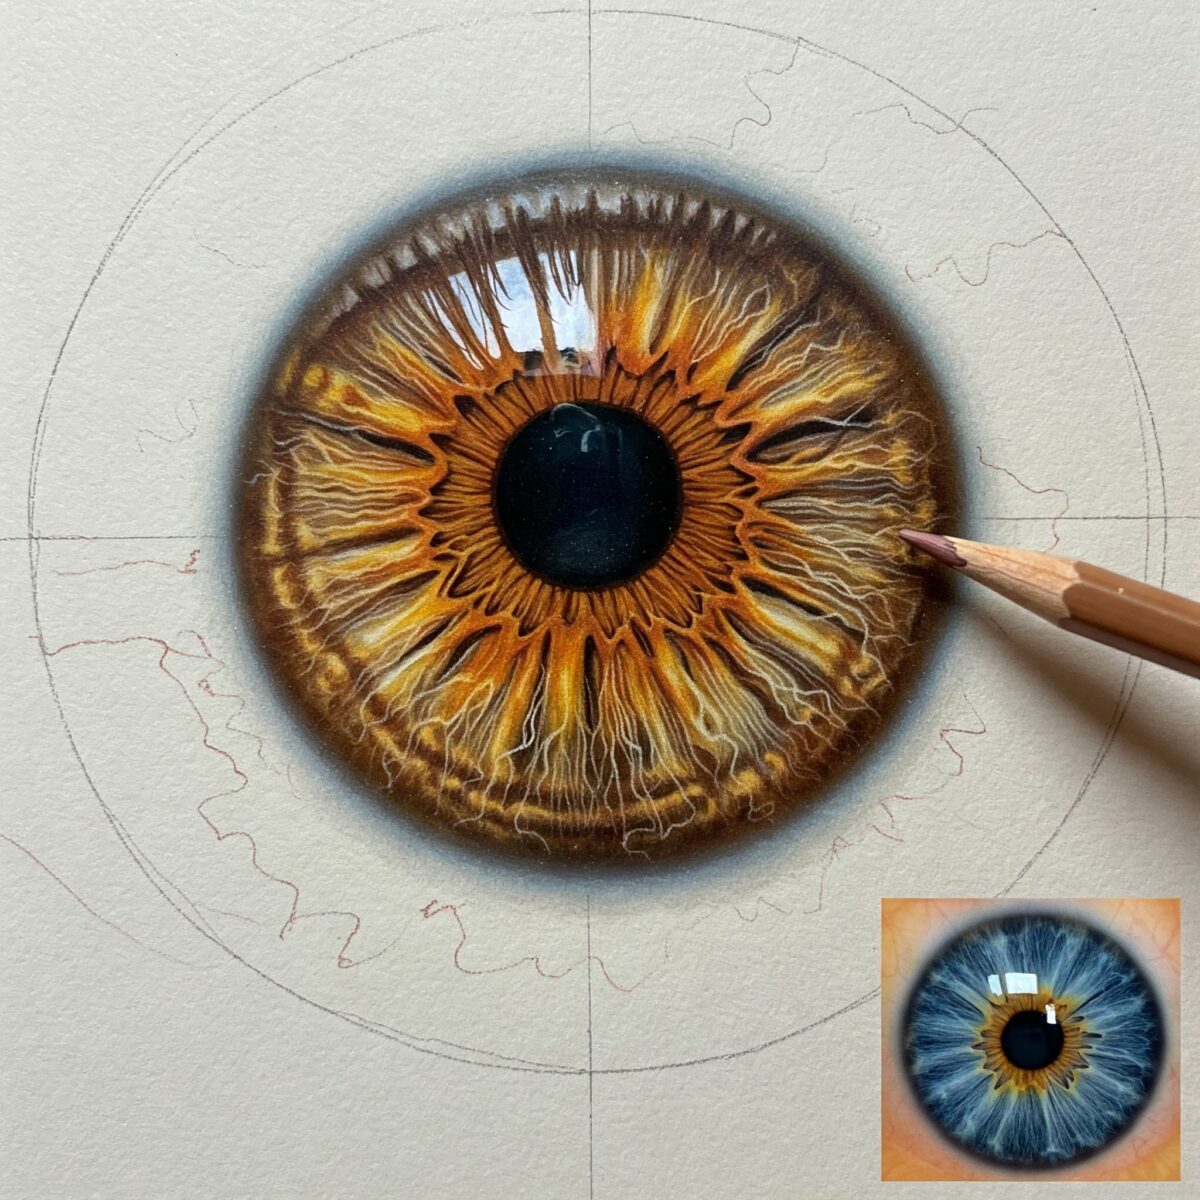
Creating Lifelike Iris Details
The iris is perhaps the most complex part of drawing a realistic eye. It contains intricate patterns that radiate from the pupil, along with variations in color and texture. Here’s how to approach it:

- Draw the basic circle of the iris
- Add the pupil in the center (remember pupils are never perfectly round in natural light)
- Draw radiating lines from the pupil outward
- Create irregular patterns between the radiating lines
- Add darker shading around the outer edge of the iris and immediately around the pupil
- Leave small areas for highlights
The iris typically has a darker outer ring and various color patterns. Even in a pencil drawing, you can suggest these variations through different shading densities. Study real eyes to understand these patterns better or look at reference photos of eyes for inspiration.
Step-by-Step Realistic Eye Drawing Process
Let’s break down the complete process of drawing a realistic eye:

Step 1: Basic Structure
Draw the almond shape of the eye and mark the position of the iris and pupil. Add guidelines for the eyelids.
Step 2: Refine the Shape
Define the upper and lower eyelids more precisely. Make sure the upper lid overlaps the iris slightly.
Step 3: Add Iris Detail
Draw the iris with its circular shape and the pupil in the center. Begin adding radiating lines from the pupil.
Step 4: Develop Eyelids and Surrounding Areas
Refine the eyelids, adding thickness to the upper lid. Sketch in the eye socket area and begin defining where the eyebrow will be.
Step 5: Begin Shading
Start with basic shading to establish the form of the eyeball. Add initial shading to the iris and deepen the pupil.
Step 6: Refine Shading and Add Eyelashes
Add more detailed shading to the iris, eye socket, and eyelids. Begin adding eyelashes with light, curved strokes.
Step 7: Add Final Details and Highlights
Place highlights on the eyeball and iris to create the gleam that makes eyes look alive. Refine eyelashes and add subtle skin texture around the eye.
For a more in-depth walkthrough, check out this video tutorial:

Common Mistakes When Drawing Realistic Eyes
Even experienced artists make mistakes when drawing eyes. Here are some common issues to watch out for:
- Symmetrical, perfect shapes: Real eyes have subtle asymmetries
- Flat shading: Without proper shading, eyes lack depth
- Hard eyelash lines: Eyelashes should taper naturally
- Missing the tear duct: This small detail adds authenticity
- Uniform iris texture: Real irises have varied patterns
- No eye moisture: The wet appearance gives eyes life
- Incorrect proportions: Eye size and placement matters
Learning to identify these mistakes in your own work is a crucial skill. Many beginners also struggle with making the whites of the eyes too white—in reality, the sclera has subtle shading and is rarely pure white except at the highlight points.
Drawing Eyes from Different Angles
Once you’ve mastered the front-facing eye, challenge yourself by drawing eyes from different angles. This skill is essential for portrait drawing and will help you create more dynamic artwork.
When drawing an eye from the side (profile), remember:
- Only a portion of the iris and pupil will be visible
- The curvature of the eyeball becomes more apparent
- The eyelid structure changes dramatically
For eyes looking up or down:
- The iris position shifts accordingly
- The amount of visible sclera changes
- The eyelid coverage adjusts based on the gaze direction
Adding Expression Through Eyes
Eyes communicate emotion more than any other facial feature. By slightly adjusting the eyelids, eyebrows, and surrounding muscles, you can portray a wide range of emotions:
- Happiness: Eyes slightly squinted, lower lid pushed up
- Sadness: Upper eyelids droop, inner corners of eyebrows raised
- Anger: Eyebrows lowered and drawn together, upper lids lowered
- Surprise: Eyes widened, eyebrows raised
- Concentration: Slight squint, eyebrows lowered slightly
Learning to capture these subtle differences will take your eye drawings from technically accurate to emotionally impactful. Try practicing different eye expressions to expand your creative skills.
Materials for Drawing Realistic Eyes
While you can draw realistic eyes with just a standard pencil, having the right materials can make the process easier:
- Pencils: Range of graphite pencils (HB to 6B)
- Paper: Smooth, medium-weight drawing paper (Bristol board works well)
- Blending tools: Blending stumps or tortillons for smooth gradients
- Eraser: Kneaded eraser for lifting highlights and fixing mistakes
- Sharpener: Keep your pencils sharp for fine details
Some artists also use colored pencils for added realism, especially when depicting colored irises. White gel pens or white colored pencils can be useful for adding crisp highlights.
Taking Your Eye Drawing Skills Further
Once you’ve mastered the basics of how to draw realistic eyes, you can expand your skills by:
- Drawing different eye shapes and types
- Incorporating eyes into full portraits
- Experimenting with colored pencils or other media
- Drawing eyes with glasses or showing tears
- Creating stylized eyes while maintaining realism
- Studying the anatomical differences in eyes across different ages and ethnicities
External resources like Draw Like a Pro offer additional exercises and tutorials to develop your skills further.
Conclusion
Learning how to draw realistic eyes takes practice and patience, but the basic principles are accessible to any beginner willing to observe carefully and follow the steps. Remember that the most lifelike eyes balance accuracy with subtle imperfections. Start with basic shapes, develop proper shading techniques, and pay special attention to highlights and reflections. As you continue practicing, you’ll develop an intuitive understanding of eye structure that will enhance all your portrait work. So grab your pencil, take a closer look at your own eyes in the mirror, and start drawing—you might surprise yourself with how quickly you can create realistic eyes that truly seem to look back at you.
FAQ: Drawing Realistic Eyes
How do I draw realistic eyebrows?
Start with light, feathery strokes following the natural growth pattern of eyebrow hairs. Avoid drawing individual hairs throughout—instead, create a soft base shape and add detail strokes on top. Remember that eyebrows are thicker toward the nose and taper toward the outer edges.
What’s the best way to blend pencil for realistic eye drawing?
Use blending stumps (tortillons) for precise control, or tissue for larger areas. Layer your graphite lightly and build up gradually. For very smooth transitions, try circular blending motions with light pressure. Leave highlights unblended or lift graphite with a kneaded eraser.
How do I draw eyes of different ethnicities?
Study the structural differences in eye shapes across ethnicities. For example, East Asian eyes often have a less prominent eye crease or epicanthic fold, while many Middle Eastern eyes have distinctive almond shapes. Research and use proper references to avoid stereotypes while capturing realistic distinctions.
What are the best pencils for realistic eye drawing?
A range of graphite hardnesses works best: H or HB for light initial sketching and highlights, 2B-4B for mid-tones and iris details, and 5B-8B for deep shadows in the pupil and lash areas. Mechanical pencils (0.5mm) work well for fine details like eyelashes.
How do I draw realistic crying eyes?
To draw eyes with tears, understand how light refracts through water. Tears form a curved surface that creates highlights and reflections. Draw tear outlines lightly, leave white highlights, and add subtle shadows beneath. The eyelids and surrounding skin may appear slightly reddened and puffy, especially at the lower lid.

