Drawing faces might seem intimidating at first, but with the right guidelines and practice, anyone can learn how to draw faces for beginners. The human face follows certain proportions that, once understood, make drawing portraits much easier and more realistic. This comprehensive guide will walk you through the essential facial proportions, common mistakes to avoid, and step-by-step techniques to help you create believable faces even if you’ve never drawn before.
Key Points:
- Learn the classic facial proportion guidelines used by artists for centuries
- Master the placement of features using simple measurements
- Understand common mistakes beginners make when drawing faces
- Practice with step-by-step methods for different angles and face shapes
- Develop your skills gradually through targeted exercises
Understanding How to Draw Faces for Beginners
When learning how to draw faces for beginners, it’s essential to start with the basic structure. The human face follows remarkably consistent proportions that artists have studied for centuries. These proportions create a framework that helps you place features correctly, regardless of the individual face you’re drawing.
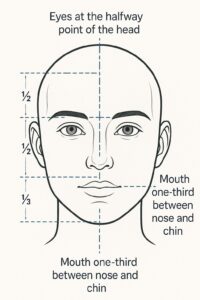
The classic proportion method divides the face into equal parts:
- The eyes sit at the halfway point of the head
- The bottom of the nose falls halfway between the eyes and chin
- The mouth sits approximately one-third of the way between the nose and chin
- The ears typically align with the eyes and nose
Essential Tools for Face Drawing
Before diving into techniques, gather these basic supplies:
| Tool | Purpose | Recommended for Beginners |
|---|---|---|
| HB Pencil | Light sketching and guidelines | ✓ |
| 2B Pencil | Adding darker details | ✓ |
| Kneaded Eraser | Precision erasing | ✓ |
| Sketchbook | Practice surface | ✓ |
| Blending Stump | Smoothing shadows | Optional |
| Drawing References | Visual guidance | ✓ |
Face Mapping: The Foundation of Portrait Drawing
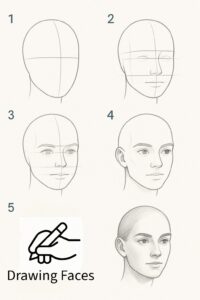
Face mapping is the process of dividing the face into proportional sections that help guide feature placement. This technique, similar to the Loomis head method used by professional artists, provides a reliable framework.
To begin mapping a face:
- Draw an oval or egg shape for the head
- Draw a vertical line down the center (the symmetry line)
- Draw a horizontal line across the middle (the eye line)
- Divide the lower half with another line (the nose line)
- Place a final line between the nose and chin (the mouth line)
This simple grid creates the foundation for accurate facial features placement, making it much easier to achieve realistic proportions.
Placing Facial Features Correctly
The most challenging aspect of learning how to draw faces for beginners is getting the features in the right place. Here’s how to place each feature:
Eyes
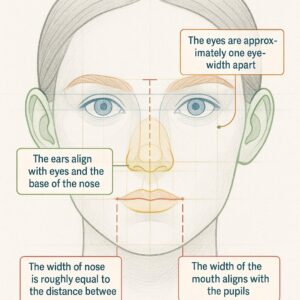
- Eyes are positioned on the horizontal halfway line
- The space between eyes equals approximately one eye width
- The outer corners of the eyes typically align with the widest part of the nose
Nose
- The bottom of the nose reaches the nose line (¾ down from the top of the head)
- The width of the nose is usually about the distance between the eyes
- The bridge of the nose connects to the forehead between the eyebrows
Mouth
- The mouth sits on the mouth line, about one-third from the nose to the chin
- The corners of the mouth generally align with the centers of the eyes or pupils
- The lower lip is typically fuller than the upper lip
Ears
- Ears usually extend from the eye line to the nose line
- The tops of the ears generally align with the eyebrows
- The bottoms of the ears align approximately with the bottom of the nose
Common Face Drawing Mistakes to Avoid
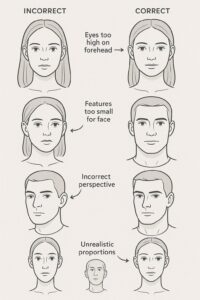
Beginning artists often make these mistakes when learning how to draw faces:
- Placing features too high: The eyes are at the center of the head, not near the top
- Making features too small: Features often appear larger than you might think
- Creating perfectly symmetrical faces: Real faces have subtle asymmetry
- Drawing what you “know” instead of what you see: Observe carefully rather than relying on symbols
- Ignoring the structure beneath: Understanding the skull and muscles improves realism
“Drawing is not what one sees, but what one can make others see.”
Edgar Degas
Different Face Shapes and How to Draw Them
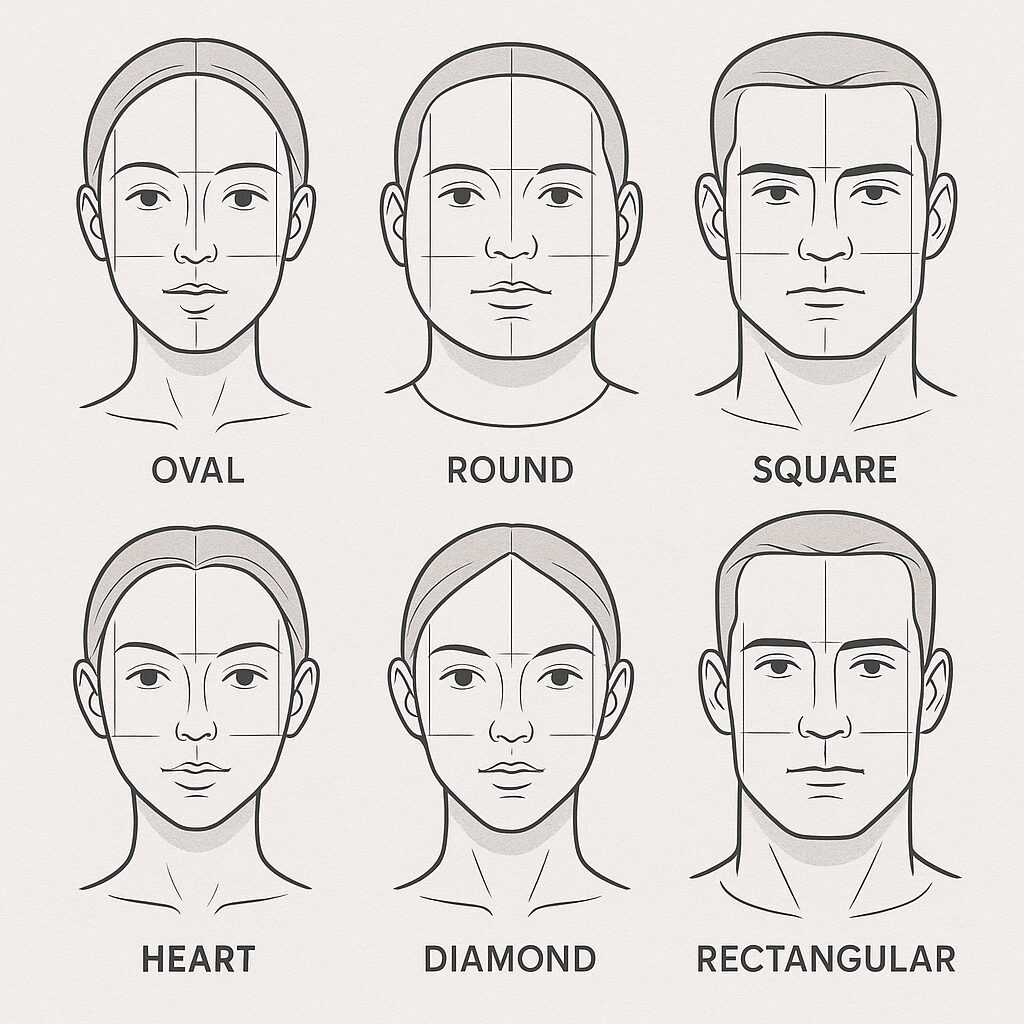
Faces come in various shapes, each requiring slight adjustments to the basic proportions:
- Oval: The classic face shape with balanced proportions
- Round: Wider cheeks and a softer jawline
- Square: Strong jawline and wider forehead
- Heart: Wider forehead tapering to a pointed chin
- Diamond: Narrow forehead and jawline with wider cheekbones
- Rectangular: Longer face with less width
When drawing different face shapes, keep the same central guidelines but adjust the outer contours accordingly. This helps maintain proper feature placement while capturing the unique characteristics of each face type.
 Various face shapes with proportion guides for diverse portrait drawing
Step-by-Step Face Drawing Exercise
Follow this exercise to practice how to draw faces for beginners:
- Draw the basic shape: Start with an oval or egg shape
- Add center lines: Draw vertical and horizontal guidelines
- Mark feature positions: Place dots where features will go based on proportions
- Sketch the eyes: Draw simple almond shapes on the eye line
- Add the nose: Draw a simple outline extending to the nose line
- Place the mouth: Draw the lips on the mouth line
- Outline the ears: Draw the ears between the eye and nose lines
- Refine the features: Add details to eyes, nose, and mouth
- Define the hair: Draw the hairline and basic hair shape
- Add shading: Create simple shadows to add dimension
Practicing this sequence repeatedly will help develop muscle memory and improve your understanding of facial proportions.
Drawing Faces from Different Angles
Once you’ve mastered the front view, try these tips for other angles:
- Profile view: The eye line and other proportions remain the same
- Three-quarter view: The center line curves around the face
- Looking up/down: The feature lines curve accordingly
For more advanced techniques on drawing faces from different angles, check out this guide on creating depth in paintings.
Practice Techniques to Improve Your Face Drawing
Improvement comes with practice. Try these exercises:
- Draw the same face multiple times from different angles
- Practice just one feature (like eyes or noses) repeatedly
- Draw from photo references and compare your results
- Try quick sketches (2-5 minutes) to capture proportions without details
- Practice drawing various head shapes to understand how proportions adapt
The Proko method, popularized by art instructor Stan Prokopenko, emphasizes starting with simple shapes and gradually refining them—a perfect approach for beginners. You can find helpful tutorials on YouTube that demonstrate these techniques:
Adding Personality to Your Face Drawings
Once you’ve mastered basic proportions, you can add personality through:
- Expressions: Subtle changes in eyebrow position, eye shape, and mouth
- Unique features: Individual characteristics like freckles, wrinkles, or dimples
- Hair styles: Different hairlines and textures
- Lighting: Shadows that enhance facial structure
Remember that the goal isn’t photorealism at first—focus on capturing the essence of the face using correct proportions.
For more ideas on developing your own artistic style, explore the beginners guide to famous artist styles for inspiration.
Beyond Basic Proportions: Next Steps
After mastering basic proportions, expand your skills by:
- Studying facial anatomy to understand what’s beneath the surface
- Learning about the rule of thirds in composition
- Exploring techniques for drawing realistic eyes
- Practicing shading techniques to add dimension
Learning how to draw faces for beginners is just the beginning of an artistic journey that can lead to creating stunning portraits. Remember that even master artists like Andrew Loomis, whose methods are still taught today, started with basic proportions.
As you continue practicing how to draw faces for beginners, you’ll develop an intuitive understanding of proportions that will make face drawing feel natural and enjoyable. The key is consistent practice and patience—with each drawing, you’ll see improvement in your ability to capture the human face in all its fascinating complexity.
FAQ: How to Draw Faces for Beginners

How do I draw eyes step by step?
Start by drawing almond shapes on the eye line, then add circles for irises, smaller circles for pupils, and finally details like eyelids, eyelashes, and subtle shading for depth. Remember that eyes are usually one eye-width apart.
What’s the easiest way to draw a nose?
Begin with a small triangle shape for the bridge, extending down to the nose line. Add two small circles for nostrils, then refine the shape with subtle curves to create the tip and sides of the nose. Keep shading minimal at first.
How do I make my drawings of lips look realistic?
Draw the mouth line first, then mark the width of the mouth aligning with the pupils. Create a shallow “M” shape for the upper lip and a gentle curve for the fuller lower lip. Add a subtle line where the lips meet and minimal shading for dimension.
What’s the difference between male and female face drawing?
Male faces typically have more angular features, squared jawlines, thicker eyebrows, and larger noses. Female faces often have softer jawlines, larger eyes relative to face size, higher cheekbones, and fuller lips. However, there’s significant variation in both.
How can I practice drawing facial expressions?
Study your own expressions in a mirror, take reference photos of different emotions, and practice drawing the same face with varied expressions. Focus on how eyebrows, eye shapes, and mouth positions change with different emotions.

