
I keep a painted rock on my desk – a small river stone covered in swirling blues and purples that a former student left on my classroom windowsill years ago. Every time I glance at it, I remember why I taught art in the first place: those moments when someone discovers they can make something beautiful with their own hands.
Rock painting has quietly become one of those rare activities that captures what I loved most about teaching. It’s immediate. Forgiving. You don’t need expensive supplies or years of training – just a smooth stone, some acrylic paint, and the willingness to try. And here’s the thing: a little acrylic painting on rocks is showing up everywhere now, hidden in parks and gardens, spreading this wonderful chain reaction of surprise and delight.
What makes rock painting special isn’t just the finished piece. It’s what happens while you’re doing it. Your breathing slows. Your mind quiets. You’re focused entirely on getting that tiny brushstroke just right, layering colors, watching something emerge from an ordinary stone. It’s meditation disguised as craft.
The beauty is in the small scale. You can finish a piece in an afternoon. There’s no intimidating blank canvas staring you down, no pressure to create gallery-worthy work. Just you, a palm-sized stone, and whatever image you want to bring into the world – whether that’s a simple polka-dot pattern or an intricate mandala that takes hours to complete.
And when you hide that painted rock for someone else to find? You’ve created a moment of unexpected joy for a stranger. That’s not small. That’s the kind of thing that reminds people there’s still magic in the world.

Key Points for Getting Started with Rock Painting:
• Choose the Right Rocks: Learn what makes the perfect canvas for your artwork
• Essential Supplies: Discover the must-have tools that won’t break the bank
• Preparation Techniques: Master the steps that ensure your art lasts for years
• Simple Painting Methods: Practice easy techniques that create professional-looking results
• Proper Sealing: Protect your masterpiece from weather and wear
• Creative Ideas: Find inspiration for designs that express your personality
Finding Your Perfect Rock Canvas
The foundation of any great rock painting project starts with choosing the right stone. Not all rocks are created equal when it comes to painting, and selecting the perfect one can make the difference between a frustrating experience and a delightful creative session.
Where to Hunt for the Best Rocks:
The ideal painting rocks are smooth, flat, and roughly palm-sized. Nature has already done most of the work for you in places where water has tumbled stones for years. Check out these prime locations:
• Riverbanks and creek beds – Water naturally smooths rough edges
• Lake shores – Gentle waves create perfectly rounded stones
• Beach areas – Ocean tumbling produces ideal surfaces
• Your own backyard – You might be surprised what’s already there
• Craft stores – If natural hunting isn’t your thing, bags of smooth rocks are readily available
What Makes a Rock Paint-Ready:
Look for stones that feel good in your hand and have a surface area large enough for your design. Avoid rocks with deep cracks, extremely porous surfaces, or too many bumps. A good test is to run your finger across the surface – if it feels relatively smooth, it’s probably perfect for painting.
Once you’ve found your treasure, give it a thorough cleaning with soap and warm water. This removes dirt, oils, and any residue that might prevent paint from sticking properly. Let your rock dry completely before moving to the next step.
Essential Acrylic Painting on Rocks Supplies
One of the most appealing aspects of rock painting is how affordable it is to get started. You probably already have some of these supplies at home, and the rest won’t cost you much.
| Supply | Purpose | What to Buy |
|---|---|---|
| Acrylic Paint | Main coloring medium | Multi-surface craft acrylics work perfectly |
| Brushes | Application tools | Small synthetic brushes in various sizes |
| Pencil | Design sketching | Regular #2 pencil with eraser |
| Sealer | Weather protection | Clear acrylic spray or brush-on sealer |
| Water Container | Brush cleaning | Any small jar or cup |
| Paper Towels | Cleanup and blending | Regular household paper towels |
Pro Tip: Start with a basic acrylic paint set that includes primary colors plus black and white. You can mix these to create virtually any color you need, making your initial investment go further.
The beauty of acrylic paint lies in its versatility and durability. Unlike watercolors that run when wet or tempera paints that chip easily, acrylics dry to a permanent, flexible finish that bonds well with stone surfaces. When properly sealed, your rock art can withstand rain, sun, and handling for years.
Preparing Your Stone for Paint
Proper preparation is the secret to rock art that looks professional and lasts. While you can paint directly onto a clean rock, taking a few extra steps will dramatically improve your results.
The Base Coat Game-Changer:
Applying a base coat might seem like extra work, but it’s worth every minute. A thin layer of white or light-colored acrylic paint serves several important purposes:
• Makes colors appear more vibrant and true
• Creates a uniform surface for painting
• Helps paint adhere better to the rock
• Provides a neutral background for light-colored designs
Use a larger flat brush to apply the base coat in thin, even strokes. Don’t worry about getting every tiny crevice – just cover the main painting area. Let this dry completely before proceeding.
Sketching Your Design:
Once your base coat is dry, lightly sketch your design with a pencil. This serves as your roadmap and helps ensure proportions look right before you commit with paint. Don’t press too hard – you want guidelines, not permanent marks that show through your paint.
For inspiration on color techniques that work beautifully on rocks, check out our comprehensive guide on color theory basics that explains how different hues work together.
Simple Techniques for Stunning Results

Rock painting doesn’t require advanced artistic skills. These basic techniques will help you create impressive designs that look like they came from an experienced artist.
Layering for Depth:
Think of your design in layers, starting with the largest areas first. For example, if you’re painting a sunset scene, paint the entire background sky first, then add the horizon line, and finally the details like trees or birds. Each layer should be completely dry before adding the next.
Dot Painting Magic:
This meditative technique creates beautiful mandala patterns and geometric designs. Use the end of a paintbrush, cotton swab, or even a toothpick dipped in paint to create perfect dots. Start with a center point and work outward in symmetrical patterns. The key is consistency in dot size and spacing.
Clean Line Secrets:
For crisp edges and clean lines, use painter’s tape to mask off areas, or invest in a fine liner brush. When outlining with black paint, wait until all other colors are completely dry to avoid muddy mixing.
Blending Techniques:
While paint is still wet, you can blend colors together for smooth transitions. This works especially well for backgrounds like sunsets or ocean scenes. Work quickly since acrylics dry fast.
For more advanced painting techniques that can be adapted to rock surfaces, explore our detailed palette knife painting guide which offers unique texturing methods.
Sealing Your Masterpiece

The final step in rock painting is also the most crucial for longevity. Proper sealing protects your artwork from the elements and ensures it maintains its vibrant appearance.
Choosing the Right Sealer:
Clear acrylic sealers come in several finishes:
• Matte – No shine, natural look
• Satin – Slight sheen, middle ground
• Gloss – High shine, most protection
For outdoor rocks, gloss provides the best weather protection, while matte gives a more natural appearance for indoor display pieces.
Application Technique:
Work in a well-ventilated area and lay down newspaper to protect surfaces. Hold spray sealers 8-10 inches from the rock and apply in light, even coats. Two thin coats provide better protection than one thick coat, which can run or create an uneven finish.
Allow the first coat to dry completely (usually 15-20 minutes) before applying the second coat. For brush-on sealers, use smooth strokes and avoid going over the same area multiple times while wet.
Creative Ideas and Inspiration

The possibilities for rock painting designs are truly endless. Here are some popular themes to get your creativity flowing:
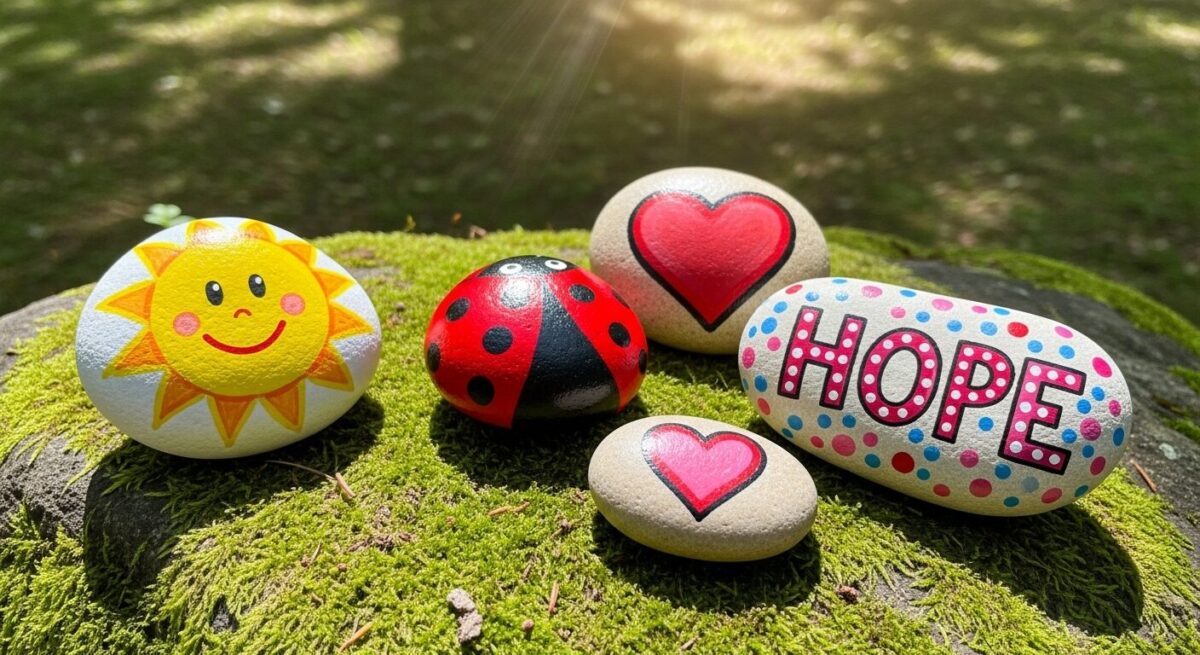
Nature Themes: • Ladybugs and butterflies • Flowers and leaves• Ocean waves and seashells • Mountain landscapes
Inspirational Messages: • Single uplifting words like “HOPE” or “DREAM” • Short motivational phrases • Positive symbols like hearts or peace signs
Character Designs: • Simple faces with different expressions • Cartoon animals • Seasonal characters (snowmen, pumpkins)
Abstract Patterns: • Geometric shapes • Mandala designs • Color gradients • Textured patterns
For broader artistic inspiration that can be adapted to rock painting, visit our exploration of abstract art principles and discover how famous artists like Claude Monet used color and texture in their masterpieces.
The Kindness Rock Movement
One of the most heartwarming aspects of rock painting is the global kindness rock movement. Participants paint positive messages on rocks and hide them in public places for others to find. This simple act creates unexpected moments of joy for strangers and builds community connections.

How to Participate:
- Paint rocks with uplifting messages or cheerful designs
- Include “#KindnessRocks” or similar hashtags
- Hide them in parks, walking trails, or other public spaces
- Share photos on social media to spread awareness
- If you find a painted rock, take a photo and rehide it for others to discover
This movement demonstrates how art can be a powerful force for spreading positivity and connecting people across communities.
Troubleshooting Common Problems
Streaky Paint: This usually happens when paint is too thin or the brush is too dry. Add less water to your paint and ensure you’re applying adequate coverage.
Chipping Paint: Indicates inadequate surface preparation or skipping the sealer step. Always clean rocks thoroughly and apply a protective topcoat.
Dull Colors: A base coat of white paint makes colors appear more vibrant. Also, ensure you’re using quality acrylic paints rather than very cheap alternatives.
Smudging: Allow each layer to dry completely before adding details or handling. Acrylics dry quickly, but rushing can ruin your work.
Frequently Asked Questions
What type of rocks work best for acrylic painting? Smooth, flat rocks with minimal texture provide the best painting surface. River rocks, lake stones, and beach pebbles are ideal because water action has already smoothed their surfaces.
How long does acrylic paint take to dry on rocks? Acrylic paint typically dries to the touch within 15-30 minutes on rock surfaces, but allow 1-2 hours for complete drying before sealing or handling extensively.
Can painted rocks stay outside in winter? Yes, when properly sealed with quality acrylic sealer, painted rocks can withstand freezing temperatures, snow, and rain without damage to the artwork.
Do I need expensive art supplies for rock painting? No, basic craft-grade acrylic paints and inexpensive synthetic brushes work perfectly for rock painting. The key is using quality sealer for protection.
How do I fix mistakes on painted rocks? For small errors, let the paint dry completely, then paint over the mistake. For major changes, you can sand the rock smooth and start over, or embrace the imperfection as part of the rock’s character.
Where should I hide kindness rocks? Choose public spaces where people walk regularly but avoid private property. Parks, walking trails, playgrounds, and community gardens are popular spots.
Final Thoughts on Acrylic Painting on Rocks
Rock painting captures what I loved most about teaching. It’s immediate, forgiving, and accessible. You don’t need expensive supplies or training – just stones, acrylic paint, and willingness to try.
What makes it special isn’t the finished piece. It’s what happens while you paint. Your breathing slows. Your mind quiets. You’re entirely focused on that tiny brushstroke, watching something emerge from an ordinary stone. Meditation disguised as craft.
And when you hide that rock for someone to find? You’ve created unexpected joy for a stranger. That’s not small – that’s magic.
Additional Resources
- Rock Painting 101 – Comprehensive tutorials and community forums
- The Kindness Rocks Project – Official headquarters of the global movement
- Acrylic Paint Safety Guidelines – Important safety information for all ages
- Free PDF Paint Colour Mixing Guide – Downloadable beginner-friendly color mixing chart and guide
- YouTube: Rock Painting Tutorials – Video demonstrations of techniques
- Environmental Considerations for Rock Painting – National Park Service guidelines for responsible rock painting

