
Learning anatomy for artists beginners can feel overwhelming when you’re just starting your artistic journey. Many new artists struggle with making their figure drawings look realistic, often ending up with characters that seem off-balance or proportionally incorrect. The good news? Understanding basic human anatomy doesn’t require medical school – just the right foundation and consistent practice. This comprehensive guide will break down essential anatomical knowledge into digestible steps, helping you create more convincing and realistic figure drawings that truly capture the human form.
Key Points Summary
- Master the 8-head proportion system for accurate figure construction
- Learn essential skeletal landmarks that affect surface anatomy
- Understand major muscle groups that influence body shape
- Use geometric shapes to build solid anatomical foundations
- Practice systematically to avoid common beginner mistakes
- Apply anatomical knowledge to improve drawing realism
_(14762456404).jpg "Anatomy for Artists Beginners: Key Knowledge to Improve Your Figure Drawing Realism 3")
Why Anatomy Matters for Artists
Throughout history, master artists like Leonardo da Vinci and Michelangelo spent countless hours studying human anatomy for artists to create their masterpieces. Da Vinci even performed dissections to understand how muscles, bones, and organs worked together beneath the skin. While you don’t need to go that far, understanding basic anatomy will dramatically improve your realistic figure drawing abilities.
Think of anatomy as the foundation of a house. Without a solid foundation, even the most beautiful decorative elements will look unstable. Similarly, without understanding how the human body is constructed, your figure drawings may lack the convincing three-dimensional quality that makes art truly compelling.
The difference between stylized and realistic approaches is significant. Cartoon artists might exaggerate or simplify anatomy for effect, but even they need to understand the underlying structure to make their exaggerations work. When you grasp drawing anatomy basics, you gain the freedom to choose how realistic or stylized you want your art to be.
Essential Anatomical Knowledge for Beginners
The 8-Head Proportion System
The foundation of human body proportions art lies in the classical 8-head system used by artists for centuries. This system divides the human body into eight equal parts, each measuring one head-length. Here’s how it breaks down:
| Head Unit | Body Part | Key Features |
|---|---|---|
| 1 | Head | Skull, facial features |
| 2 | Neck to nipple line | Shoulders, chest |
| 3 | Nipple to bottom of ribcage | Chest muscles, ribs |
| 4 | Ribcage to navel | Waist, core muscles |
| 5 | Navel to pubic bone | Lower torso, hips |
| 6 | Pubic bone to mid-thigh | Upper leg muscles |
| 7 | Mid-thigh to below knee | Quadriceps, knee joint |
| 8 | Below knee to feet | Calves, ankles, feet |
Major Bone Landmarks

Understanding skeletal structure drawing helps you locate where muscles attach and how the body moves. Focus on these key bony landmarks that you can actually see or feel on the surface:
- Skull: Creates the basic head shape
- Spine: The central column affecting posture
- Ribcage: Protects organs and creates chest volume
- Pelvis: Hip bones that support the torso
- Shoulder blades: Affect back muscle appearance
- Joints: Knees, elbows, wrists, and ankles
These landmarks remain consistent regardless of body type or muscle development, making them reliable reference points for figure construction.
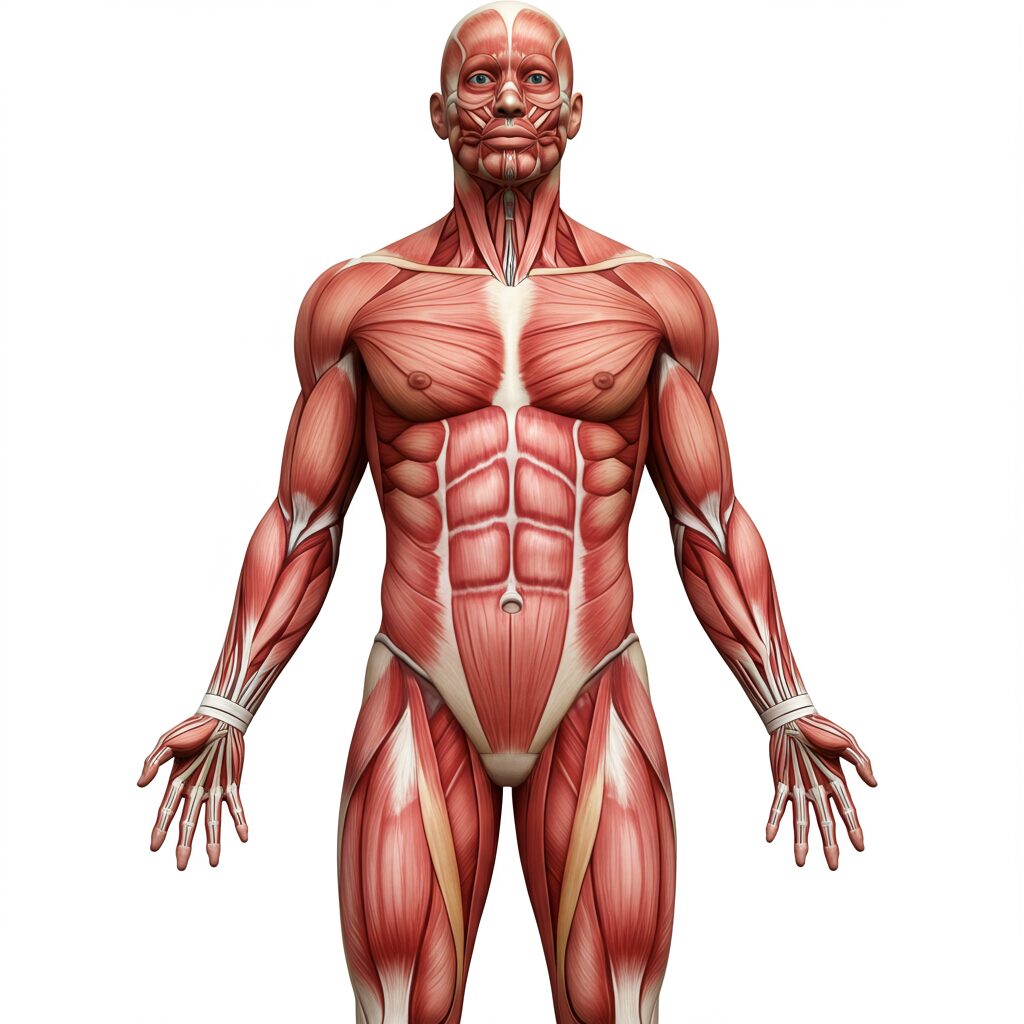
Key Muscle Groups
While there are over 600 muscles in the human body, artists only need to focus on major muscle groups that affect surface appearance:

Upper Body:
- Chest muscles (pectorals)
- Shoulder muscles (deltoids)
- Arm muscles (biceps and triceps)
- Back muscles (latissimus dorsi and trapezius)
Lower Body:
- Thigh muscles (quadriceps and hamstrings)
- Calf muscles (gastrocnemius)
- Glute muscles
Understanding these muscles helps you draw figures with proper volume and form, essential for creating dimensional figures.
Getting Started – Foundation Techniques with Anatomy for Artists Beginners
Building with Basic Shapes

The secret to constructive figure drawing lies in breaking down complex human forms into simple geometric shapes. This approach, recommended by art schools worldwide, makes anatomy less intimidating and more manageable.
Start with these basic shapes:
- Head: Oval or egg shape
- Torso: Rectangle or cylinder
- Arms and legs: Cylinders of varying thickness
- Hands and feet: Simplified box shapes initially
- Joints: Small spheres or circles
“The human figure is like a complex machine made of simple parts. Once you understand how to build with basic shapes, you can construct any pose or perspective.”
Charles Bargue, renowned figure drawing instructor
This geometric approach aligns perfectly with drawing fundamentals and helps establish proper proportions before adding anatomical details.
Progressive Complexity Approach
When learning artist anatomy fundamentals, resist the urge to draw detailed muscles immediately. Instead, follow this progression:
- Gesture: Quick 30-second sketches capturing basic pose and movement
- Construction: Build the figure using basic shapes and proportions
- Volume: Add three-dimensional form using light and shadow techniques
- Surface anatomy: Add muscle definition and surface details
- Refinement: Polish features and add finishing touches
This systematic approach prevents overwhelm and builds skills progressively. Many art schools use similar methods because they work consistently across different learning styles.
Understanding Form and Volume
Human anatomy isn’t flat – it’s three-dimensional. Every muscle, bone, and body part has volume that changes depending on viewpoint and lighting. Practice drawing simple forms like cylinders and spheres with different lighting to understand how dimensional drawing works before applying these principles to anatomy.
Consider how a cylinder looks when lit from different angles. The same principles apply to arms, legs, and the torso. This understanding separates amateur drawings from professional-quality work.
Common Beginner Mistakes and Solutions
Proportion Errors

The most frequent mistakes in figure drawing anatomy include:
Oversized heads: Many beginners draw heads too large relative to the body. Remember the 8-head proportion system – the head should be 1/8 of total body height.
Short arms: Arms should reach approximately to mid-thigh when hanging naturally. A common test: when arms hang at the sides, fingertips should reach about halfway down the thigh.
Tiny hands and feet: These are often drawn too small. Hands should be roughly the same length as the face from chin to hairline.
Rushing to Details
Another common error involves jumping straight to detailed muscle definition without establishing proper underlying structure. This approach often results in figures that look like they’re wearing muscle suits rather than having integrated anatomy.
Always establish your basic framework first. Professional artists often spend 70% of their time on construction and only 30% on surface details. This ratio might surprise beginners, but it’s the foundation of convincing figure work.
Ignoring the Skeleton
Muscles attach to bones and follow skeletal structure. Ignoring this relationship leads to figures that don’t look structurally sound. Study how major muscle groups connect to the skeleton – this knowledge will make your figures more believable.
For example, understanding that chest muscles attach to the collarbone, sternum, and upper arm helps you draw them with proper volume and attachment points.
Practice Strategies and Resources
Structured Practice Routines
Effective practice exercises for artists should be varied and progressive. Here’s a weekly practice schedule that builds skills systematically:
Monday – Wednesday – Friday: 30-minute gesture drawing sessions focusing on capturing an image quickly
Drawing Practice Timer
Hone your observational drawing skills. A new, random image will appear for each interval, challenging you to capture the essence of any subject.
Tuesday – Thursday: Detailed anatomical studies from reference photos or anatomy books
Saturday: Life drawing if available, or longer studies from high-quality references
Sunday: Review and sketch from imagination to test your understanding
Recommended Study Materials
Quality references make a significant difference in learning outcomes. Consider these anatomy books for beginner artists:
- “Figure Drawing for All It’s Worth” by Andrew Loomis – Classic proportion and construction methods
- “Anatomy for the Artist” by Sarah Simblet – Beautiful photographic references with anatomical overlays
- “Constructive Anatomy” by George Bridgman – Time-tested approach to structural drawing
Digital and Traditional Tools
Modern artists have access to excellent digital resources alongside traditional methods. Anatomy learning apps provide interactive 3D models you can rotate and study from any angle. These tools complement traditional drawing from life and photos.
Consider exploring simple subjects for anatomy practice to build confidence before tackling complex poses.
Frequently Asked Questions
What anatomy should artists learn first?
Begin with basic proportions using the 8-head system, then study major skeletal landmarks like the ribcage, pelvis, and spine. These provide the foundation for everything else. Focus on understanding how these elements create the overall structure before diving into muscle details.
How long does it take to learn anatomy for art?
With consistent daily practice, most artists see significant improvement in 3-6 months. However, anatomy study is ongoing – even professional artists continue learning throughout their careers. The key is consistent practice rather than trying to learn everything at once.
Do you need to know anatomy to draw people?
While stylized art can work without detailed anatomical knowledge, understanding basic proportions and structure dramatically improves figure drawings. Even cartoon artists benefit from anatomical understanding, as it helps them make deliberate choices about exaggeration and simplification.
What are the 8 heads proportions in figure drawing?
The 8-head system divides the human body into eight equal units, each measuring one head-length. This classical approach helps artists maintain consistent proportions across different poses and viewpoints. It’s been used successfully for centuries and remains relevant today.
How do you draw human body proportions correctly?
Start with the 8-head measurement system, use construction lines to maintain alignment, and check your work frequently against references. Practice drawing from life when possible, as this trains your eye to see proportional relationships accurately.
What muscles are most important for artists to know?
Focus on major muscle groups that significantly affect surface appearance: chest muscles, shoulder muscles, back muscles, arm muscles, thigh muscles, and calf muscles. These create the primary volumes and forms that define the human figure.
How do you practice figure drawing as a beginner?
Begin with short gesture drawings to capture basic proportions and movement, then progress to longer studies focusing on construction and volume. Use a mix of references including photos, life drawing, and anatomical diagrams to build comprehensive understanding.
Should beginners start with skeleton or muscles?
Start with basic proportions and skeletal landmarks before studying muscles. The skeleton provides the framework that muscles attach to, so understanding this foundation first creates a logical learning progression that builds skills systematically.
Conclusion
Mastering anatomy for artists beginners opens up new possibilities for creating compelling, realistic figure drawings. By understanding basic proportions, key skeletal landmarks, and major muscle groups, you’ll develop the foundation needed for convincing figure work. Remember that learning anatomy is a gradual process requiring patience and consistent practice.
Start with the 8-head proportion system, practice constructing figures with basic shapes, and gradually add anatomical details as your confidence grows. Avoid common mistakes by focusing on underlying structure before surface details, and maintain regular practice to reinforce your learning.
Whether you’re interested in face drawing proportions or exploring figure drawing practice exercises, the anatomical foundation you build now will serve you throughout your artistic journey. With dedication and the right approach, anatomy for artists beginners becomes an exciting tool for artistic expression rather than an overwhelming obstacle.
Important Resources
Essential Anatomy References:
- Proko Figure Drawing Course – Structured online learning
- Kenhub Anatomy Learning Platform – Interactive 3D anatomy models
- New Masters Academy – Classical art training methods
- Quickposes.com – Timed gesture drawing practice

