
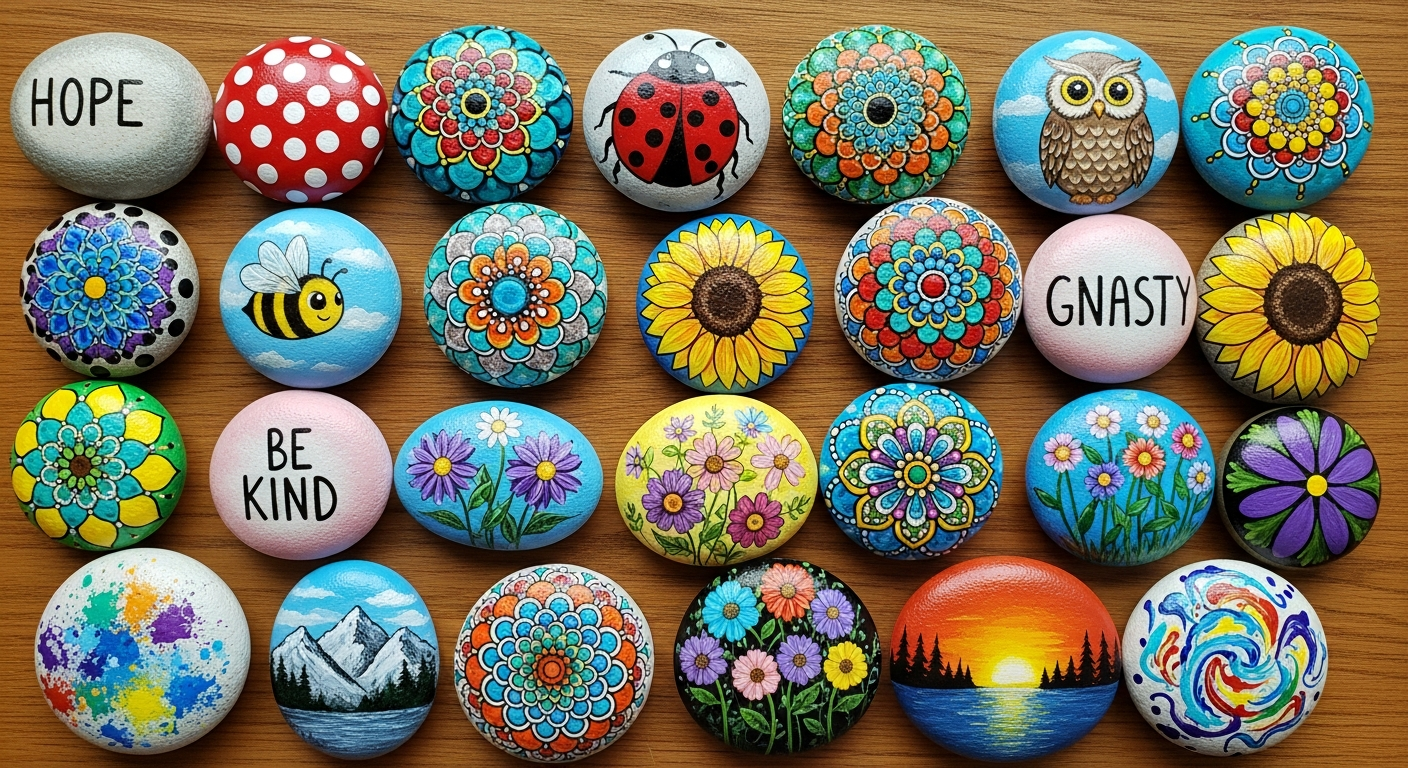
Rock painting ideas have transformed ordinary stones into miniature masterpieces that brighten gardens, spread kindness, and bring joy to communities worldwide. Whether you’re a complete beginner picking up a brush for the first time or an experienced artist looking for a new canvas, rock painting offers an accessible, affordable, and incredibly rewarding way to express your creativity.
Key Points:

- Rock painting is suitable for all ages and skill levels, from simple dots to intricate designs
- Essential supplies include smooth rocks, acrylic paints, brushes, and sealant
- Proper rock preparation and sealing ensures your artwork lasts outdoors
- Kindness rocks projects spread joy throughout communities
- Designs range from nature themes to abstract patterns, animals, and inspirational messages
Getting Started: Essential Supplies and Rock Preparation
Before diving into creative designs, gathering the right materials sets you up for success. Much like choosing the right canvas for your art, selecting proper rocks and supplies makes all the difference in your final results.
Must-Have Rock Painting Supplies
Your basic rock painting toolkit should include smooth rocks (river rocks or craft store stones work best), acrylic paints (weatherproof varieties are ideal for outdoor display), brushes in various sizes, paint pens for details, and a good sealant to protect your finished artwork. Optional extras include dotting tools, sponges for texture, and stencils for precise patterns.

Preparing Your Rocks for Painting
Proper preparation ensures your paint adheres well and your designs last longer. Start by thoroughly washing your rocks with soap and warm water, removing all dirt, dust, and debris. Let them dry completely – moisture trapped under paint can cause peeling.
Many artists apply a base coat of white acrylic paint or gesso to create a smooth, opaque surface. This step is especially helpful with dark-colored rocks, as it makes your colors pop and prevents the rock’s natural color from showing through.
50+ Rock Painting Ideas for Every Skill Level
Here’s a comprehensive table of rock painting ideas organized by difficulty level:
| Design Idea | Difficulty | Best For | Key Technique |
|---|---|---|---|
| Solid color blocks | Beginner | Color practice | Base coating |
| Simple polka dots | Beginner | Kids, quick projects | Dotting tool |
| Rainbow stripes | Beginner | Cheerful decor | Straight lines |
| Basic hearts | Beginner | Kindness rocks | Simple shapes |
| Smiley faces | Beginner | Kids projects | Circles and curves |
| Simple stars | Beginner | Garden decor | Five-pointed shapes |
| Colorful swirls | Beginner | Abstract art | Flowing lines |
| Basic flowers | Beginner | Nature lovers | Petal patterns |
| Checkerboard pattern | Beginner | Geometric design | Grid layout |
| Simple ladybugs | Beginner | Kids crafts | Red base with black dots |
| Bumblebees | Beginner | Garden stones | Yellow stripes |
| Butterflies | Beginner-Intermediate | Spring themes | Symmetrical wings |
| Cacti designs | Beginner-Intermediate | Desert themes | Green base with spines |
| Simple mandalas | Intermediate | Meditative art | Dotting patterns |
| Inspirational quotes | Intermediate | Kindness rocks | Hand lettering |
| Beach scenes | Intermediate | Coastal decor | Layered painting |
| Sunset silhouettes | Intermediate | Landscape art | Gradient backgrounds |
| Simple owls | Intermediate | Animal lovers | Large eyes feature |
| Nautical anchors | Intermediate | Beach themes | Bold outlines |
| Geometric patterns | Intermediate | Modern decor | Precise lines |
| Galaxy designs | Intermediate | Space themes | Blending colors |
| Succulent plants | Intermediate | Garden markers | Green variations |
| Basic cats | Intermediate | Pet lovers | Simple silhouettes |
| Dogs and puppies | Intermediate | Pet themes | Fur texture |
| Fish designs | Intermediate | Aquarium decor | Scales and fins |
| Tree silhouettes | Intermediate | Nature scenes | Black on gradient |
| House designs | Intermediate | Address markers | Architectural details |
| Tic-tac-toe boards | Intermediate | Game pieces | Grid with symbols |
| Abstract faces | Intermediate | Modern art | Simplified features |
| Monstera leaves | Intermediate | Tropical themes | Split leaf pattern |
| Simple portraits | Intermediate-Advanced | Personal gifts | Facial features |
| Detailed mandalas | Advanced | Intricate designs | Multiple dot sizes |
| Realistic animals | Advanced | Wildlife art | Shading and detail |
| Landscape scenes | Advanced | Scenic art | Depth and perspective |
| Famous artwork replicas | Advanced | Art education | Reproduction skills |
| Detailed flowers | Advanced | Botanical art | Petal layers |
| 3D effects | Advanced | Optical illusions | Shading techniques |
| Detailed birds | Advanced | Nature realism | Feather texture |
| Castle scenes | Advanced | Fantasy themes | Architectural detail |
| Underwater scenes | Advanced | Marine life | Multiple elements |
| Forest scenes | Advanced | Nature art | Tree depth |
| City skylines | Advanced | Urban themes | Building details |
| Zodiac signs | Intermediate | Personalized gifts | Symbolic imagery |
| Emoji faces | Beginner | Kids projects | Circular expressions |
| Paw prints | Beginner | Pet lovers | Simple stamps |
| Musical notes | Intermediate | Music themes | Symbol accuracy |
| Holiday themes | All levels | Seasonal decor | Festive elements |
| Book titles | Intermediate | Library decor | Typography |
| Garden vegetables | Intermediate | Garden markers | Realistic shapes |
| Fairy houses | Advanced | Fantasy art | Miniature details |
| Dragon designs | Advanced | Fantasy themes | Scales and wings |
| Motivational symbols | Intermediate | Inspiration | Meaningful icons |

Easy Rock Painting Ideas for Beginners
Starting your rock painting journey doesn’t require advanced artistic skills. Simple designs build confidence while teaching fundamental techniques that apply to painting for beginners.
Nature-Inspired Beginner Designs

Nature provides endless inspiration for easy rock art. Paint cheerful ladybugs with a red base and black dots, or create buzzing bees with yellow and black stripes. Simple flowers with five petals and a center dot make perfect garden markers. Green leaves with simple vein details add organic touches to any space.
The beauty of nature themes lies in their forgiving nature – no two flowers in nature look identical, so your unique interpretation is always “correct.” This freedom helps beginners relax and enjoy the creative process without pressure.
Abstract and Geometric Patterns
Abstract designs offer another beginner-friendly approach. Create mesmerizing patterns with concentric circles, radiating lines, or flowing swirls. Geometric designs using triangles, squares, and diamonds can be as simple or complex as you like.
Polka dots in various sizes create cheerful, whimsical designs. Start with a solid background color, let it dry, then add dots using the end of a paintbrush, a cotton swab, or a dedicated dotting tool. Understanding color theory basics helps create harmonious color combinations that make your abstract designs pop.
Advanced Rock Painting Techniques and Creative Designs
Once you’ve mastered basic shapes and patterns, exploring advanced techniques opens up a world of creative possibilities. These methods require patience and practice but produce stunning results.
Intricate Mandalas and Dotwork
Mandala designs represent some of the most visually striking rock art. Start from the center point and work outward in symmetrical patterns using dotting tools of varying sizes. Layer different colors to create depth and dimension. The meditative process of creating mandalas offers both creative and calming benefits.
Pro tip: Use a pencil compass to lightly mark concentric circles as guides before adding your dot patterns. This ensures symmetry without visible guidelines in your final piece.
Detailed Animal Portraits

Creating realistic animal portraits on rocks challenges your observational skills and fine motor control. Begin with a light pencil sketch, then build up layers of paint gradually. Focus on capturing the eyes first – they’re often called the “soul” of a portrait for good reason.
Use fine brushes to add individual fur strokes, feather details, or scale patterns. Study reference photos to understand light and shadow placement, which brings your animal subjects to life.
Landscape and Scenic Artwork
Transforming a flat rock into a miniature landscape requires understanding perspective and depth creation. Layer your painting from background to foreground – start with sky and distant mountains, then add middle-ground elements like trees or buildings, finishing with foreground details.
Use lighter, cooler colors for distant elements and darker, warmer colors for closer objects. This atmospheric perspective creates convincing depth on your small canvas.
Comparison of Popular Rock Painting Sealants
Protecting your finished artwork is crucial, especially for outdoor display. Here’s a detailed comparison of the most popular sealant options:
| Sealant Type | Pros | Cons | Best Use |
|---|---|---|---|
| Acrylic Spray Sealant (Clear Coat) | Quick drying, even coverage, good for large batches, strong protection against elements | Strong fumes (requires ventilation), can be sticky if applied too thick, not brush-on | Outdoor display, high durability needed |
| Brush-On Mod Podge (Outdoor/Dishwasher Safe) | Water-based, low fumes, easy cleanup, satin or gloss finish, good for small details | Takes longer to dry, can leave brush strokes if not careful, may require multiple coats | Indoor/outdoor display, specific detailed areas |
| Epoxy Resin | Extremely durable, high-gloss finish, waterproof, professional look | More expensive, mixing required, longer cure time, potential for bubbles, can be tricky for beginners | Premium outdoor display, art pieces, high-end finish |
| UV Resin | Fast curing (with UV light), crystal clear, durable, good for small details | Requires UV lamp, can be more expensive, small quantities | Jewelry-like finish, small rocks, quick sealing |
| Water-Based Polyurethane | Durable, low VOCs, good for outdoor use, various finishes (satin, gloss) | Can yellow over time, may require multiple coats, takes time to fully cure | General outdoor protection, a more natural feel |
Application Tips for Best Results

Regardless of which sealant you choose, proper application ensures maximum protection. Always work in a well-ventilated area, even with low-VOC products. Apply sealant only after paint has completely dried – rushing this step causes smearing and color bleeding.
For spray sealants, hold the can 8-10 inches from your rock and apply thin, even coats. Multiple thin layers provide better protection than one thick coat. Allow each coat to dry completely before adding the next. Most projects benefit from 2-3 coats of sealant.
Spreading Joy: Kindness Rocks and Community Projects
Rock painting transcends personal creativity to become a powerful tool for community connection and spreading positivity. The Kindness Rocks Project has inspired millions worldwide to hide painted rocks with uplifting messages for strangers to discover.
The Power of Kindness Rocks
Imagine discovering a brightly painted rock with the message “You are enough” or “Keep going” during a difficult day. These small acts of kindness create ripple effects throughout communities. Paint inspirational quotes, encouraging words, or cheerful designs, then place them in public spaces like parks, hiking trails, or community gardens.
Many communities have dedicated Facebook groups for local rock hiding and finding. Participants share photos of rocks they’ve found, creating connections between creators and finders.

Creating Meaningful Messages
When designing kindness rocks, consider your message carefully. Keep text clear and legible using hand lettering techniques or paint pens. Popular themes include:
- Motivational quotes: “Believe in yourself,” “You’ve got this,” “Be brave”
- Affirmations: “You are loved,” “You matter,” “You are strong”
- Simple encouragement: “Smile,” “Shine bright,” “Make today amazing”
- Community spirit: “Love your neighbor,” “Spread kindness,” “Together we rise”
Important: Always use non-toxic, weatherproof paints and sealants for rocks intended for public spaces. Consider the environment when placing rocks – avoid disrupting natural habitats or placing them where they might create hazards.
Rock Painting with Kids: Age-Appropriate Projects
Rock painting offers wonderful opportunities for family creativity and DIY art projects for kids. Adjust complexity based on age and skill level to ensure everyone enjoys the experience.
Projects for Young Children (Ages 3-6)
Preschoolers enjoy simple projects focused on color exploration and basic shapes. Provide washable paints and let them experiment freely with rainbow color rocks (each rock a different solid color), simple stamping with sponges, handprint or fingerprint designs, and large polka dots in bright colors.
Use larger, smooth rocks that small hands can grip easily. Focus on the process rather than the product – at this age, creative exploration matters more than perfect results.
Projects for Elementary Ages (Ages 7-12)
School-age children can handle more detailed projects. Try pet rock characters with googly eyes and painted features, tic-tac-toe game sets with X’s and O’s, simple animals like ladybugs, bees, or turtles, and inspirational message rocks for hiding around the neighborhood.
Teach basic techniques like letting layers dry between colors and cleaning brushes properly. These skills transfer to other painting techniques for beginners.
Special Rock Painting Projects and Applications

Garden Markers and Plant Labels
Transform your garden with custom-painted rock markers. Paint vegetable names, herb labels, or flower varieties on smooth, flat rocks. Use weatherproof paint pens for crisp lettering that withstands rain and sun. These functional pieces add personality while helping you remember what you planted where.
Story Stones for Children
Create educational story stones for children by painting simple images on sets of rocks – animals, vehicles, people, places, and objects. Children draw stones randomly and create stories incorporating the images. This activity develops creativity, language skills, and imagination while providing screen-free entertainment.
Troubleshooting Common Rock Painting Problems
Paint Won’t Adhere to Rock Surface
Problem: Paint beads up or won’t stick to your rock. Solution: Wash the rock more thoroughly to remove oils and residue. Apply a base coat of gesso or white acrylic paint to create a paintable surface. Some very smooth rocks benefit from light sanding.
Colors Look Muddy or Dull
Problem: Your bright paints look dull on darker rocks. Solution: Always use a white base coat on dark-colored rocks. This allows colors to appear true to their actual hue. Apply 2-3 thin coats of white rather than one thick coat.
Paint Cracking or Peeling After Drying
Problem: Dried paint develops cracks or peels away. Solution: Apply thinner layers of paint, allowing each to dry completely before adding more. Ensure your rock is completely dry before painting – trapped moisture causes adhesion problems.
Detail Work Looks Messy
Problem: Fine details and lines look shaky or imprecise. Solution: Use proper tools – invest in quality fine-tipped brushes or paint pens. Practice steady hand techniques by bracing your painting hand against your other hand. Thin your paint slightly if it’s too thick to flow smoothly.
Where to Find the Best Rocks for Painting
Rock quality significantly impacts your final results. Here’s where to source excellent painting rocks:
Natural Sources: River beds and streams offer smooth river rocks naturally polished by water. Beaches provide beautiful stones in various sizes. Check local regulations before collecting from public waterways.
Purchased Options: Home improvement stores sell landscaping river rocks by the bag affordably. Craft stores like Michaels and Hobby Lobby sell pre-cleaned, painting-ready rocks. Online retailers like Amazon and Etsy offer specialized painting rocks in uniform sizes.
Rock Selection Tips: Choose rocks with smooth surfaces, flat on one side for stability, medium weight, and interesting shapes that might suggest design ideas.
Conclusion
Rock painting ideas offer limitless creative possibilities for artists of all ages and skill levels. From simple polka dots that teach valuable color concepts to intricate mandala masterpieces that showcase advanced techniques, each painted rock carries its creator’s unique vision and personality. The beauty of this art form lies in its accessibility – anyone with rocks, paint, and imagination can transform ordinary stones into extraordinary miniatures.
Whether you’re decorating your garden, spreading kindness through hidden community rocks, or simply enjoying the meditative process of creating art, rock painting provides a fulfilling creative outlet. Start with simple projects to build confidence, experiment with different techniques to find what you enjoy most, and don’t be afraid to make mistakes – they often lead to unexpected creative discoveries. Every rock you paint adds color, joy, and beauty to the world around you.
Frequently Asked Questions (FAQs)
What kind of paint should I use for rock painting?
Acrylic paints work best for rock painting due to their opacity, vibrant colors, and quick drying time. For outdoor rocks, choose craft-quality or artist-grade acrylics labeled “outdoor” or “weatherproof.” Many rock painters also use acrylic painting techniques that translate beautifully to stone surfaces. Paint pens with acrylic ink provide excellent precision for details and lettering.
How do I prevent my painted rocks from fading or chipping?
Protection begins with proper sealing. After your paint has completely dried (wait at least 24 hours), apply 2-3 thin coats of clear acrylic sealer, allowing each coat to dry between applications. For outdoor rocks, choose sealants specifically labeled for exterior use with UV protection to prevent sun fading.
Do I need to wash rocks before painting them?
Yes, washing rocks before painting is essential for paint adhesion and longevity. Scrub rocks thoroughly with soap and warm water to remove dirt, dust, oils, and loose particles. Let rocks dry completely – overnight is ideal – before applying any base coat or paint.
Where can I find rocks suitable for painting?
Smooth river rocks make the best painting surfaces. Home improvement stores sell bags of landscaping river rocks affordably. Craft stores carry pre-selected painting rocks. You can also collect rocks from nature – river beds, creek sides, and beaches – but always check local regulations first.
How long does it take for rock paint to dry?
Acrylic paint typically dries to the touch within 15-30 minutes, but full curing takes longer. Wait at least 30 minutes between adding different colored layers. Before sealing, let your completely finished rock dry for a full 24 hours to ensure all paint layers have thoroughly cured.
Can I use rocks I find in my backyard?
Absolutely! Backyard rocks can make excellent painting surfaces if they’re smooth and relatively flat. Wash them thoroughly as they may have been exposed to lawn chemicals or other substances. Test your backyard rocks by applying paint to a small area first.
What’s the best size rock for beginners to paint?
Beginners should start with rocks between 2-4 inches in diameter – large enough to paint comfortably without needing extremely fine motor control, but small enough to complete quickly. Palm-sized rocks fit comfortably in one hand while painting with the other.
How do I add lettering and quotes to rocks?
Paint pens offer the most control and cleanest results – brands like Posca, Sharpie Paint, and Artistro are popular choices. For freehand lettering with brushes, use fine-tipped brushes and thin your paint slightly for smoother flow. Stencils help beginners create even, professional-looking letters.
What should I do if I make a mistake while painting?
Mistakes are easily corrected! For wet paint mistakes, wipe away with a damp cloth immediately. For dried paint errors, paint over the mistake once it’s completely dry – acrylic paint’s opacity covers well. For larger mistakes, apply a fresh white base coat over the problem area and start again.
Are there any safety concerns with rock painting?
Rock painting is generally safe, but use non-toxic, water-based acrylic paints, especially when painting with children. Work in well-ventilated areas when using spray sealants. Wash hands thoroughly after painting sessions. For rocks intended for public spaces, avoid placing them where they could create hazards.
Citations
- The Kindness Rocks Project. (2025). About The Kindness Rocks Project. Retrieved from https://www.thekindnessrocksproject.com/
- Michaels Stores. (2025). Rock Painting Projects and Ideas. Retrieved from https://www.michaels.com/projects/decor-projects/rock-painting
- Craftsy. (2025). Rock Painting Tutorials and Techniques. Retrieved from https://www.craftsy.com/blog/category/painting/

