
Have you ever wondered how to create a breathtaking sunset painting in just minutes? You’re about to discover the secret that professional artists use to paint gorgeous evening skies with minimal supplies. This simple sunset painting technique uses only three basic colors and takes less time than brewing your morning coffee. Whether you’re a complete beginner or looking for a quick creative outlet, this method will have you creating stunning artwork that looks like it took hours to complete.
Key Points Summary

- Learn to paint beautiful sunsets using only yellow, red, and blue paint
- Master color mixing techniques for realistic sunset hues
- Complete your artwork in just 5 minutes with simple brush strokes
- Perfect for beginners with no prior painting experience
- Create professional-looking results with basic art supplies
Why This 3-Color Sunset Painting Method Works
The magic of this sunset painting approach lies in understanding basic color theory. When you mix yellow, red, and blue in different combinations, you create every color you see in a real sunset. Yellow becomes the bright horizon light, red adds warmth and drama, while blue provides the deep evening sky contrast.
Professional artists have used this three-color system for centuries because it creates natural color harmony. Unlike using many different paint tubes, this method ensures your colors blend seamlessly together, just like nature intended.
“The best sunset paintings capture the feeling of that magical golden hour, not necessarily every detail. Three colors give you everything you need to create that emotional impact.”
Essential Supplies for Your Quick Sunset Painting
You don’t need an expensive art studio to create beautiful artwork. Here’s everything required for this easy sunset painting tutorial:
Paint Colors Needed
- Yellow (Cadmium Yellow or similar warm yellow)
- Red (Cadmium Red or Alizarin Crimson)
- Blue (Ultramarine Blue or Prussian Blue)
Basic Equipment
| Item | Purpose | Alternative Options |
|---|---|---|
| Small canvas (8×10 inches) | Painting surface | Canvas board, watercolor paper |
| Flat brush (#6 or #8) | Sky gradients | Any medium flat brush |
| Round brush (#4) | Details and blending | Small detail brush |
| Palette or paper plate | Color mixing | Disposable plate works fine |
| Water container | Brush cleaning | Any small jar or cup |
| Paper towels | Cleanup | Old rags or tissues |
The beauty of this technique works with both acrylic paints and watercolors. Acrylics dry faster and are more forgiving for beginners, while watercolors create beautiful transparent effects.

Step-by-Step Sunset Painting Tutorial
Step 1: Set Up Your Workspace (30 seconds)
Position your canvas horizontally – sunset paintings work best in landscape orientation. Squeeze small amounts of each color onto your palette, keeping them separate. You’ll need more yellow and red than blue for most sunset effects.

Step 2: Create Your Color Mixtures (1 minute)
Before touching your canvas, mix these essential sunset colors:
- Light orange: Mix yellow + tiny amount of red
- Deep orange: Mix equal parts yellow and red
- Pink-orange: Mix red + small amount of yellow
- Light purple: Mix red + tiny amount of blue
- Deep purple: Mix blue + small amount of red
Pro Tip: Always add darker colors to lighter ones gradually. It’s easier to darken a color than to lighten it!
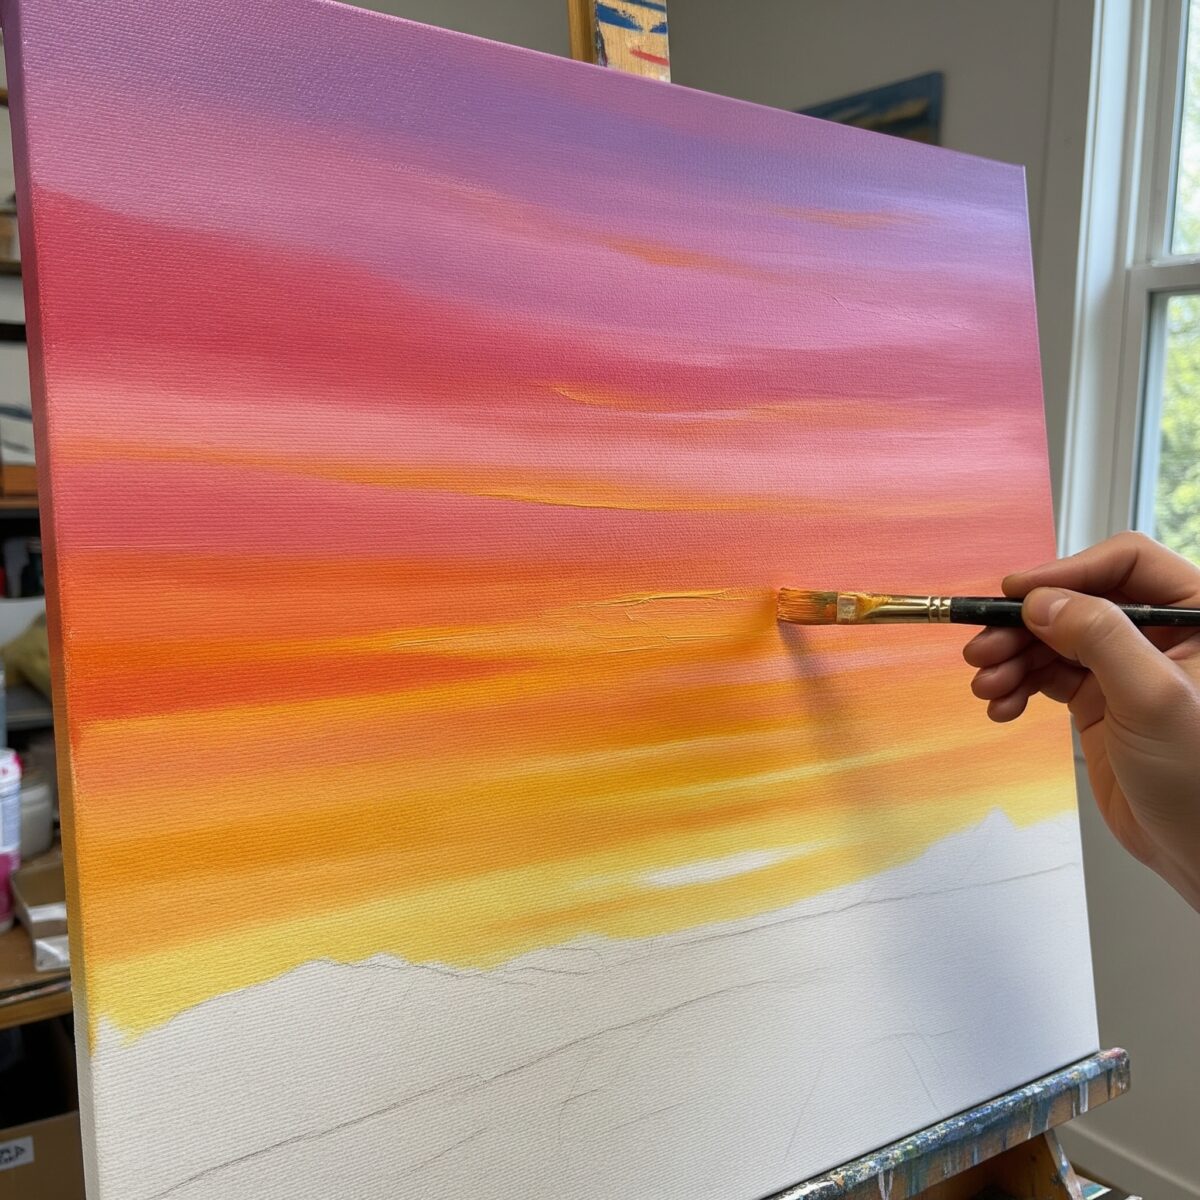
Step 3: Paint the Sky Gradient (2 minutes)
Start with your lightest color (light orange) at the bottom of your canvas where the horizon would be. Using horizontal brush strokes, paint a band about 2 inches high.

While this paint is still wet, add your deeper orange above it, blending where the colors meet. Continue upward with pink-orange, then light purple, finishing with deep purple at the top.
The key to smooth color blending is working while the paint stays wet. Don’t worry about perfection – real sunsets have natural variations that make them beautiful.
Step 4: Add Simple Silhouettes (1 minute)
Mix a small amount of blue and red to create a dark purple-black color. Using your round brush, paint simple shapes along the horizon line:
- Basic tree shapes (just trunks and simple branch clusters)
- Rolling hills or mountains
- Simple building outlines
Keep these silhouettes very simple. In real sunsets, you can barely see details in the foreground because of the bright sky behind them.
Step 5: Final Touches (30 seconds)
Add a few small birds in the distance using tiny curved lines. You can also dab a few lighter spots in the sky to suggest clouds catching the sunset light.
Step back and admire your completed sunset painting! The entire process from start to finish takes just 5 minutes.
Color Mixing Secrets for Perfect Sunset Hues
Understanding how colors interact is crucial for realistic sunset effects. Here’s what happens when you combine your three primary colors:
Warm Combinations (Yellow + Red):
- More yellow = bright, cheerful orange
- Equal amounts = classic sunset orange
- More red = deep, dramatic orange
Cool Combinations (Blue + Red):
- Tiny bit of blue = warm purple
- Equal amounts = rich violet
- More blue = deep evening sky color
Avoiding Muddy Colors: Never mix all three colors together in large amounts – this creates brown or gray. Instead, focus on two-color combinations with just a touch of the third color for subtle variations.
Learn more about color theory basics to enhance your painting skills further.

Inspirational Sunset Painters
| Painter | Era/Movement | Notable Sunset Works (Examples) |
|---|---|---|
| Claude Monet | Impressionism | Impression, Sunrise, San Giorgio Maggiore at Dusk, The Houses of Parliament, Sunset |
| J.M.W. Turner | Romanticism | The Fighting Temeraire, Venice, storm at Sunset |
| Vincent van Gogh | Post-Impressionism | The Red Vineyard, Willows at Sunset, Sunset at Montmajour |
| Frederic Edwin Church | Hudson River School (American) | Twilight in the Wilderness, Sunset in the Rockies |
| Albert Bierstadt | Hudson River School (American) | Sunset in the Rockies, Sunset over the River |
| Caspar David Friedrich | Romanticism | Evening Landscape with Two Men (Sunset Brothers) |
| Ivan Aivazovsky | Romanticism | The Ninth Wave |
| Camille Pissarro | Impressionism | Sunset at Eragny |
| Edvard Munch | Expressionism | The Scream (known for its expressive, vibrant sunset sky) |
| Winslow Homer | Realism/American Art | Sunset |
Common Sunset Painting Mistakes to Avoid
Even with this simple technique, beginners sometimes run into these issues:
Mistake #1: Making the sky too dark too quickly Real sunsets start very light near the horizon. Begin with your lightest colors and gradually add deeper tones moving upward.
Mistake #2: Overworking the paint
Once you’ve blended your colors, resist the urge to keep brushing. Too much blending creates muddy colors instead of the clean gradients you want.
Mistake #3: Adding too much detail to silhouettes Remember, silhouettes should be simple shapes. Save detailed landscape painting techniques for daylight scenes.
Mistake #4: Using paint that’s too thick For smooth blending, your paint should be creamy, not thick like toothpaste. Add a tiny amount of water (for acrylics) or painting medium to achieve the right consistency.
Advanced Tips for Your Next Sunset Painting
Once you’ve mastered this basic technique, try these variations:
Adding Texture with Different Brushes
- Use a fan brush for wispy clouds
- Try a sponge for soft, textured cloud effects
- Experiment with unconventional painting tools for unique textures
Creating Different Sunset Moods
- Calm evening: Use more yellow and soft oranges
- Dramatic sunset: Emphasize deep reds and purples
- Tropical sunset: Add more pink and coral tones
Expanding Your Color Palette
Once comfortable with three colors, gradually introduce:
- Cadmium Orange for richer warm tones
- Magenta for vibrant pink effects
- Burnt Sienna for earthier silhouettes
Watch and Learn: Video Tutorial
Displaying and Preserving Your Sunset Painting
Your completed artwork deserves proper care! For acrylic paintings, allow 24 hours to dry completely before handling. Consider these finishing touches:
- Varnishing: Protects your painting and enhances colors
- Framing: Choose simple frames that don’t compete with your sunset
- Lighting: Display where natural light won’t cause fading
For comprehensive guidance on protecting your artwork, check out the ultimate guide to framing and varnishing.
Beyond the Basics: Growing Your Painting Skills
This three-color sunset painting technique is just the beginning of your artistic journey. Consider exploring:
- Watercolor techniques for different effects
- Painting emotions through color to add deeper meaning
- Creating depth for more realistic landscapes
Many successful artists started with simple exercises like this one. The key is consistent practice and gradually challenging yourself with new techniques.
Frequently Asked Questions
How long does it take to paint a sunset?
Using this three-color method, you can complete a beautiful sunset painting in just 5 minutes. More detailed sunset paintings may take 30 minutes to several hours depending on complexity.
What colors do you need to paint a sunset?
You only need three primary colors: yellow, red, and blue. These mix to create all the orange, pink, and purple hues found in natural sunsets.
How do you blend sunset colors smoothly?
Work while the paint is still wet, using horizontal brush strokes. Blend where colors meet by gently overlapping with clean brush strokes. Don’t overwork the paint.
What’s the best canvas size for sunset painting?
For beginners, an 8×10 inch or 9×12 inch canvas works perfectly. This size is manageable while providing enough space to practice color blending techniques.
Can I use watercolors instead of acrylic paint?
Absolutely! This technique works beautifully with watercolors. Use less water for intense colors near the horizon, and more water as you move up the sky.
How do I make orange paint for sunset?
Mix yellow and red paint together. Start with yellow and gradually add small amounts of red until you achieve the desired orange tone. More red creates deeper oranges.
What brushes are best for sunset painting?
A medium flat brush (#6 or #8) works best for sky gradients. Add a small round brush (#4) for details and silhouettes. Quality matters less than technique for beginners.
How do I paint clouds in my sunset?
For this quick technique, keep clouds simple. Use a slightly lighter version of your sky color and dab gently with your brush. Avoid making clouds too white or detailed.
Conclusion
Creating a stunning sunset painting doesn’t require expensive supplies or years of training. With just three colors and five minutes, you can produce artwork that captures the magic of golden hour. This technique proves that sometimes the simplest approaches yield the most beautiful results.
Remember, every professional artist started with basic exercises like this sunset painting tutorial. The more you practice these fundamental color mixing and blending skills, the more confident you’ll become with advanced techniques. Your artistic journey begins with a single brushstroke – why not make it a sunset?
Start painting today, and discover how these simple techniques can unlock your creative potential. Soon, you’ll be creating sunset masterpieces that friends and family will treasure.
Ready to expand your painting skills? Explore our complete guide to painting techniques for beginners and discover your next artistic adventure.

