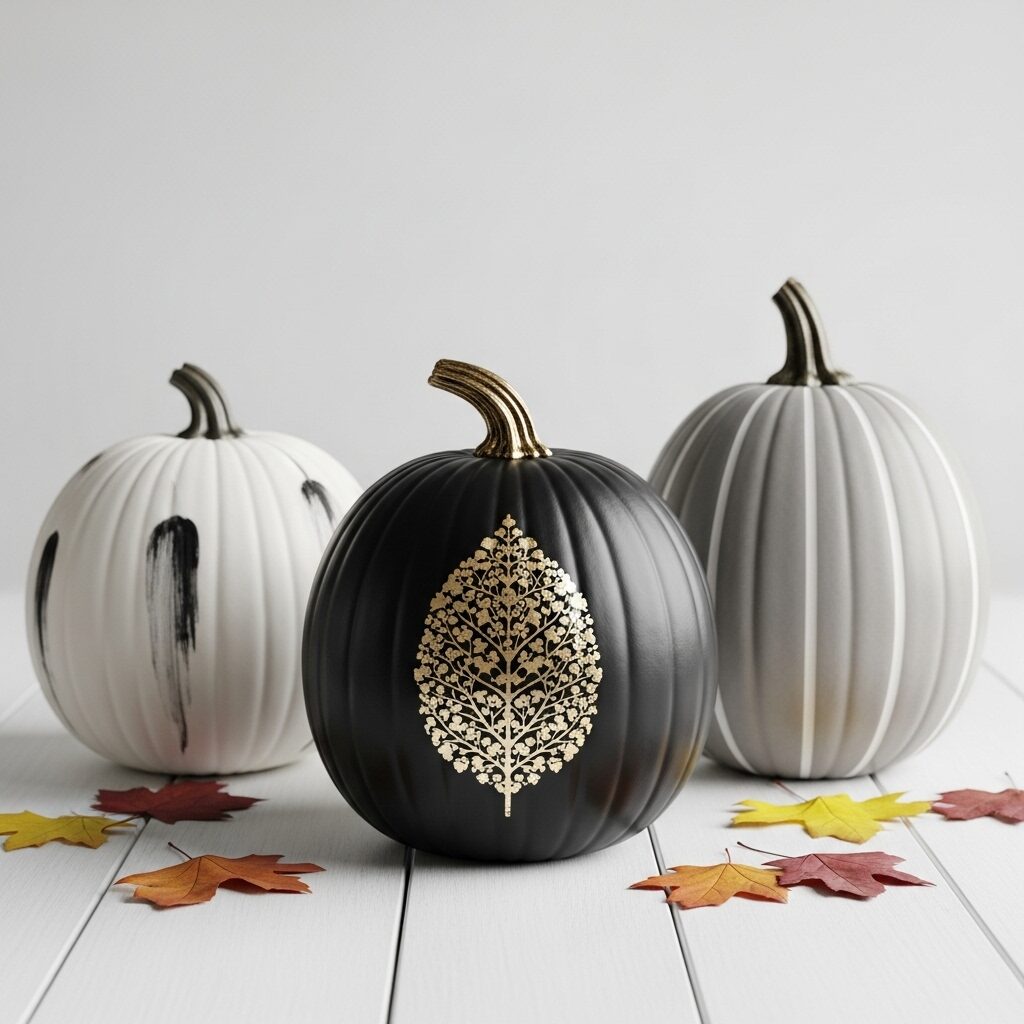
Tired of the slimy, messy, and sometimes dangerous ordeal of carving pumpkins? You know the feeling: elbows deep in pumpkin guts, struggling to get that perfect spooky grin, only to have it collapse a few days later. Well, what if we told you there’s a better way to create a stunning autumn masterpiece with Halloween just around the corner?

Ditch the carving tools and grab a paintbrush! This year, we’re diving into the vibrant world of easy pumpkin painting ideas, where creativity flows freely and the only mess is a little bit of colorful paint. From adorable creatures to elegant designs and everything in between, painting your pumpkin is the perfect way to make it last longer and express your unique style. Let’s get started and turn that plain gourd into a work of art!
Key Point Summary:
- Why Paint? Painting is a safer, cleaner, and longer-lasting alternative to carving. It allows for more detailed and creative designs, perfect for all ages.
- Essential Supplies: You only need a few basic items like acrylic paint, brushes, and a sealer to get started. Paint pens are also a great tool for adding fine details.
- Prep is Key: Cleaning your pumpkin and letting it dry completely is the most important step for a flawless finish.
- Unique Design Ideas: Explore a wide range of themes, from simple polka dots and stripes to elegant florals and spooky silhouettes, all in one easy-to-read table.
- Art History Connection: Discover how famous artists like Yayoi Kusama and Henri Matisse found inspiration in pumpkins, turning a simple gourd into a subject for serious art.
- Seal the Deal: A final coat of varnish or a craft sealer will protect your design and help your painted pumpkin last for weeks.
The Art of the Gourd: Why Pumpkin Painting is the New Black

For centuries, pumpkins have been a symbol of harvest and celebration. The tradition of carving them dates back to ancient Ireland and the folklore of “Stingy Jack,” but the modern world has brought us a cleaner, more artistic way to decorate. Painting not only eliminates the risk of knife cuts and the dreaded pumpkin mush, but it also gives you a blank canvas that won’t rot as quickly.
This means your beautiful creation can be the star of your autumn decor for much longer. It’s an activity the whole family can enjoy, from little kids with finger paint to aspiring artists looking to try a new medium. It’s also an excellent way to practice some of the basic skills you might learn when working on a traditional canvas, such as brush control and color mixing. For more on getting started with the right materials, check out our guide on Choosing Your First Paints.
Your Palette and Your Canvas: Getting Started with Supplies
You don’t need a fancy art studio to paint a pumpkin. The best part about this craft is how simple the supplies are. Here’s a quick list to get you ready:
- The Pumpkin: Pick a smooth, firm pumpkin with a nice shape. Make sure it doesn’t have any bruises or soft spots. Don’t forget to give it a good wash with a little soap and water and let it dry completely before you start. This simple step is vital for making the paint stick!
- Paints: Acrylic craft paints are your best friend here. They’re cheap, they dry fast, and they’ll stick to the pumpkin’s surface without a problem. You can find them at any craft store in a huge variety of colors.
- Brushes: A set of basic brushes in different sizes—a wide one for large areas, a flat one for edges, and a fine-tipped one for details—is all you need.
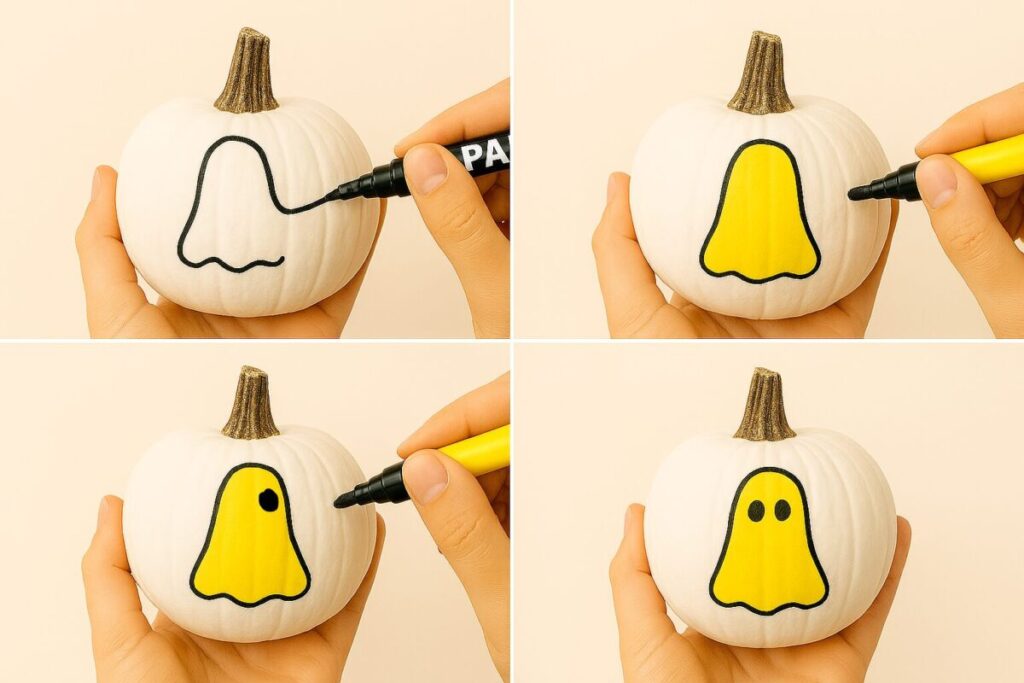
- Extra Tools: For those intricate designs, consider using paint pens (like Posca or Sharpie paint pens). They make drawing fine lines and adding text super easy. You can also use stencils, sponges, or even cotton swabs for cool effects.
- Sealer: A clear acrylic spray or brush-on varnish will seal your finished design and protect it from rain, wind, and little hands that might want to touch it.
More Than Just a Jack-O’-Lantern: Inspiring Pumpkin Designs
When it comes to pumpkin painting, your imagination is the only limit. Below is a comprehensive table with over 20 easy pumpkin painting ideas to get you started, whether you’re a total beginner or an experienced artist.
| Idea | What to Do | Skill Level |
| Polka Dots | Paint the pumpkin a solid color, then use the end of a paintbrush to add dots of a contrasting color. | Beginner |
| Stripes | Use painter’s tape to mark off sections, then paint each stripe a different color for a clean, bold look. | Beginner |
| Dripping Paint | Pour a thick layer of paint on top of the pumpkin and let it drip down the sides for a fun, abstract effect. | Beginner |
| Ghostly Silhouettes | Paint the pumpkin black, then use a white paint pen to draw simple, cartoonish ghost shapes. | Beginner |
| Autumn Leaves | Use a real or plastic leaf as a stencil. Paint the pumpkin a base color, place the leaf on top, and dab on a different color. | Beginner |
| Monster Eyes | Paint the pumpkin a bright color (like green or orange), then add various sizes of simple eyes with white and black paint. | Beginner |
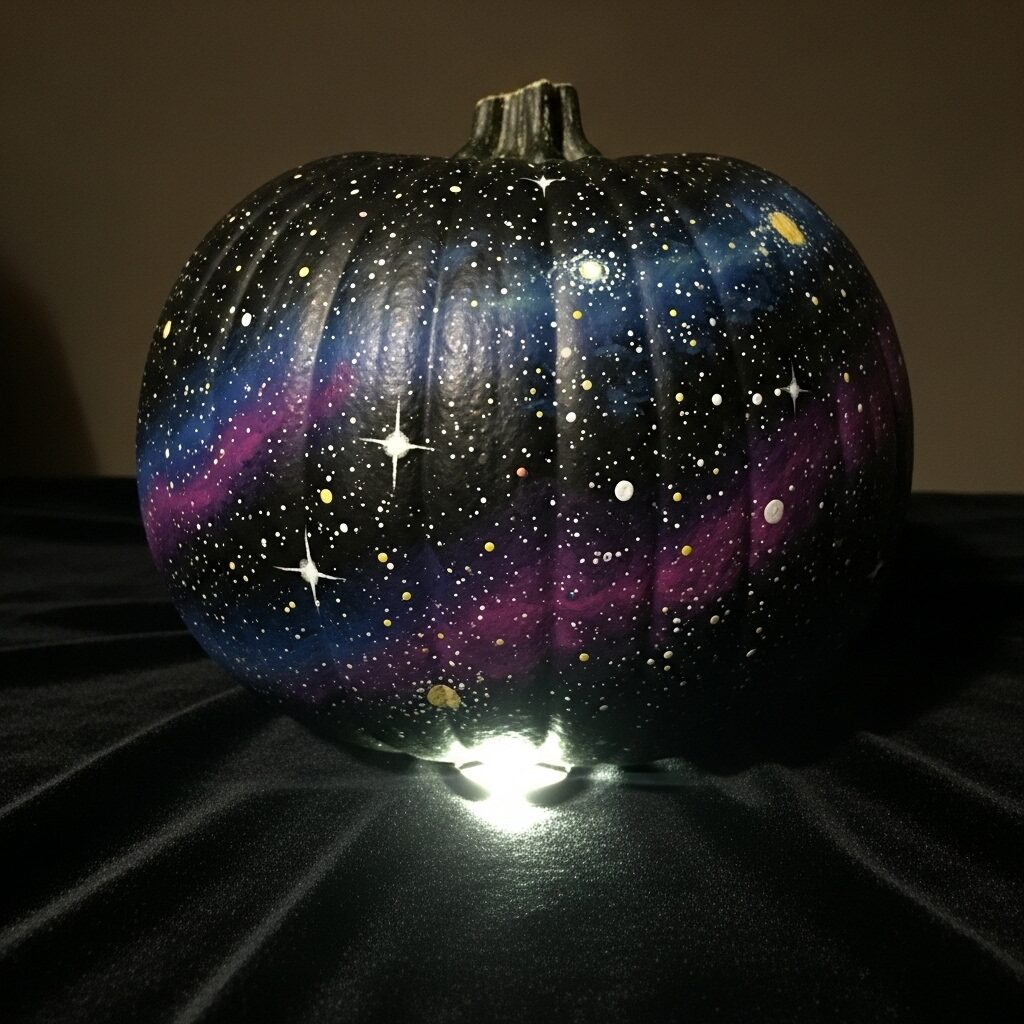
| Galaxy | Paint the pumpkin black. Dab on dark blue, purple, and pink paint with a sponge, then splatter with white paint for stars. | Beginner |
| Watercolor Wash | Thin acrylic paint with water and let the colors bleed together for a soft, transparent look. | Beginner |
| Color-Blocking | Divide the pumpkin into sections with tape or freehand and fill each section with a different color. | Beginner |
| Black and White | Stick to a simple palette of black and white to create graphic patterns like chevrons, checkerboards, or stripes. | Beginner |
| Spider Web | Use a fine-tipped brush or paint pen to draw a simple spider web design. You can add a plastic spider for extra effect. | Beginner |
| Simple Floral Motifs | Paint simple flowers and leaves with a paintbrush or paint pen. No need for complex details! | Beginner |
| Gingham Pattern | Use a ruler and a paint pen to create a grid of intersecting lines, then fill in alternating squares. | Intermediate |
| Unicorn | Paint the pumpkin a light color. Use a horn and ears made from clay or cardboard, then paint on a simple face. | Intermediate |
| Mummy | Paint the pumpkin white, then use a black or brown marker to draw lines and a face to look like a mummy. | Beginner |
| Starry Night Swirls | Inspired by Van Gogh, use thick, bold brushstrokes of blue and yellow to create a swirling sky. | Intermediate |
| Sequin Art | Use a hot glue gun to attach sequins or small rhinestones in patterns or to cover the entire pumpkin. | All Levels |
| Muted Florals | Use a light base color and paint delicate flowers in muted, pastel tones for an elegant look. | Intermediate |
| Cat Silhouette | Paint the pumpkin a solid color. Use a black paint pen to draw a simple cat’s face and ears. | Beginner |
| Witch’s Hat | Paint the entire pumpkin a deep purple or black. Use a simple, pointy hat shape cut from black paper and glue it on top. | Beginner |
| Candy Corn | Paint the pumpkin with three horizontal sections: a white top, an orange middle, and a yellow bottom. | Beginner |
| Favorite Characters | Paint a simple outline of a favorite character or symbol from a book or movie. | Intermediate |
| Crayon Melt | Attach crayons to the top of the pumpkin with glue, then use a hairdryer to melt them, letting the wax drip down. | All Levels |
A great piece of art can be created with a simple and humble object. As the legendary artist Yayoi Kusama once said,
“The pumpkin has a generous and unpretentious charm.”
This wisdom reminds us that even an ordinary pumpkin can become a canvas for something extraordinary.

Looking for more creative inspiration? Check out ideas to get your creative juices flowing.
Video Tutorial: Simple Painted Pumpkins
Sometimes it helps to see the process in action! Here is a great YouTube video that walks you through some simple and effective pumpkin painting techniques.
From Canvas to Gourd: Art History You Can Hold

Want to make your pumpkin truly unique? Look to the great masters for inspiration. This is where painting pumpkins goes beyond a simple craft and becomes a fun exploration of art history.
- Monet’s Impressionism: Use dabbing brushstrokes to create a scene of a water lily pond or a field of poppies. Don’t worry about perfection; Impressionism is all about capturing a fleeting moment.
- Vincent van Gogh’s Starry Night: The swirling, rhythmic strokes of Van Gogh’s masterpiece are perfect for a pumpkin. Use thick, bold lines of blue, yellow, and white to recreate the famous swirls.
- Yayoi Kusama’s Polka Dots: One of the most famous artists alive today, Yayoi Kusama, has a deep, personal connection to pumpkins, which she sees as “generous and unpretentious.” She is famous for her use of polka dots, which she uses to create a feeling of infinity. Painting a pumpkin with simple polka dots is a direct homage to her work.
Comparison of Painting Techniques for Pumpkins
| Technique | Description | Best For | Skill Level |
| Sponge Painting | Dabbing paint onto the pumpkin with a sponge for a textured or blended look. | Creating soft, cloud-like effects or quick color fills. | Beginner |
| Paint Pens | Using acrylic-based pens for precise lines and small details. | Drawing faces, lettering, or intricate patterns. | All Levels |
| Dot Painting | Applying dots of various sizes with a tool (like a skewer or paintbrush end). | Symmetrical, mandala-like designs or simple polka dots. | Beginner |
| Brushstroke | Using a variety of brushes to apply paint in smooth, controlled strokes. | Detailed scenes, portraits, or abstract designs. | Intermediate |
| Masking/Taping | Using painter’s tape to create clean, sharp edges and geometric shapes. | Stripes, color-blocking, and modern designs. | Beginner |
When you’re ready to share your art with the world, remember that every artist has to start somewhere.
The Final Step: Preserving Your Pumpkin
Once your beautiful painted pumpkin is completely dry, it’s time to seal the deal. A coat of clear acrylic spray will protect your art from the elements, ensuring your pumpkin looks fresh for as long as possible. If you live in a warm, humid climate, it’s best to display your pumpkin indoors or on a covered porch to keep it from rotting. When the season is over, you can wipe it clean and save it for next year, a painted pumpkin is forever!
This holiday season, embrace the fun of no-carve pumpkin decorating and create a beautiful work of art that will make your home stand out.
FAQs: Easy Pumpkin Painting Ideas

Q: What is the best paint to use on a pumpkin?
A: The best paint for pumpkins is acrylic craft paint. It’s durable, water-resistant once dry, and sticks well to the pumpkin’s surface. For fine details, acrylic paint pens are also an excellent choice.
Q: Do you need to seal a painted pumpkin?
A: Yes, it is highly recommended to seal a painted pumpkin. A clear acrylic spray or varnish will protect your design from moisture and scuffs, helping it last longer, especially if it’s displayed outdoors.
Q: How do I prepare a pumpkin for painting?
A: First, wash the pumpkin with a little soap and water to remove any dirt or debris. Then, dry it completely. You may also want to use a primer or a base coat of white paint, especially if you plan on using lighter colors, as this will help the colors pop.
Q: How do you paint on a pumpkin so it doesn’t rub off?
A: To prevent the paint from rubbing off, make sure the pumpkin is clean and completely dry before you start. Use acrylic paint, which adheres well. After the paint has dried, apply a clear sealer or varnish to protect the surface and lock in your design.
Q: How long do painted pumpkins last?
A: A painted pumpkin, unlike a carved one, can last for many weeks, sometimes even months, if kept in a cool, dry place. The paint acts as a protective barrier, preventing it from rotting as quickly. For a longer-lasting option, you can use a faux or craft pumpkin.
Citations:
- ArtSprouts — “https://artsproutsart.com/pumpkin-in-art-history/“
- The Pioneer Woman — “https://www.thepioneerwoman.com/home-lifestyle/crafts-diy/g36902235/pumpkin-painting-ideas/”
- Masterworks — “https://insights.masterworks.com/art/artists/significance-of-yayoi-kusamas-pumpkin-motif/“
- A Hundred Affections — “https://ahundredaffections.com/non-halloween-painted-pumpkin-ideas-non-scary/“
- Parlee Farms — “https://parleefarms.com/evolution-decorative-pumpkins/“


